iOS App Testing Checklist 2025
iOS Specific Testing Requirements
The iOS App Testing Checklist matters a lot because of Apple’s tightly controlled ecosystem. You’re working within limits—fewer device models compared to Android, yes, but somehow, that simplicity can actually complicate things. Because each model, while limited, brings unique quirks. Updates roll out at Apple's discretion; you don’t control when users update their OS, or even if they do it at all. This makes comprehensive testing pretty crucial.
Apple’s review process itself—stringent, sometimes even picky—demands extra caution. You have to align carefully with their guidelines. The smallest thing could cause rejection, like a missed privacy disclosure or slightly inconsistent UI behavior.
Testing tools provided by Apple, like TestFlight or Xcode, become your lifeline. You can’t just wing it with generic software testing approaches. It means you’re constantly balancing platform standards with user expectations. Plus, device diversity isn’t huge, but it’s deceptive: each iPhone or iPad brings subtle differences—screen resolutions, processing power—that need careful checking.
Ignoring any part of the checklist can cost you weeks, delays, maybe even multiple review cycles. So yeah, the checklist isn't just paperwork; it's your roadmap through a tight, tricky landscape.
1. Development Environment Requirements
A robust development environment is crucial for effective iOS application testing, ensuring apps are optimized for Apple’s vast ecosystem. The reason why applications on iOS seem smoother on every Apple device is due to the optimization and testing efforts put into them. If your testing environment doesn’t align with the criteria set by Apple, it may fail during App Store submission, putting all those efforts to waste.
- Xcode Testing Tools: Xcode is the homegrown integrated development environment (IDE) for developing and testing iOS apps. Offering a comprehensive suite of tools to validate functionality, performance, and compliance, Xcode is an indispensable aspect of the iOS mobile app QA checklist. The following are the various tools offered with Xcode, making testing stress-free.
- XCTest Framework: When it comes to testing unit, UI, and performance testing, XCTest Framework should be your first choice. By allowing you to write unit tests in Swift or Objective-C, you can test individual components of your code in isolation. Built on top of XC Test, the XCUIAutomation, the UI testing framework, allows you to write and execute UI tests for a smoother user interface.
Note: XCUIAutomation, a component of XCTest, is used to execute automated UI tests - Instruments: Based on the DTrace tracing framework, Instruments, a performance analysis tool integrated with Xcode, allows you to monitor various aspects of your application's behavior in real time. With this tool, you can track various application metrics, including CPU usage, memory allocation, disk activity, user events, and network activity.
Must Read: Mobile app testing checklist
- XCTest Framework: When it comes to testing unit, UI, and performance testing, XCTest Framework should be your first choice. By allowing you to write unit tests in Swift or Objective-C, you can test individual components of your code in isolation. Built on top of XC Test, the XCUIAutomation, the UI testing framework, allows you to write and execute UI tests for a smoother user interface.
- iOS Simulator: Simulating is among the most effective testing techniques, which involves virtual devices with varying device specifications for testing. The Xcode’s integrated simulator can be your preferred choice for this test. However, make sure that you use the latest version of Xcode for the best testing outcome. Apart from that, the following are the vital strategies that you can implement:
- Add Variety of Devices: The biggest perk of simulation is the ability to test on legions of devices without physically having them. With that in mind, your testing should involve every permutation and combination of devices, including varying screen sizes, OS versions, and hardware.
- Simulate at Early Stages: Rather than waiting until the end, simulate the app's UI and functional elements at early stages to compensate for the simulator's hardware testing limitations.
- Feature Simulation: Whether it’s the hero feature or a supplementary feature, every feature should be tested using simulators. For instance, in addition to the way it’s supposed to work, add scenarios such as low battery, poor network conditions, opening from push notification, opening directly from the App Store, and more.
- Remove Unused Simulators: While testing, you may create various simulators. However, these tend to slow down the overall performance of the machine, leading to inaccurate test outcomes. The best practice is to remove any unused simulators for the right results.
- Physical Device Testing Requirements: Testing on virtual devices surely gives better test coverage, but simulation cannot fully replicate device-specific features. That’s where testing on real devices comes into play. Not just behavior, but testing on real devices brings hidden hardware and software issues to light. The following are the things you need to know to test iOS apps on real devices.
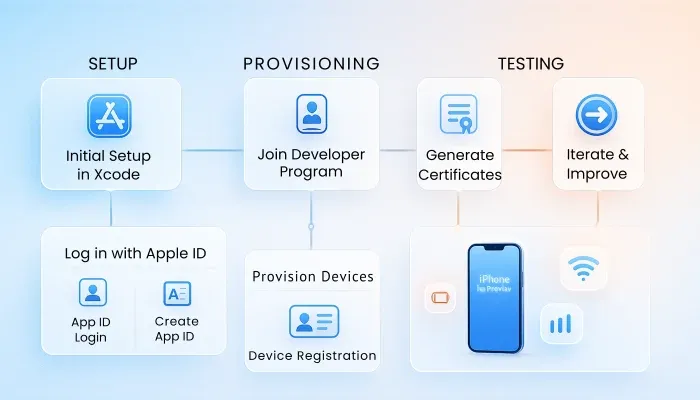
- Apple Developer Program: When it comes to testing on real devices, Apple allows you to test on your devices (logged in with the same Apple ID as Xcode) for free and for up to seven days. You need to rebuild and reinstall the app from Xcode within seven days. However, if you want to expand the testing, you need to enroll in the Apple Developer Program for $99 a year.
- Test on a Variety of Devices: Akin to simulating, the best outcome will be achieved when you test your app on various devices. From the older iPhone X to the latest iPhone 16 Pro Max and iPads, you need to test on every variant for high test coverage.
- Device Provisioning: Apple uses a robust code signing and provisioning process to ensure that only approved applications run on devices. Development certificates, app IDs, unique device identifiers (UIDs), and provisioning profiles are necessary to run your app on your Apple devices.
- Real-World Scenarios: The test cases you utilize should not only contain controlled elements but also day-to-day scenarios, including low battery, fluctuating network, hardware interactions, external accessories, and accessibility.
- TestFlight Beta Testing: Testing your app on both internal and external users helps you identify issues that may be missed in testing. Beta testing is one crucial factor where a small group of users install and use the app on their devices, giving you feedback on any issues they face.
Beta testing gives you real-world user feedback, identifies bugs before release, and improves the overall user experience.
To perform beta testing on iOS applications, you need to have TestFlight, as it is required to distribute your application to other iOS users.- To begin beta testing, you need to upload your created app to App Store Connect and define whether you want to release the app for the App Store or for Internal Use Only.
- Make sure to provide information such as features to test, new features, any specific instructions for the testers, and contact information for feedback.
- Once uploaded, you can either send invites to the testers for closed beta or create a public link to invite external testers.
- With TestFlight, you can add a maximum of 100 members as internal testers, whereas the limit for external testers is set to 10,000 testers.
- The Groups feature comes built into TestFlight, where you can create groups of testers who will work on testing specific features or areas of your app. You can also release different versions for different groups, giving you a comparison of different builds.
- For feedback, your beta testers can share screenshots within the application, crash reports, and any additional information they want.
2. iOS Platform Validation
Testing your iOS app not just involves ensuring its functionalities are perfect or its transferring data securely, but also about how it looks and feels. It’s often said that what makes Apple devices different from others is the ‘feeling of using an Apple device’.
But what is this feeling? The app should work the Apple way.
In simpler terms, it should conform to Apple’s design, behavior, and policy standards. Apple enforces strict guidelines related to design consistency, permission handling, and platform behavior. Any app that fails to meet these standards may be rejected during App Store review.
To ensure that your app releases on the App Store, you need to follow the following iOS platform validation guidelines and techniques:
- Apple Human Interface Guidelines: Apple has always been transparent about how apps running on its OS should look and feel, and it has design documentation for iOS applications called Human Interface Guidelines (HIG), which provides recommendations on app development. HIG is a highly detailed documentation divided into five categories: Foundations, Patterns, Components, Inputs, and Technologies.
- Foundations: With a focus on offering excellent user experiences, the Foundation category offers guidelines for text, colors, layout, images, accessibility, icons, motion, privacy, and more. The goal is to maintain visual contrast without adding any confusing elements to the app.
- Patterns: Patterns focus on providing clear information to the user, allowing them to understand what is happening while they’re performing common user actions. These patterns can be charts, entering data, managing files, or launching an app, among others. Your developed iOS app should keep the user updated, whether it's almost full iCloud storage or showing loading screens.
- Components: Apple ensures that system components are always accessible to offer a consistent user experience. The Components section offers guidelines on layout, navigation, menus, selection input, status, and system experiences of your application. For instance, the app can hide the navigation bar temporarily to minimize distraction from the app content.
- Inputs: Whether it is a touchscreen, Apple Pencil, external mouse, keyboard, a game controller, or a remote control, your app should offer various ways of interaction. The Input guidelines help you comply so that the app can offer the experience they’re hoping for while using the app. For instance, if the Apple Pencil is used for input, the app should give the option to switch between pencil and finger, or let the users know what the specific button will do if they hover over it using the pencil.
- Technologies: Your application may interact with several different technologies for a better user experience and feature offering. These technologies can be Always On Display, Apple Pay, Game Center, iCloud, Maps, CarPlay, iMessage, and more. Your application should follow the guidelines while interacting with these apps, along with how the user will interact in the frontend while using your app. Adherence to these guidelines is crucial, making iOS human interface guidelines testing an essential part of the quality assurance process to ensure the app aligns with Apple's user experience expectations. You can find detailed information on HIG guidelines here.
- iOS Version Compatibility Testing: Apple offers a major OS update every year, and the latest one is iOS 18, released in September 2024. Since then, 88% of users have updated to this OS, while the rest still function on iOS 17 or earlier.
If your app only supports the latest version, you may miss out on the remaining 12% of users, limiting your reach. A general rule of thumb is to build the app that supports at least two previous iOS versions for maximum reach.
Along with versions, Apple also introduces new APIs while deprecating or removing older ones. Your app needs to adapt to these changes without crashing on older OS versions.
- Identify your Target Version: The first thing you need to identify is the target iOS version for your app. As mentioned and recommended by Apple, it is best to keep your app compatible with at least two to three iOS versions (excluding the current version). You can head to Apple’s Developer page to learn about the latest adaptation. For existing apps, you can evaluate your current user base’s iOS version distribution on App Store Connect.
- Forward Compatibility Testing: Out of the box, your app should be compatible with the latest iOS versions and upcoming beta tests. Performing forward compatibility testing ensures this compatibility. Start testing your app on iOS betas as soon as they are available without waiting for their official public release. A bug-free iOS version compatibility can be achieved by running your full suite of functional, UI, and performance tests on the new iOS version and focusing on system changes, such as notification, widget behavior, new APIs, and UI paradigms. Use Xcode betas and developer preview simulators.
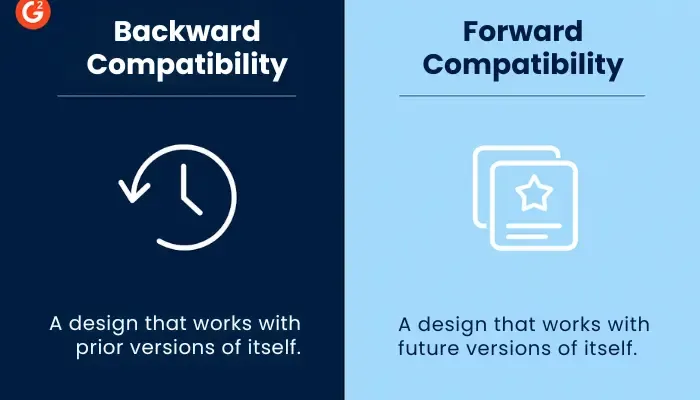
- Backward Compatibility Testing: For compatibility with previous iOS versions and retaining users who haven’t updated their devices to the latest versions, testing app performance on older devices is essential. Your primary focus should be on the most common older iOS version your users are still on. Real devices combined with simulators will allow you to test your app features on various versions. In addition, your app should have graceful degradation where the features limited to newer versions (Apple Intelligence, Dynamic Island) should not break the app when used on older versions without these features.
- iOS Specific Permission Handling: Apple has a strong emphasis on transparency and user control regarding data access, rather than having every permission to the user device, Apple mandates that permissions be requested from the user. For instance, the app must ask for user consent before accessing the camera or storage. Handling permissions is a crucial element of app development, interlinked with privacy and overall user experience.
- Runtime Permissions: iOS requires runtime permission requests where the user is prompted to grant or deny access for the first time your app attempts to use a protected resource. The key aspects include explicit dialogs where the system will display a standard alert dialog, and you cannot customize the button. To request sensitive information access, you should have a ‘Usage Description’ string in your app’s ‘Info.plist’ file to explain the reason for this permission.
If the user denies any permission request, you cannot request the same permission again. However, you can let the user know about the necessary permission and how they can grant it through ‘Settings’. - Request Contextually: Requesting all permission app launch is never essential for its functionality and may even lead to App Store rejection. The best practice is to request permission before the feature that requires it is used.
- Pre-Permission Explanation: Before requesting permission, display an iOs dialog box that clearly explains why your app requires these permissions and how it will benefit the user.
- Privacy Manifest File: Every app submitted to the App Store must include a PrivacyInfo.xcprivacy file, which declares the data types your app collects, the reasons for accessing APIs, and any tracking domains your app is connected to. Without this privacy manifest file, your App will face rejection from the App Store.
- Rejection Message: Whenever a user denies permission, your app should still remain functional rather than crashing. For instance, if the user denies storage permission, they should get a message explaining that the feature is unavailable without the relevant permissions.
- Runtime Permissions: iOS requires runtime permission requests where the user is prompted to grant or deny access for the first time your app attempts to use a protected resource. The key aspects include explicit dialogs where the system will display a standard alert dialog, and you cannot customize the button. To request sensitive information access, you should have a ‘Usage Description’ string in your app’s ‘Info.plist’ file to explain the reason for this permission.
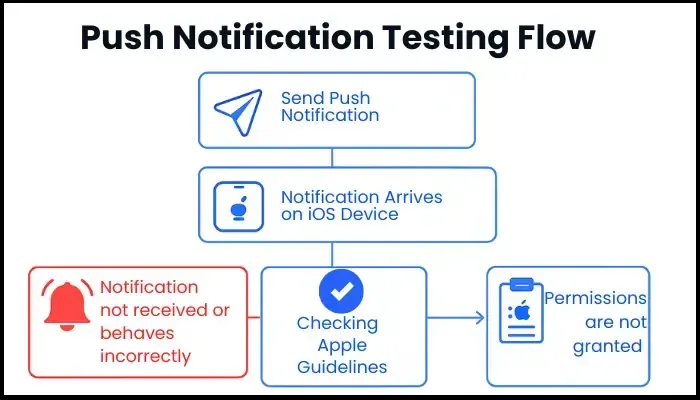
- Push Notification Testing: One of the best ways to interact with users is through push notifications. From marketing to providing information, sending push notifications is an excellent method to generate engagement with your application. Failing to handle push notifications correctly can lead to missed messages or unresponsive apps. Push notifications validation on iOS is about ensuring they arrive and verifying they behave as Apple expects in all usage scenarios.
- Authentication Key: Apple has a central service for handling the routing and delivery of notifications from the server to iOS devices called Apple Push Notification Service (APNs). You need to generate an APNs Authentication Key to test push notifications through the Apple Developer Portal, which will work for all your apps.
- Configuration: Before testing, you need to configure the Xcode Project for push notifications and implement push notification registration in your iOS application code. In addition, make sure that your backend server stores the device tokens received from the apps, uses the APNs authentication key, constructs an APNs JSON payload, and sends it to the correct APNs endpoint.
- Environment: APNs operate in two distinct environments: Sandbox and Production for testing on developing and live apps, respectively. A common mistake is trying to send a notification from a production server to a device token generated by a development build, or vice versa. Doing so leads to failure, which is why it is essential to ensure that the server environment matches the app’s build environment.
- Test on Physical Devices: Unlike many tests that can be simulated, testing push notifications on mobile apps is best done on real devices. Your app should request permission before sending notifications and only after clearly explaining the benefits to the user. Upon receiving the notification, tap on it to ensure it routes the user to the correct screen inside the app, that action buttons are working correctly, if any, silent notifications do not alert the user, and the function works correctly on different iOS versions. The app should not receive notifications if permissions are not granted and should remain stable without crashing.
- App Store Guidelines: Releasing your application on the App Store is not as easy as it may sound. With strict policies and reviews, only apps complying with Apple’s guidelines are given the green light. These guidelines are a comprehensive set of rules and serve as a living document, meaning they are updated periodically. Therefore, it is essential to stay informed about the latest updates before you begin app store submission testing.
According to Apple, the purpose of these guidelines is to keep the Apple ecosystem safe for its users. For better understanding, these guidelines are segregated into five categories: Safety, Performance, Business, Design, and Legal.- Safety: Apple has always put special focus on keeping its devices as secure as possible. The application shouldn't cause harm to the user (physically or mentally) and shouldn’t contain any offensive content.
- Objectionable Content: The App should refrain from having content that is defamatory, discriminatory, shows illegal behavior, encourages violence, or promotes illegal substances. Apps that have user-generated content should have an option to filter and report objectionable content.
- Sensitive information: If your app deals with sensitive data, it must be handled with extreme care, adhere to relevant privacy laws, and have robust data encryption.
- Kids Content: Any app targeted towards children must comply with stricter privacy rules and cannot include third-party analytics or advertising.
- Physical Harm: Applications that facilitate reckless or illegal behavior, such as promoting drunk driving, providing inaccurate medical data, promoting tobacco products, and facilitating betting, will be rejected by Apple.
- Developer Information: Any user who wants to reach out to you should be able to do so easily. With that in mind, your apps should have an easy way to contact you for any feedback or support.
- Data Security: Collected user data should be handled responsibly and according to the Apple Developer Program License Agreement guidelines.
- Performance: You have to ensure that your app is functional, reliable, bug-free, and offers a good user experience to release it for iOS users.
- App Completeness: The first part to ensure a high-performing application is to avoid releasing an unfinished product. The app you submit for review should be stable, free from issues, well-tested, and have complete information.
- Beta Testing: Applications intended for beta testing should never be submitted for App Store submission. Rather, they should follow the TestFlight route.
- Accurate Metadata: Maintaining transparency is highly valued by Apple. Therefore, you should add accurate metadata, including a description, category, images, privacy information, and previews. Any discrepancy in metadata can result in rejection.
- Hardware Compatibility: Apple believes that iOS apps should be compatible with all Apple devices. Not just iPhones, but apps, iPads, and Apple TVs as well, wherever possible. Moreover, the app should use power efficiently without draining the battery drastically and should not generate excessive heat while in use.
- Software Requirements: In addition to supporting the latest iOS version, the application should utilize only public APIs that are necessary for its functionality. Any obsolete features, frameworks, or technologies should be phased out of the app. In addition, apps should function inside their container and should not read or write data outside the container.
- Business: You’re going to monetize your app in some way or another. Your business model should be clearly explained in the metadata or App Review notes to maintain transparency. Failure to do so may result in delayed approval or rejection. Additionally, engaging in forged reviews, paid chart rankings, or any other fraudulent practices will result in banishment from the Apple Developer Program. For payments, you may use the following:
- In-App Purchases: The commonest way of collecting payment is through in-app purchases. It’s mandatory to use Apple’s In-App Purchase system for such transactions. Also, you need to have a restore purchase mechanism.
- Other Purchase Methods: Developers may also provide the option for users to make a purchase through external links. However, it will be the developer’s responsibility to maintain the authenticity of the external URL.
- Subscriptions: Services such as music or entertainment may offer auto-renewal subscription models. Auto-renewal subscriptions must be valid for at least a week, should offer some value for the user, work on all devices where the app is available, and should not force users to rate the app.
- Design: Functionality and aesthetics are two major elements of an application. While being functional, your app should have an excellent design. The following are the minimum design requirements for an iOS app.
- Originality: Rather than copying someone else’s design or app, it should have original features and design.
- Functionality: Every app on the App Store should offer valuable features or utility to the user, else it will be rejected during review.
- Avoid Spam: The App Store has various categories, and targeting saturated categories increases the likelihood of rejection. For instance, every toss-a-coin or roll-a-dice app offers the same functionality, and submitting these for review guarantees rejection. Apart from that, creating multiple Bundle IDs of the same is not recommended.
- Login Methods: If you’re using third-party login methods or social logins, your app should have a ‘Sign in with Apple’ option along with an alternative login option using a third-party as their primary account.
- Legal: Many App Store apps are not region-specific and have a global reach. Such apps not only have to follow Apple’s guidelines but also comply with local laws. Any app that does not follow the laws or promotes objectionable content will be flagged and rejected for submission to the App Store.
- Data Collection and Storage: Every app should have an easily accessible privacy policy that explains how user data is collected and why. In addition, the app should seek user permission before accessing and storing their data. Also, any kids' app should comply with the Children’s Online Privacy Protection Act (COPPA).
- Intellectual Property: Apple respects intellectual property and takes measures to protect it. The application should use only original content or obtain a license to use someone else’s IP. Any app infringing on IPs will be rejected and removed from the App Store.
- Gaming, Gambling, and Lottery Apps: All these apps are highly regulated by Apple and can only be reviewed once all legal obligations of the location where the app will be functioning are met.
- VPNs: Only organizations can submit VPN apps that utilize the NEVPNManager API. In addition to the data collection rules, the app should submit its VPN license for the location where it will be functional in the App Review Notes.
- Developer Code of Conduct: App Store is a safe and respectable place for users as well as developers. Considering that fact, Apple expects developers to follow a code of conduct where respectful communication, whether it's in reviews, support, or interactions with Apple officials, is the norm. Any rude behavior, discriminatory comments, bullying, or intimidation is not tolerated and will lead to a ban from the Apple Developer Program.
- Safety: Apple has always put special focus on keeping its devices as secure as possible. The application shouldn't cause harm to the user (physically or mentally) and shouldn’t contain any offensive content.
3. iOS Device-Specific Testing
Undeniably, iOS's hardware variety is less fragmented than Android's; it’s far from monolithic. iOS device-specific testing is a crucial phase that ensures your app performs with stability and consistency across a diverse range of iPhones and iPads.
- iPhone Model Compatibility: iPhone 16 is the current generation of smartphones by Apple, offering a top-of-the-line experience in terms of software and hardware. Although OTA updates can update software, the hardware itself cannot be upgraded. Adequate device testing ensures that your application is compatible with every device currently supported by Apple. Before you begin testing, consider these key factors for testing and fundamental differences between iPhone models that will directly impact your app.
- Screen Sizes and Aspect Ratios: Whether a user wants a large 6” plus phone or a compact screen, Apple has provided it all. Although it may be beneficial for the user, it becomes complex during testing. A UI designed for a small iPhone will look different and may break on a large iPhone 16 Pro Max. Considering the various screen sizes and aspect ratios should be one of your priorities, so that your layout can adapt dynamically as per the device.
- Performance: With each new iPhone, Apple introduces significantly powerful processors and more RAM. With powerful processing, iPhones become capable of running animations and complex calculations without any hiccup. However, the same cannot be said for older gen devices (iPhone X or 11). These devices might feel sluggish, drop frames, or crash due to memory constraints. In that case, performance optimization requires additional efforts.
- Device Strategy: Your testing devices should not be limited to the latest or currently supported devices. For effective coverage, aim for at least 5 different iPhone models that represent your target audience. Here, you can include the latest flagship, a mid-range recent model, an older but supported model, an older but not supported model for new updates, and the smallest screen size you support.
- Tests: Your testing strategy for iPhones should include various test types, including UI, performance, functional, stability, and memory management testing.
- iPad Optimization Testing: iPads hold nearly 50% of the tablet market share, demonstrating the immense market share captured by this device. Apple’s guidelines include that the application should support as many devices as possible. If your iOS app is not optimized for iPads, you’re missing out on a significant market. The following areas should be your primary focus to optimize your app for iPads and provide the best experience for iPad users.
- User Interface and Layout: Your app’s UI must intelligently adapt to various iPad screen sizes and orientations, utilizing the screen effectively. Whether it's a portrait or a landscape, the app must adapt to the layout without a stretched or pixelated image or clipped text. Moreover, the content should be positioned correctly within the safe areas, avoiding bezels or status bars.
- Multitasking: One of the key features of the iPad is its ability to run two different apps simultaneously on a single screen. Test your app’s capability to run with another app in Split View. It should resize and re-layout its UI as the split divider is dragged.
- External Devices: Don’t forget to test your app’s compatibility with external devices, including Apple Pencil, mouse, and keyboard. In addition to a touchscreen, your app should respond to physical input from external devices for a more seamless user experience.
- Hardware-Specific Performance: Like iPhones, iPads also come in various variants, each with distinct hardware. Apps should maintain acceptable performance across all currently supported iPad generations, which vary in processing power and RAM. From multitasking to drag-and-drop, all features should work seamlessly across devices.
- iOS Device Fragmentation Strategy: Currently, 29 iPhones and 25 iPads are compatible with iOS 18. Many people still use devices for which Apple has stopped providing major OS updates. With nearly 50 different devices, testing on every device type is a complex process. This is the part where the device fragmentation strategy comes into play. With the right strategy, you can cover the maximum number of devices, ensuring your app becomes compatible with every major iOS device on the market.
- Identify Your Target Devices: Instead of testing on every device, the best approach is to identify the target devices first and prioritize testing on them. If your app is already on the App Store, you can use App Store Connect Analytics or third-party analytics tools, such as Firebase and TelemetryDeck, to identify the distribution of iOS versions among your active users. Otherwise, you can target the last three generations of iPhones, iPads, and iOS versions.
- Adaptive Design: Having a fixed UI may not provide the responsiveness you want your app to have. You can implement auto layout and size classes, allowing your app to adjust its elements correctly as per different screen sizes. You can also utilize the SwiftUI framework to create a UI that automatically handles many scaling and layout challenges.
- Blend of Simulators and Real Devices: Simulators surely save a ton of time and effort while testing, but they are insufficient for performance, battery, thermal, or actual hardware feature testing. Your iOS device fragmentation strategy should involve a blend of simulators and real devices to discover underlying issues within your app. In addition, consider utilizing cloud-based testing platforms, such as Sauce Labs or BrowserStack, to expand your testing capabilities.
- Device-Specific Features: Every few years, Apple introduces new features to its devices. From enhancing security through Touch ID and Face ID to providing better functionality through the Action button, Apple has endeavored to offer something unique and valuable to its users. If your app leverages any such features, then testing them becomes inevitable if you want to release a stable version. The following information will provide you with the information needed to test these features effectively.
- Biometrics: Apple is renowned for offering the most secure devices. This sense of security stems from the biometric mechanisms built into their devices. Touch ID and Face ID are the two primary hardware-focused security features. Introduced with iPhone 5s, Touch ID was the primary security feature in iOS but was phased out in 2017 with the introduction of Face ID with iPhone X. Testing these features involves ensuring that your app grants permission only after successful authentication, and gives the option to use a passcode initially and mandates a passcode after multiple failed attempts.
- Dynamic Island: Introduced with iPhone 14 Pro, the Dynamic Island is a unique, interactive area around the TrueDepth camera that dynamically changes shape to display alerts, notifications, and ongoing background activities. While your app is running, you have to monitor how it behaves when an incoming call appears on Dynamic Island, how system alerts are displayed, and confirm the appearance of green and orange dots indicating camera and microphone usage, respectively.
- Action Button: The Action Button replaces the traditional mute switch on the iPhone 15 Pro models, allowing users to assign various functions or custom Shortcuts. If your app provides actions that can be triggered via a Shortcut, then pressing that button should perform the specific shortcut.
- Camera Button: The latest iPhone 16 comes with a capacitive camera button that controls the entire camera module. Third-party apps can also leverage this button to allow users to control the camera using their app. If your app has camera functionality, you need to test camera permission prompts, switching between front and rear cameras, and test from the lock screen, home screen, and with another app. Also, ensure that all the camera features within your app are working correctly using the camera button.
Conclusion
Adhering to this comprehensive iOS App Testing Checklist ensures exceptional performance, seamless App Store approval, and high user satisfaction.
FAQs
Share This Article:


