Cross-Browser Testing with Playwright (2026
Introduction
Testing a web application on just one browser is not enough because your users are everywhere, including Chrome, Firefox, Safari(Webkit), mobile devices, and even embedded browsers. What works fine for you might break for client’s mobile device. That’s where cross-browser testing comes in. and why tools like Playwright have become useful for modern teams.
In this guide (updated for 2026), we’ll walk through setup, debugging, mobile/device testing, and best practices used in real ThinkSys client projects.
- A working Playwright setup that runs tests in Chromium, Firefox, and WebKit.
- Your first few tests running across browsers and devices.
- An understanding of how Playwright helps eliminate flakiness with smart waiting and test isolation.
- Debugging tools like Trace Viewer, Inspector Mode, and HTML reports.
Whether you're building a simple site or a complex web app, this guide gives you the foundation to test it confidently across browsers.
This guide is perfect for: Frontend developers, QA engineers, automation testers, solo devs, and product teams.
So let’s begin.
1. Why Cross-Browser Testing Still Breaks in 2026?
Take an example to understand the problem. Suppose you built a feature and tested it in Chrome. Everything worked well, but then your teammate or users opened it in Firefox or any other browser, they noticed the layout was broken. The button that was supposed to be centered floated off to the side. The form didn’t behave the same. Even worse, a client tried it in Safari on their iPhone, and it wouldn’t even submit.
This is the cross-browser problem.
These issues are caused by:
- Inconsistent CSS or Flexbox behaviour.
- Rendering Engine Differences.
- JavaScript timing quirks.
- Different security models (especially on iOS Safari).
- Unpredictable mobile layouts or touch behaviors.
And it gets worse when you factor in devices, what works on a large desktop screen might break on mobile Safari. These issues can easily affect functionality, accessibility, and ultimately the user’s trust.
Why does this matter?
When you don’t test across browsers, you're assuming that all your users:
- Use the same browser you do.
- Have the same screen size.
- Don’t use mobile.
- Never try it in Safari.
That’s rarely true.
In reality, most developers skip cross-browser testing despite knowing its importance because it feels like a tedious task. Setting up multiple browsers, managing driver versions, and writing separate test cases for each environment takes time. And time is something most devs don’t have.
Fact: According to StatCounter’s 2025 browser usage report, , Chrome is the dominant browser but Firefox, Safari, and mobile browsers still have millions of daily users. If your product breaks for just 5–10% of your users, that’s a serious problem and you're risking trust, revenue, and user retention. Cross-browser testing is about validating real-world usability for real users.
Understanding Engine Differences
Cross‑browser issues arise from fundamental differences in rendering and JavaScript engines. Browsers like Chrome (Blink & V8), Firefox (Gecko & SpiderMonkey) and Safari (WebKit & JavaScriptCore) interpret CSS, JavaScript APIs, HTML rendering, event handling and default styles differently. These differences often lead to inconsistent behaviour or degraded performance across browsers.
Safari, for example, has known quirks with flex item sizing and alignment – explicitly setting flex-basis can resolve sizing issues. By understanding these engine‑level variations, you can better anticipate and prevent cross‑browser bugs.
How do browsers actually differ?
Here are just a few examples of browser-specific flaws:
- Rendering differences: Safari might handle flexbox or grid layouts slightly differently than Chrome.
- CSS support gaps: Not all CSS properties behave the same. For example, newer layout features might work in Chrome but not in older versions of Firefox.
- JavaScript engine variations: Event handling or timing (like setTimeout) can act unpredictably across browsers.
- Security models: Some APIs or permissions behave differently on mobile browsers or within iOS Safari.
- Viewport sizes and interactions: A drag-and-drop feature might work fine on desktop Chrome but fail entirely on mobile Safari.
Why is mobile part of this conversation?
Cross-browser testing is not limited to testing on Chrome and Firefox on your laptop. In fact, you want to test for the real-world experience, and that includes mobile.
- A button that’s easy to click on desktop might be impossible to tap on mobile.
- A layout that’s readable on a 1440px screen might collapse on a 375px screen.
- An API call that works fine on desktop might fail on a slow mobile connection.
When you test only on the desktop, you miss all these issues.
What’s the fix?
You need a way to test across browsers and devices without pain. That’s where Playwright comes in. It’s designed to make cross-browser testing simple, fast, and scalable. With a single test file, you can run your tests in Chromium, Firefox, and WebKit (Safari's engine), both in desktop and mobile modes.
We'll get into that soon. But first, let's make sure your environment is ready.
2. Meet Playwright: The Future of Web Testing
What is Playwright?
Playwright is an open-source tool from Microsoft that helps you write and run automated tests for web applications. It allows you to simulate how a real user interacts with your app like clicking buttons, filling forms, navigating pages, across multiple browsers.
In simple terms, you just need to write one test, and Playwright will run it in Chrome, Firefox, and Safari.
Why Playwright Matters?
As we discussed above, if you’re building a web app, you need to ensure that it works well in different browsers, and on different devices.
But doing this manually is exhausting. You’d have to open your app in Chrome, Firefox, Safari, maybe even on a phone, and test the same flow over and over.
That’s where Playwright steps in:
- You write tests once. No need to duplicate them for each browser.(i.e One test = runs in all browsers).
- Playwright handles the rest. It runs the same test across multiple engines and gives you clear results.
- It reduces bugs that only show up in one browser including the kind of bugs that frustrate users and hurt credibility.
Unlike older tools that depend on browser extensions or flaky drivers, Playwright talks directly to the browser engines. That makes tests faster and more stable.
Playwright vs. Cypress
To help you understand where Playwright shines compared to another popular framework, here’s a quick comparison:
Feature | Playwright | Cypress |
|---|---|---|
| Browser support | Chrome, Firefox, Edge & Safari | Primarily Chrome/Edge; limited Firefox, no Safari |
| Language support | TypeScript, JavaScript, Python, .NET, Java | JavaScript only |
| Parallel execution | Built‑in concurrency & auto‑waiting | Limited parallelism |
| Debugging | Trace Viewer, UI Mode, Inspector, network mocking | Time‑travel debugging, interactive test runner |
Know the complete difference between both the tools in our comparison guide here.
What Does Playwright Support?
Playwright supports all major modern browsers:
Browser | Engine | Example |
|---|---|---|
| Chromium | Chrome, Edge | Most common |
| Firefox | Gecko | Good for Mozilla testing |
| WebKit | Safari | Crucial for Apple devices |
It runs on:
- Windows.
- macOS.
- Linux.
And supports multiple languages:
- JavaScript / TypeScript (most common).
- Python.
- Java.
- .NET (C#).
In this guide, we’ll use JavaScript/TypeScript because it’s the default and easiest to start with.
Headless vs Headed Mode
When Playwright runs tests, it can do so:
- In headless mode, where the browser runs in the background without showing a window (faster, used in CI).
- Or in headed mode, where the browser is visible, and you can watch the test run (great for debugging).
You can switch modes in your config with a single flag. More on that in the configuration section.
What Makes Playwright Stand Out
- Auto-waiting: It waits for elements to be visible before interacting. No need to add sleep timers manually.
- Browser context isolation: Each test runs in a clean browser session.
- Powerful debugging tools: Trace viewer, screenshot capture, and inspector built-in.
- Mobile emulation: Simulate devices like iPhones without needing physical hardware.
- Parallel execution and CI-ready.
Real‑world impact
Playwright’s concurrency and auto‑waiting features allow developers to run several tests at once across different browsers, reducing overall runtime. It automatically waits for network events and UI elements to be ready, leading to enhanced test accuracy and fewer flaky tests.
In the next section, we’ll set up our development environment and install Playwright.
3. Setup & Install
Before we can write or run any tests, we need to set up our development environment. In this guide, we’re using JavaScript with Node.js, which is the default setup recommended by the Playwright team.
Even if you've never worked with Node.js before, don’t worry because every step is explained clearly.
Step 1: Check if Node.js is Installed
Playwright runs on top of Node.js. So first, we need to make sure Node is installed on your system.
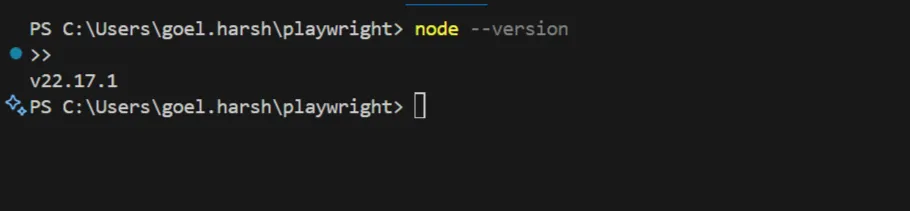
To check, open your terminal or command prompt and type:
Command: node --version
If Node is installed, you’ll see a version number like:
v18.17.1
If it says something like command not found, you’ll need to install Node first from the official site: nodejs
Make sure you download LTS (Long-Term Support) version 18 or later. LTS is more stable and better supported by most tools.
Step 2: Create a New Project Folder
Next, create a folder to keep all your Playwright test files.
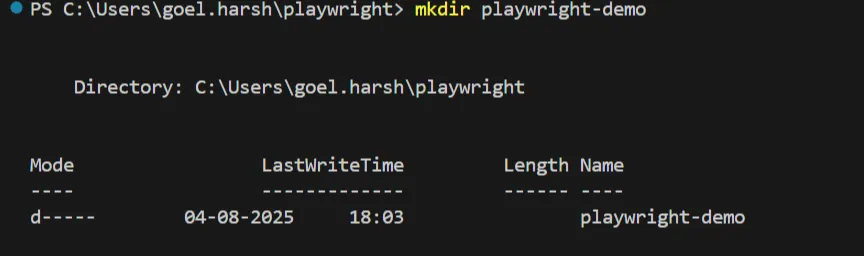
In your terminal, run:
mkdir playwright-demo
cd playwright-demo
This creates a folder called playwright-demo and switches into it so that everything you install or create stays organized inside that folder.

Step 3: Initialize a Node.js Project
Now, let’s turn this folder into a Node.js project by creating a package.json file. This file tracks your dependencies (like Playwright) and project settings.
npm init -y
This command quickly creates a default package.json without asking you setup questions (thanks to the -y flag).
You’ll see a message like:
Wrote to /path/to/playwright-demo/package.json
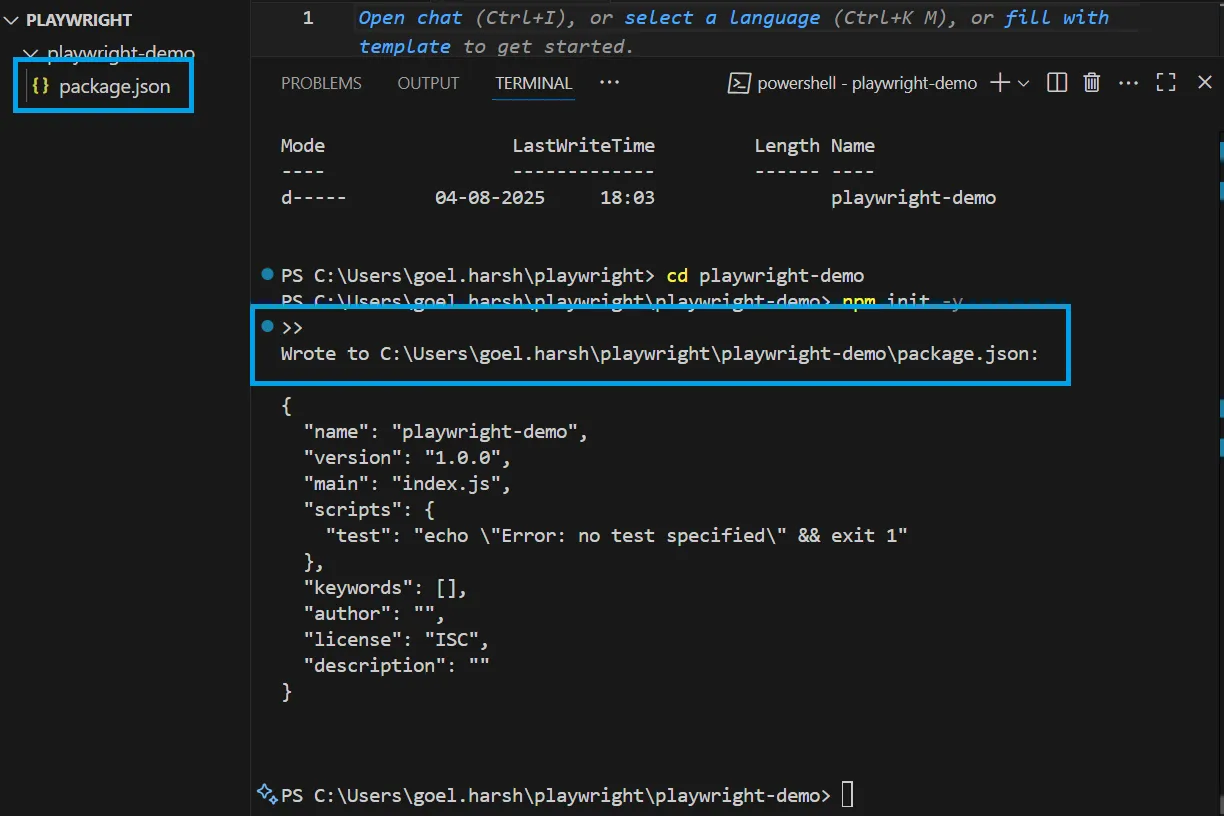
If you check your folder now, you’ll see the package.json file was created.
Step 4: Install Playwright
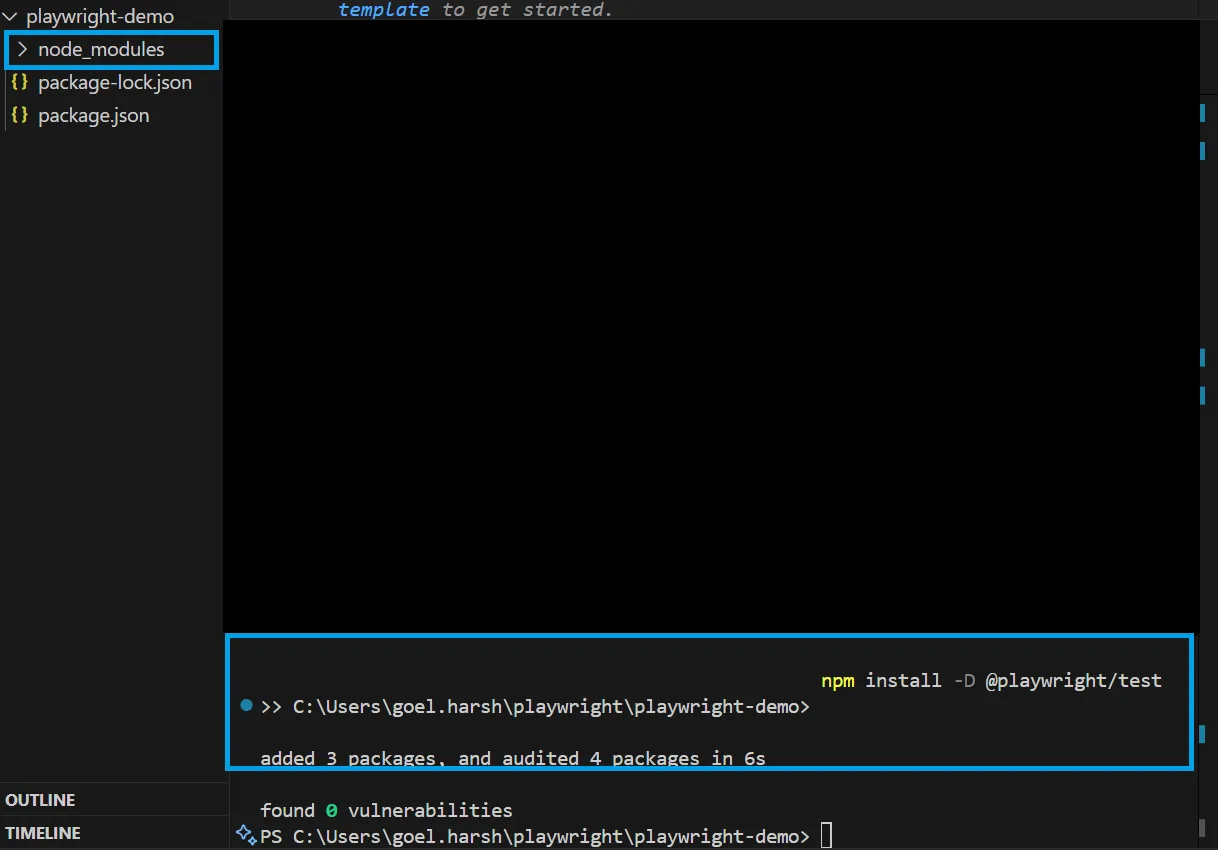
Now, we’ll install Playwright’s test runner.
In the same terminal window, run:
npm install -D @playwright/test
Here’s what this command means:
- npm install is how we install packages in Node.
- -D means this is a development dependency. It’s only needed during testing, not in production.
- @playwright/test is the official Playwright test library.
Once the command finishes, you’ll see a node_modules/ folder (where all the packages are stored) and your package.json will be updated with Playwright listed under devDependencies.
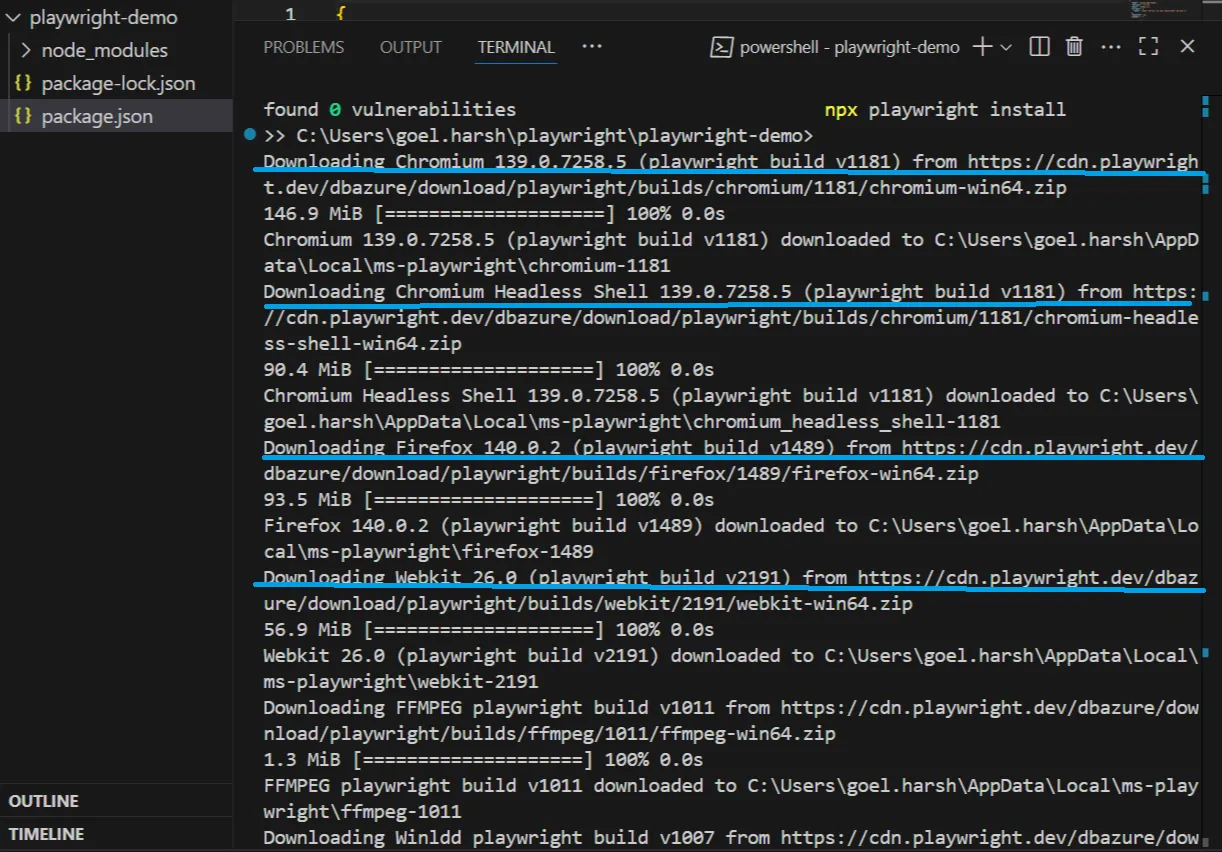
Step 5: Download Browsers
Here’s something important that surprises many beginners:
Playwright doesn’t use your system’s Chrome, Firefox, or Safari. Instead, it downloads its own versions of these browsers to ensure tests are consistent on every machine.
To download these browsers, run:
npx playwright install
You’ll see it download:
- Chromium: Used by Chrome and Edge.
- Firefox: Mozilla’s browser.
- WebKit: Used by Safari.
This ensures that even if you don’t have Firefox or Safari installed locally, Playwright can still run tests in those engines.
If you're using Python, Java, or .NET, Playwright has versions for those too.
For example, Python users can run:
pip install playwright
playwright install
But in this guide, we’ll focus only on JavaScript and Node.js.
4. Writing Cross-Browser Tests
Now that you’ve installed Playwright, it’s time to write your first test.
In this section, you’ll learn:
- How Playwright test files are structured.
- How to write reliable browser interactions.
- Where to store your tests so Playwright can find and run them.
- How to run your tests across different browsers.
If you're just starting out, don’t worry. We’ll go step by step.
What Is a Test?
A test is a script that tells Playwright what to do in the browser and what to expect.
For example:
- Open a webpage.
- Click a button.
- Check that something appeared on the screen
Each test is written in code and saved in a .spec.ts file (the .spec part tells Playwright it's a test file).
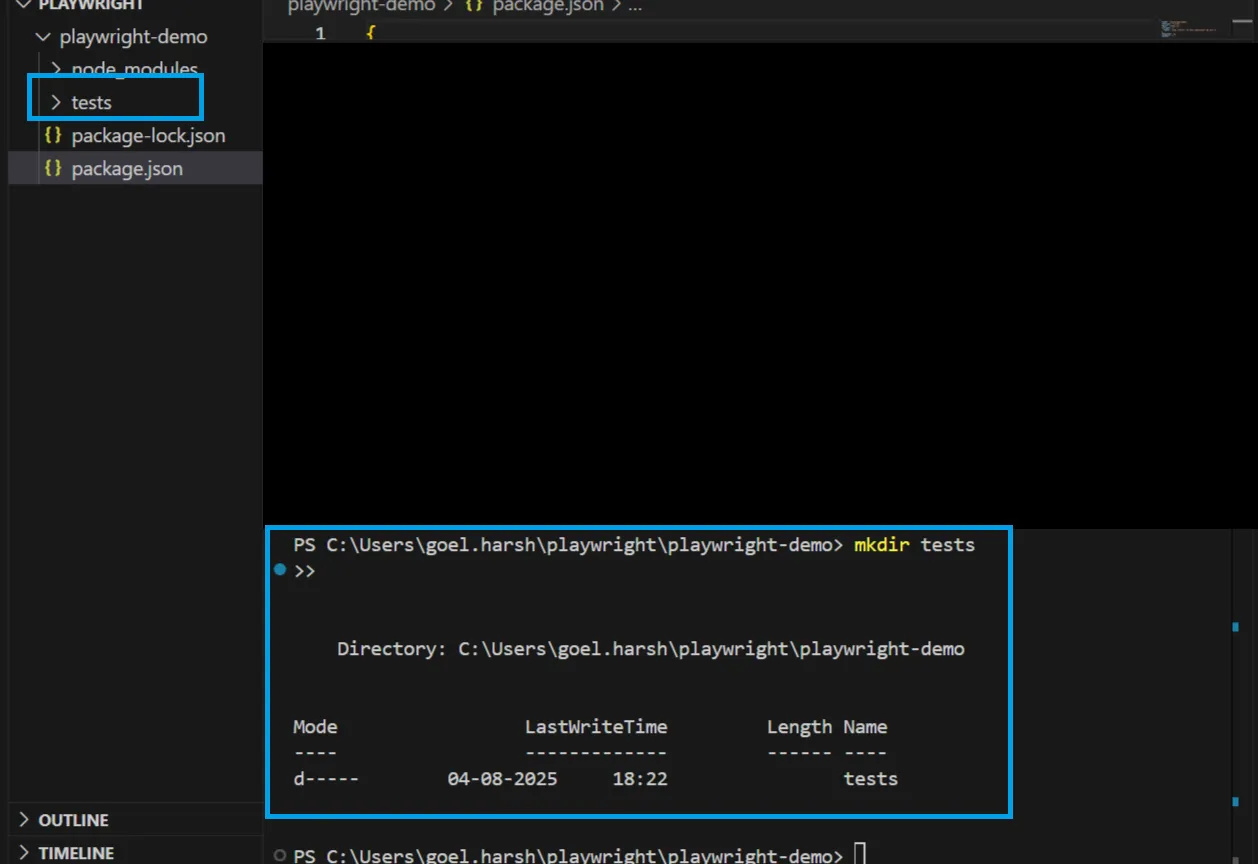
Step 1: Create a tests folder
Playwright looks for tests inside a folder called tests by default.
In your terminal, run:
mkdir tests
Then open your project folder in VS Code (or another code editor), and you should see the tests/ folder created.
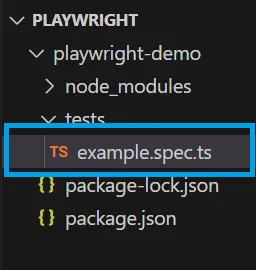
Step 2: Create your first test file
Inside the tests/ folder, create a new file named:
example.spec.ts
This file will hold your first two tests.
Note: If you're not using TypeScript, you can name the file example.spec.js, both work the same way for simple tests.
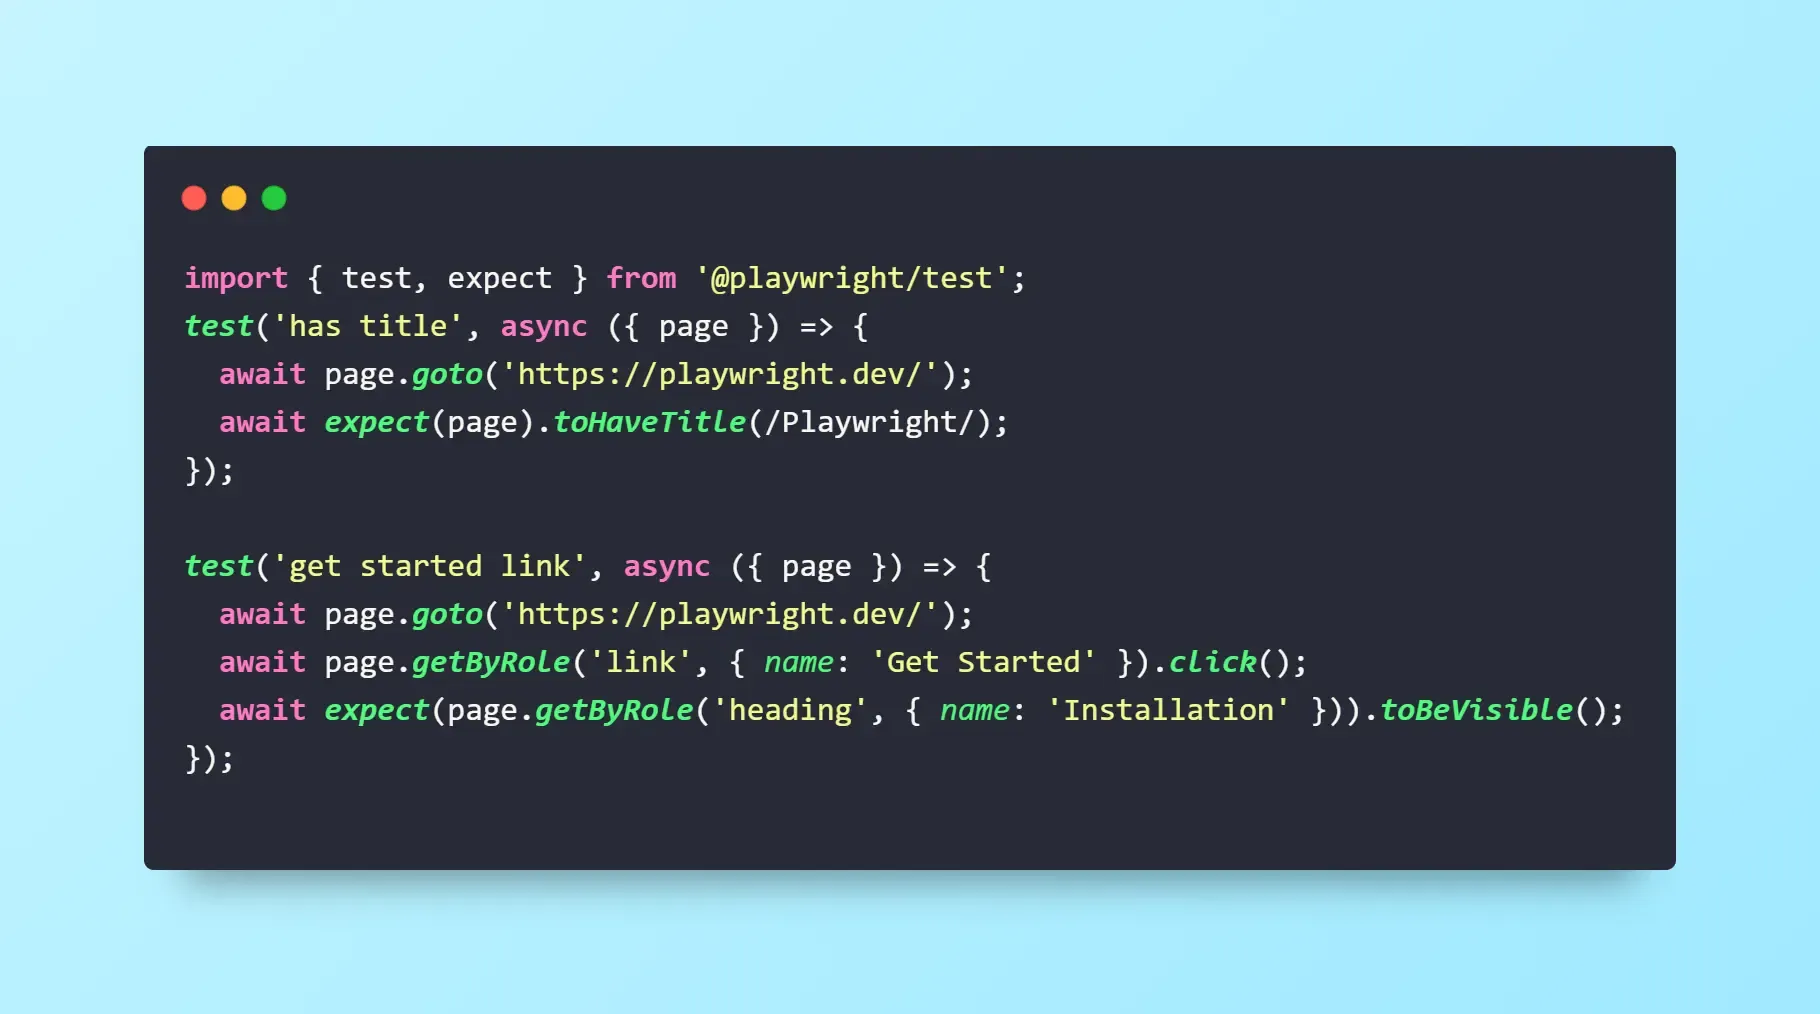
Step 3: Add your first two tests
Paste the following code into example.spec.ts:
Let’s break down what this code does:
import { test, expect } from '@playwright/test';
This line brings in Playwright's test functions.
- test defines a test case
- expect is used to check that something is true on the page (called an assertion)
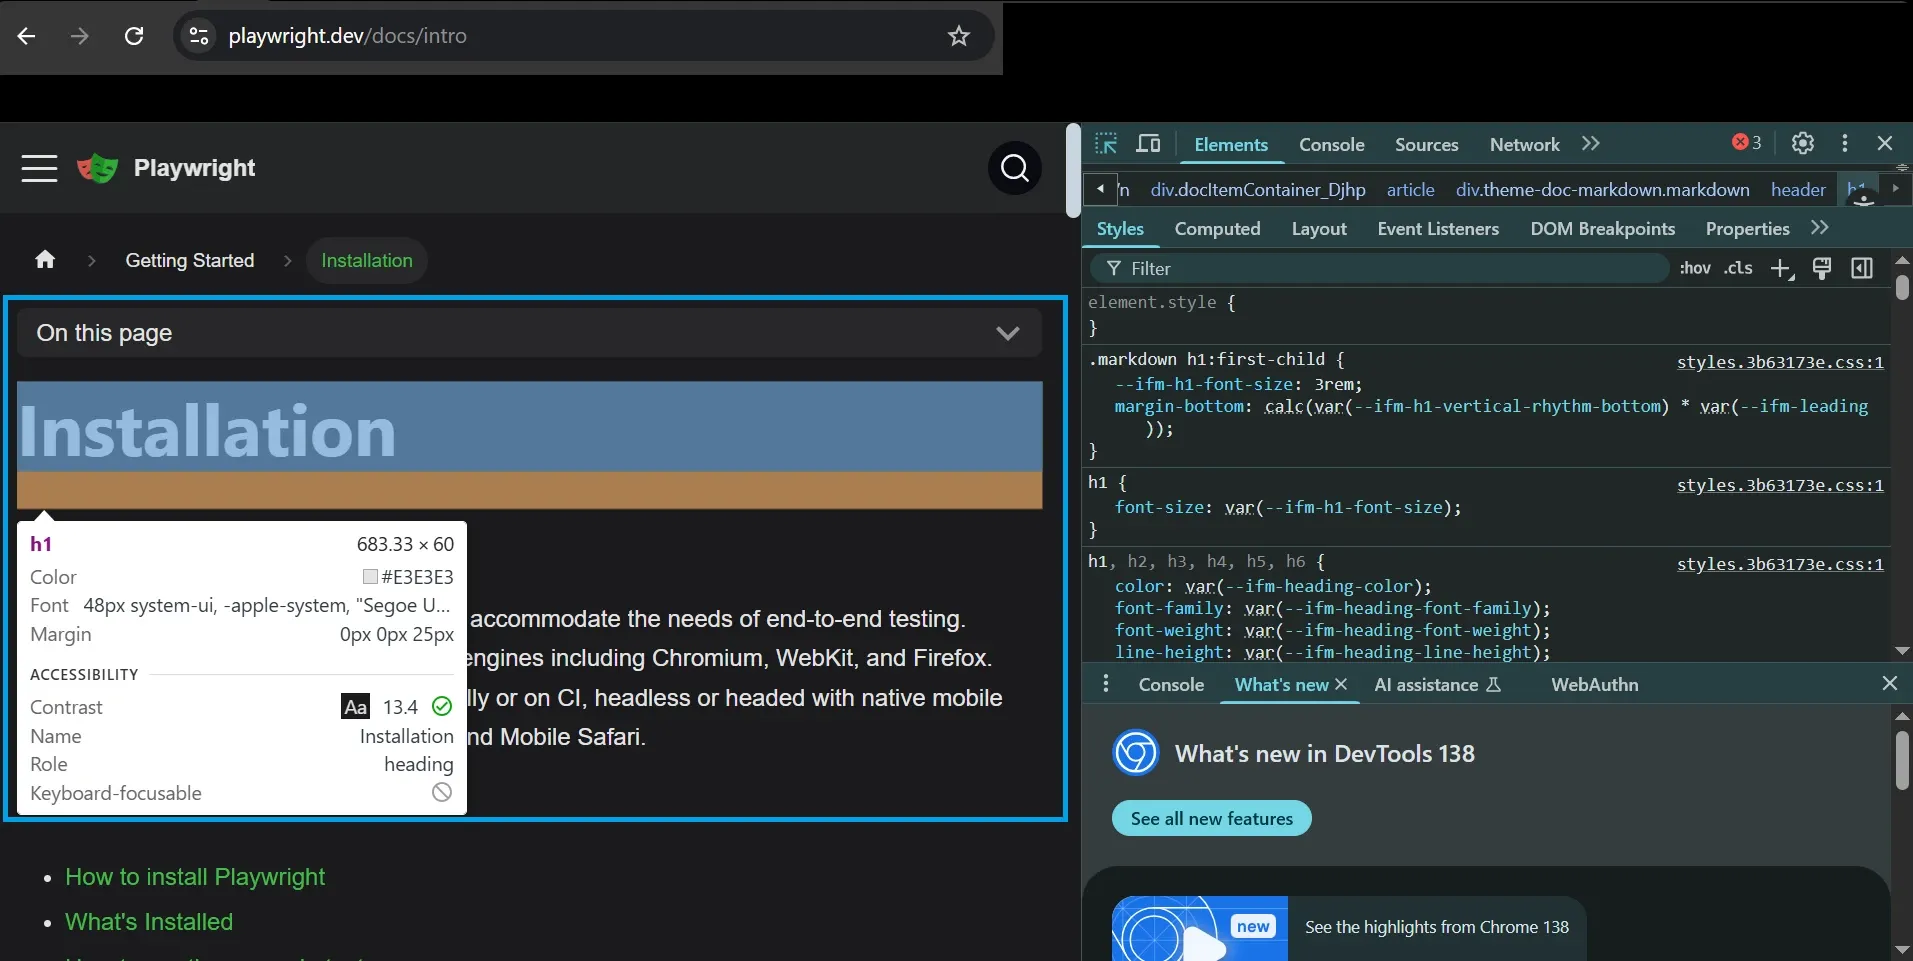
First test: "has title"
await page.goto('https://playwright.dev/');
await expect(page).toHaveTitle(/Playwright/);
This opens the Playwright homepage and checks that the browser title includes the word “Playwright”.
Second test: "get started link"
await page.getByRole('link', { name: 'Get Started' }).click();
await expect(page.getByRole('heading', { name: 'Installation' })).toBeVisible();
This:
- Finds the “Get Started” link (by its accessible role, not CSS selector).
- Clicks it.
- Then verifies that the page shows an “Installation” heading.
Here you also need to know about locators.
A locator is how Playwright finds an element on the page (like a button or link).
Playwright uses smart locators like getByRole() instead of fragile CSS selectors. These are:
- More reliable (don’t break if class names change).
- Aligned with accessibility standards.
- Easier to understand.
If you’re familiar with Selenium or Cypress, this is a much more stable approach.
Step 4: Run the tests
Go back to your terminal and make sure you’re in the project root (not inside the tests/ folder).
Then run:
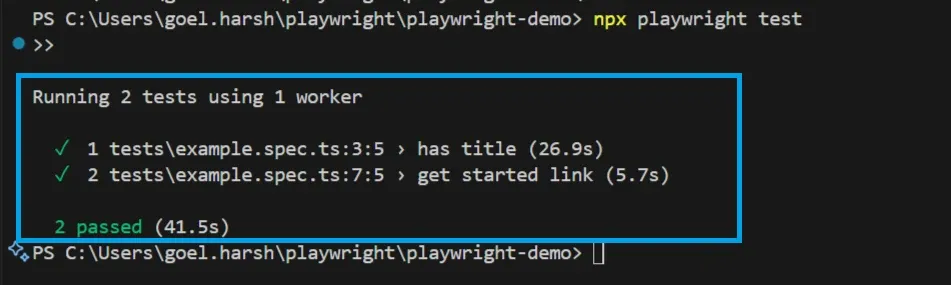
npx playwright test
This tells Playwright to:
- Find all test files in the tests/ folder.
- Run each test across all browsers you’ve configured.
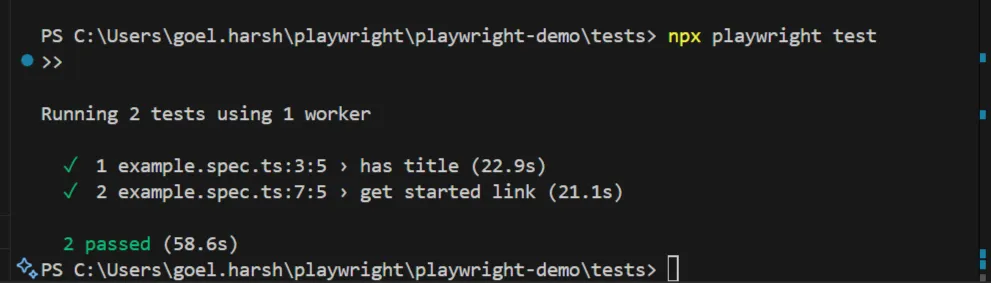
If everything is set up correctly, Playwright will:
- Launch headless versions of each browser.
- Run both tests in parallel.
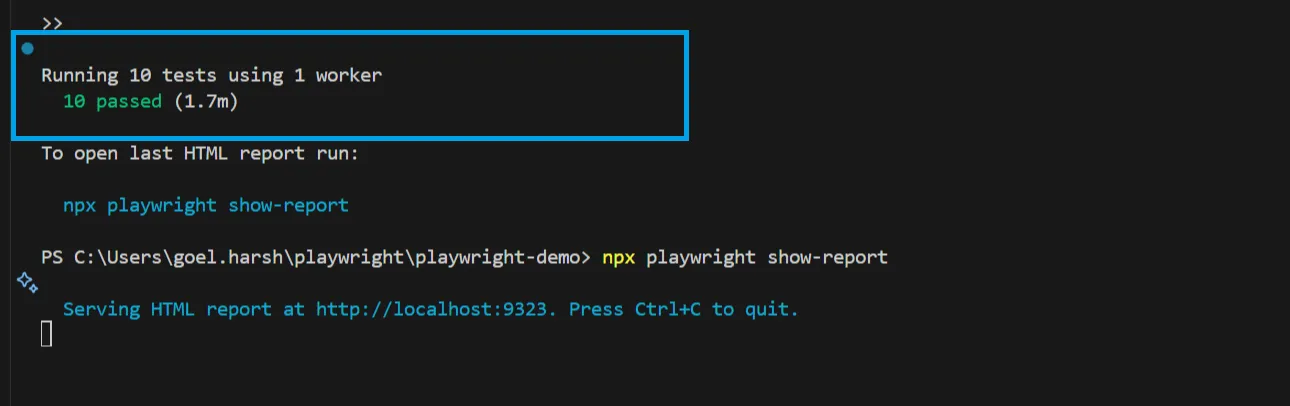
- Show a result summary in the terminal.
This means all tests passed, without any extra work from you.
5. Browser Configuration
When you first run Playwright, it automatically uses Chromium, the open-source engine behind Google Chrome and Microsoft Edge. That’s a good start but real users visit your site using Firefox, Safari, mobile devices, and different operating systems. If you only test on Chromium, you may miss bugs that show up elsewhere.
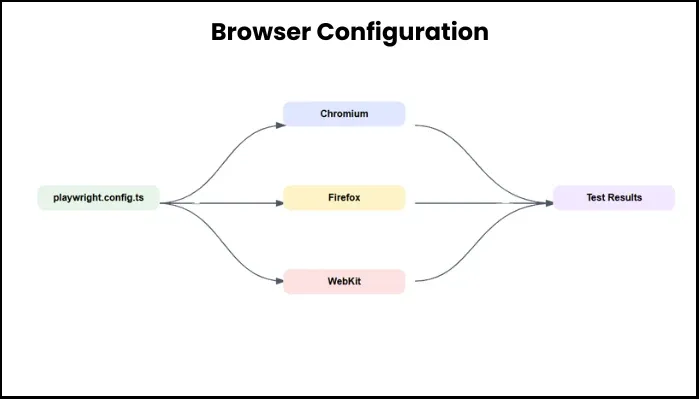
Playwright makes it easy to run your tests across multiple browsers from a single test file. You can also simulate mobile devices or open visible browser windows for debugging. All of this is controlled from a single file: playwright.config.ts.
Let’s walk through how to configure Playwright for cross-browser and device testing, step by step.
What is playwright.config.ts?
This is a configuration file that tells Playwright:
- Where your tests live.
- How long to wait before failing a test.
- Which browsers to test in.
- Whether to show HTML reports or run in headless mode.
And more
You only need to create it once, and it becomes your test setup command center.
Step 1: Create the config file
Open your project in VS Code. In the root folder (the same place as your package.json), create a new file called:
playwright.config.ts
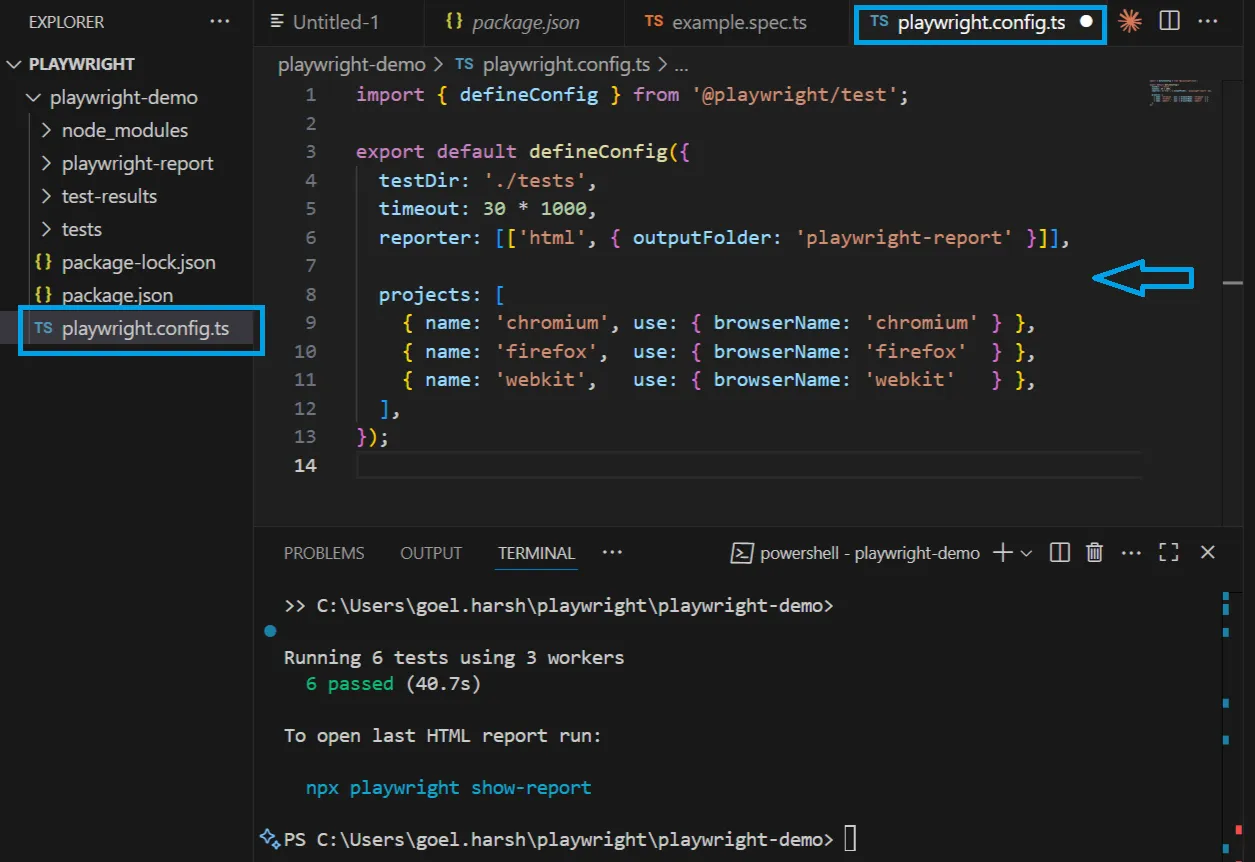
Step 2: Add basic multi-browser configuration
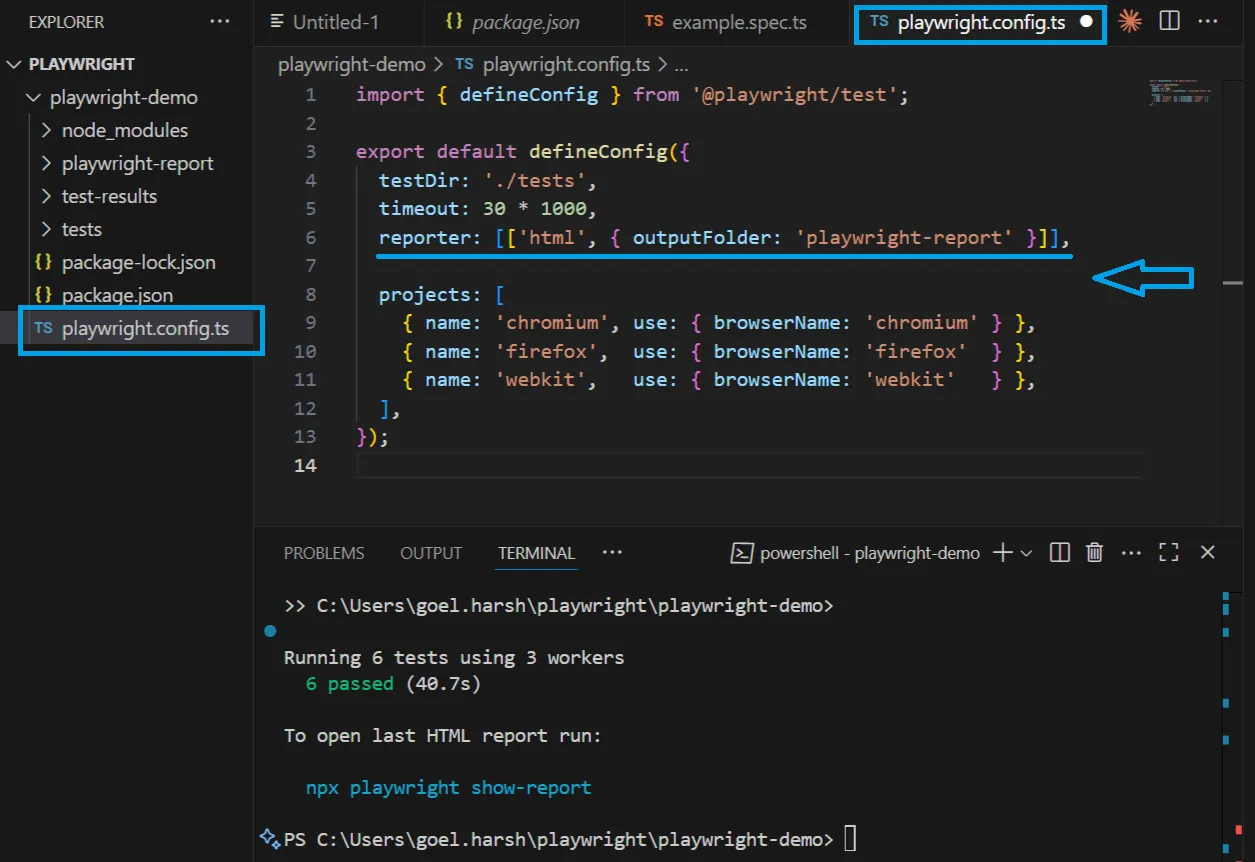
Paste the following code into playwright.config.ts:

What this does:
- testDir: Points to your test folder.
- timeout: Sets a 30-second limit for each test.
- reporter: Enables an HTML report after tests run.
- projects: Defines which browsers to run the tests in.
By default, this setup will test your app in Chromium, Firefox, and WebKit (Safari's engine).
Step 3: Run your tests again
Go back to your terminal and make sure you're in your project root. Then run:
npx playwright test
Playwright will now:
- Launch Chromium, Firefox, and WebKit in parallel.
- Run the same tests in each.
- Show separate results for each browser in your terminal.
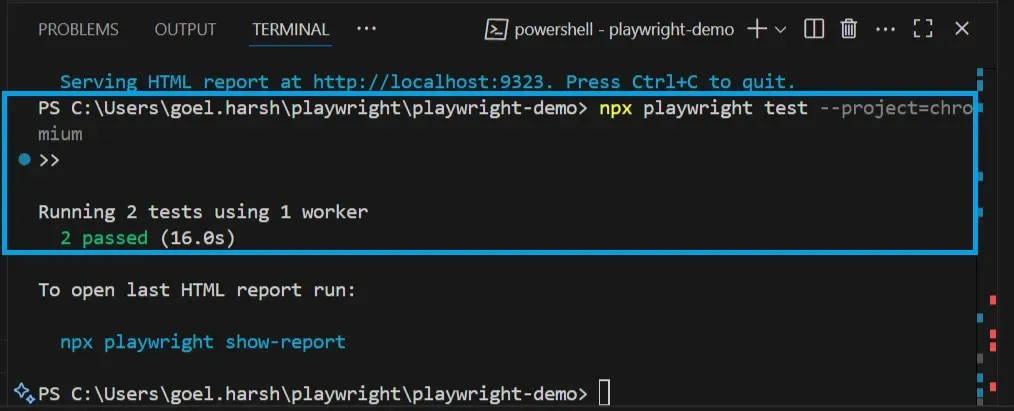
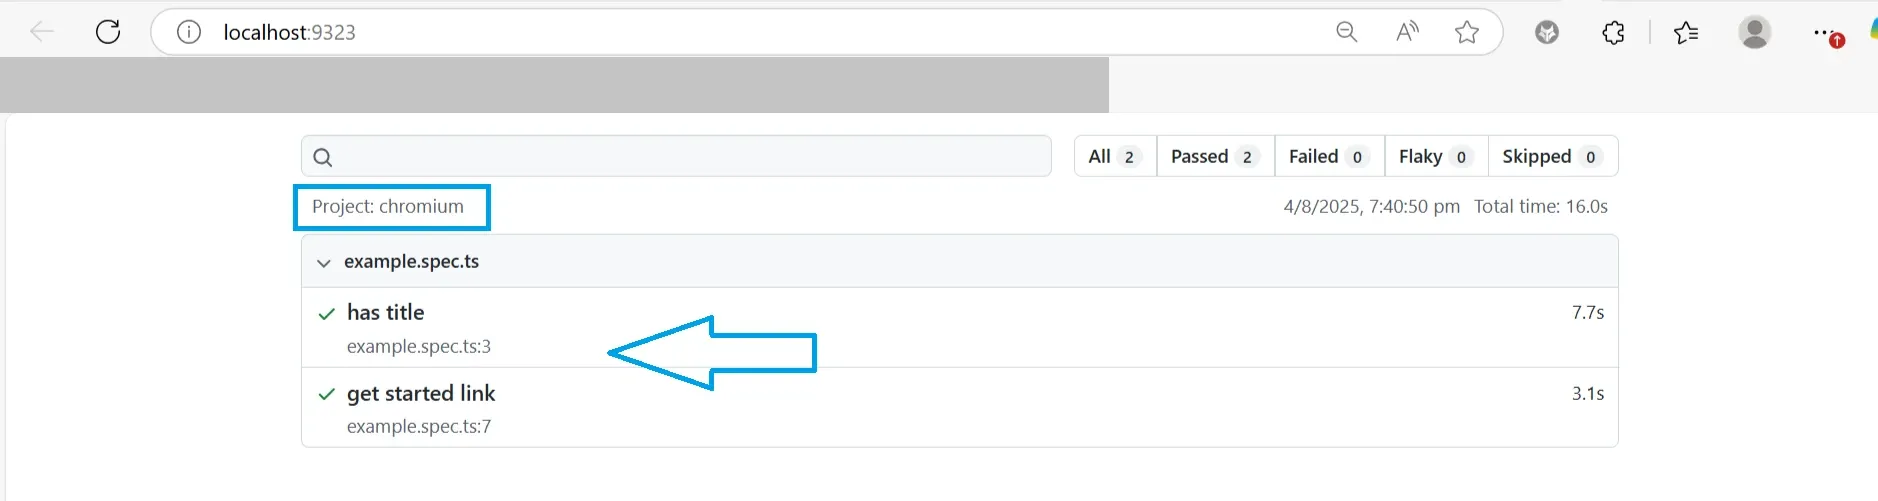
Step 4: Run tests in one browser only
Sometimes you don’t want to run every browser, especially when debugging.
To test only in Chromium:
npx playwright test --project=chromium
You can replace chromium with firefox or webkit depending on your need.

Beyond the basics, Playwright lets you define special browser environments inside the same config file. Here are two useful cases:
1. Run in Headed Mode (Show the Browser Window)
By default, Playwright runs in headless mode, meaning the browser runs in the background without showing a window. It’s fast, but not helpful when you're trying to figure out why something isn’t working.
You can run tests in headed mode, which opens a visible browser window while the test runs. This is great for debugging.
Inside your projects array, add this:
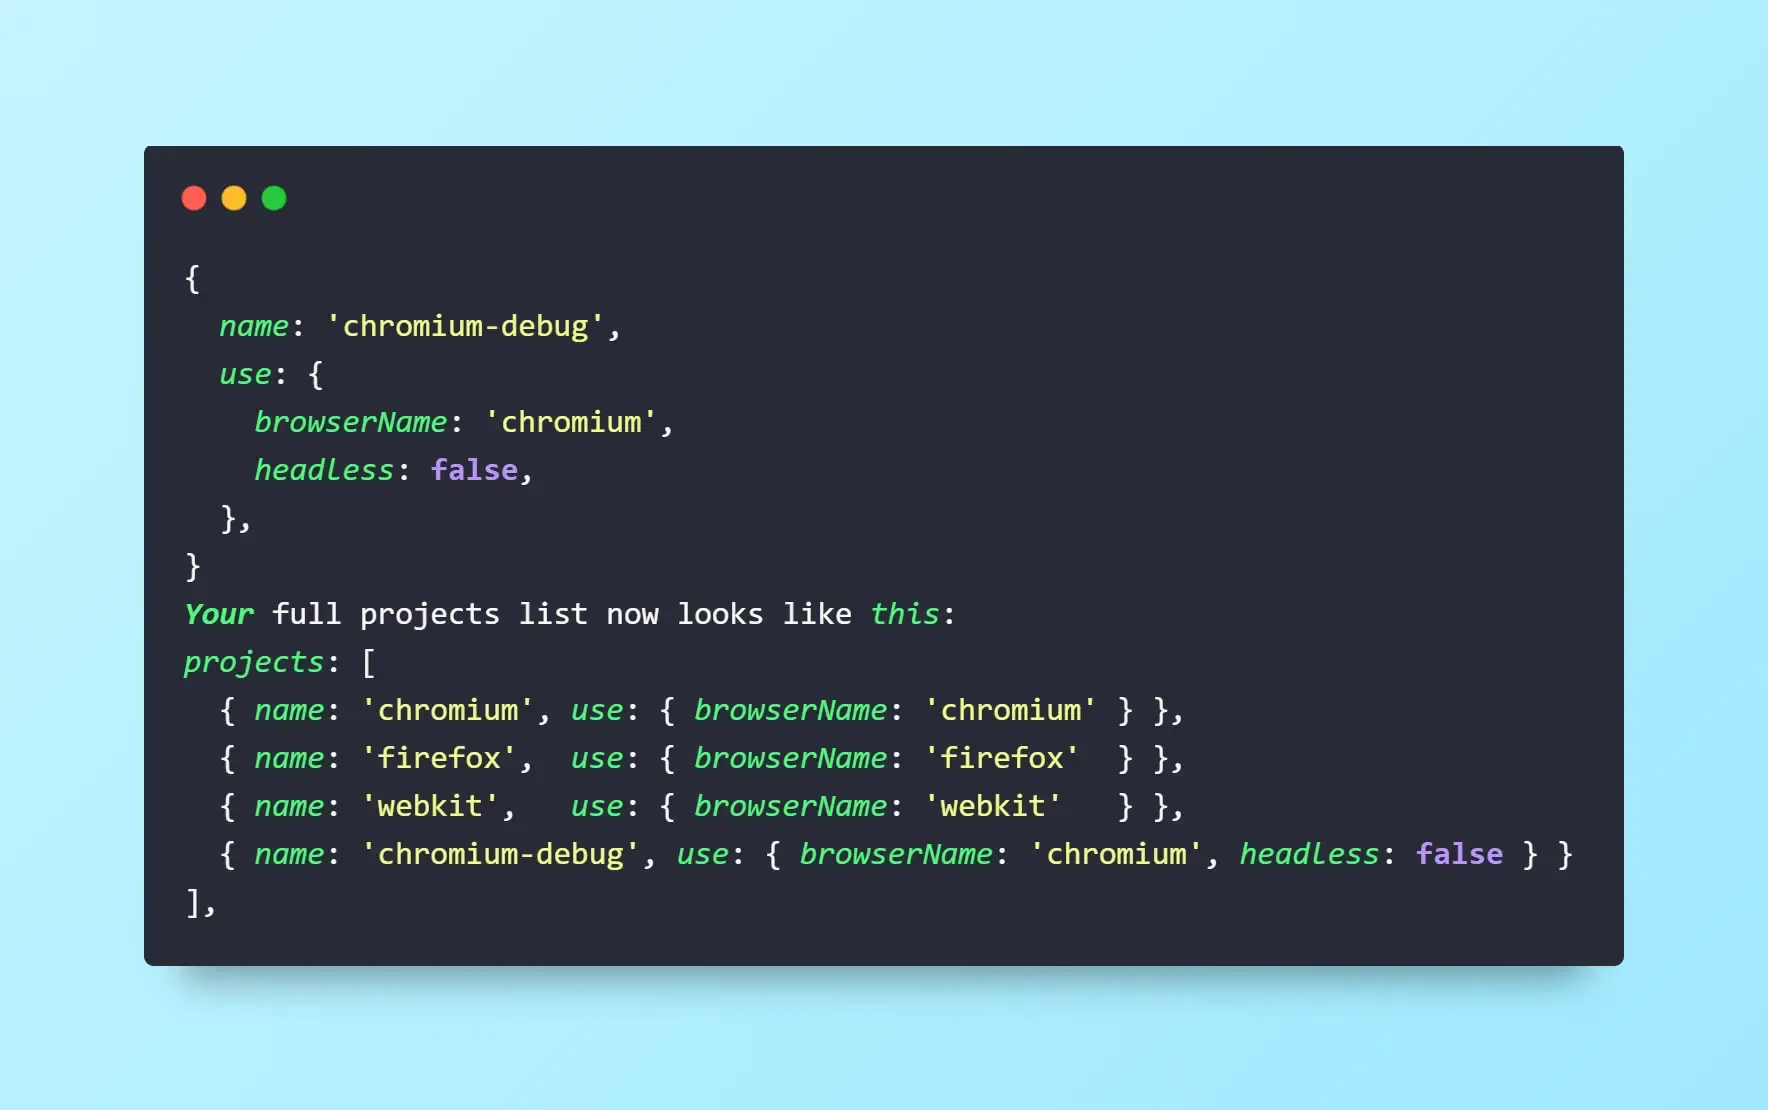
How to run it:
npx playwright test --project=chromium-debug
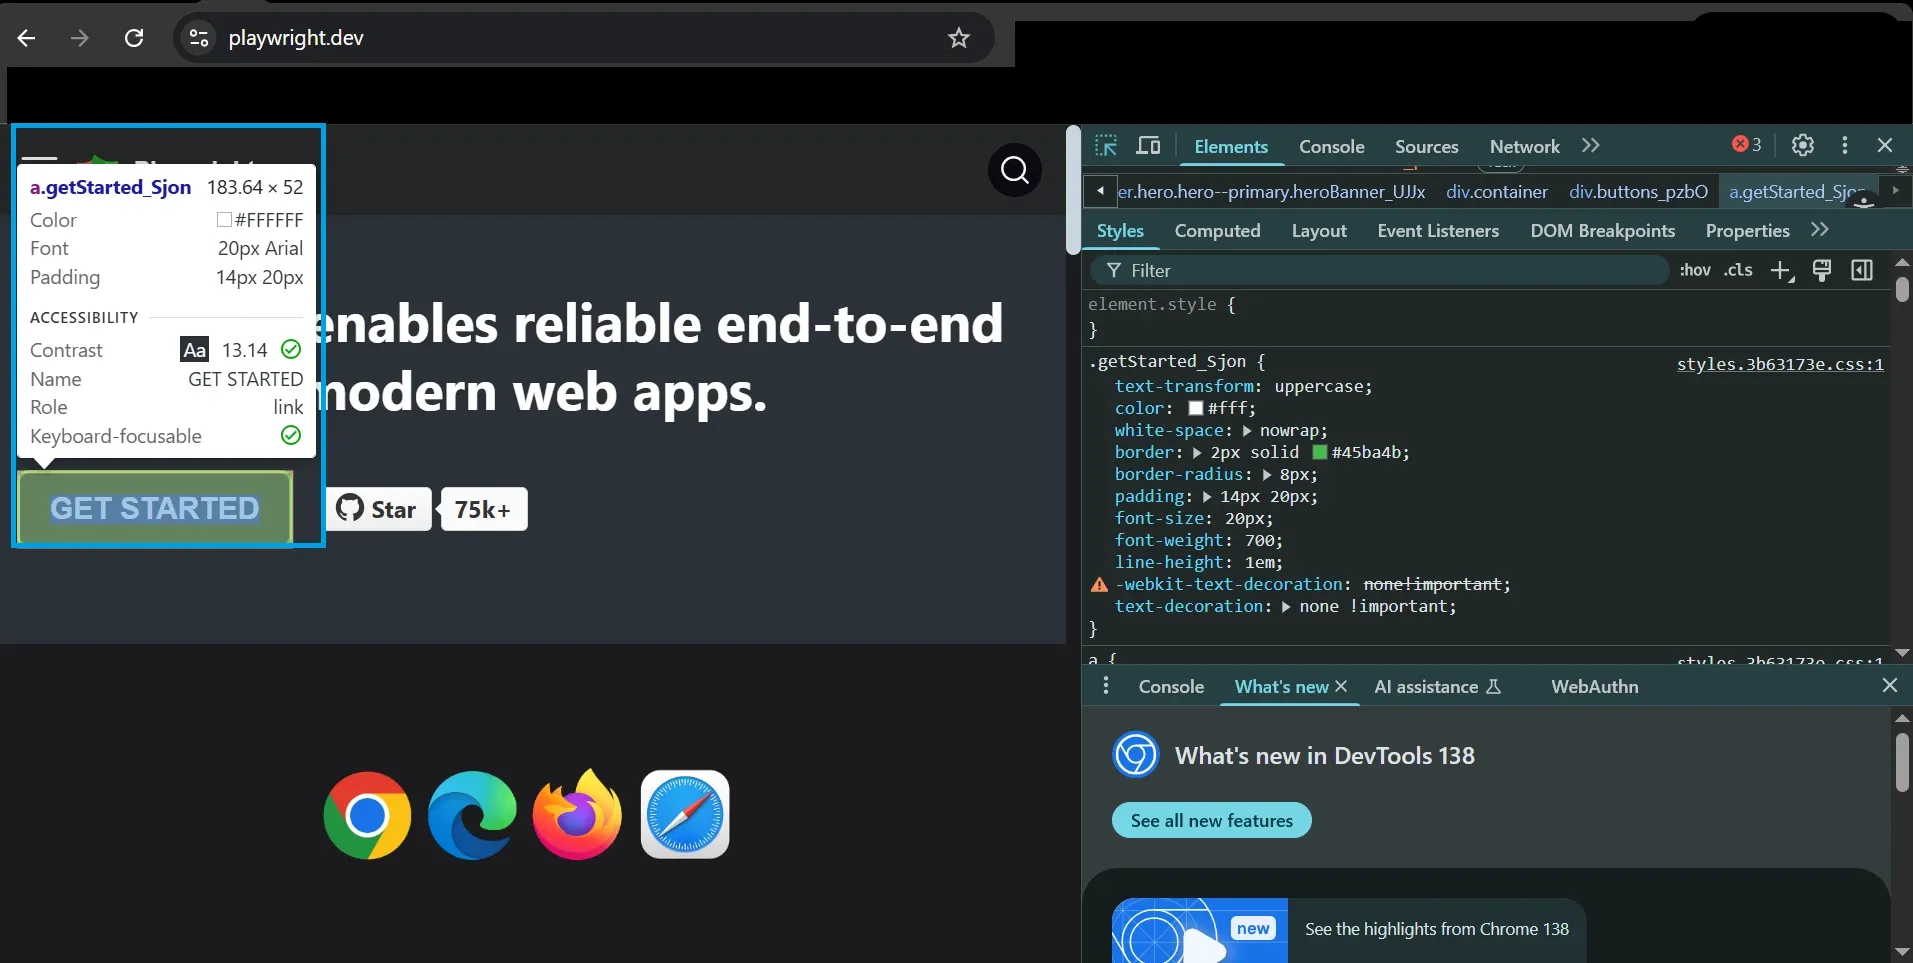
Now you’ll see the actual browser window open and actions being performed in real-time.
Here’s how this will look like in your Chromium browser.
2. Emulate Mobile Safari (iPhone 13)
Playwright includes a library of device profiles that simulate mobile devices, including screen size, resolution, touch input, and user-agent headers.
At the top of your config file, update your import:
import { defineConfig, devices } from '@playwright/test';
Then add this to your projects array:
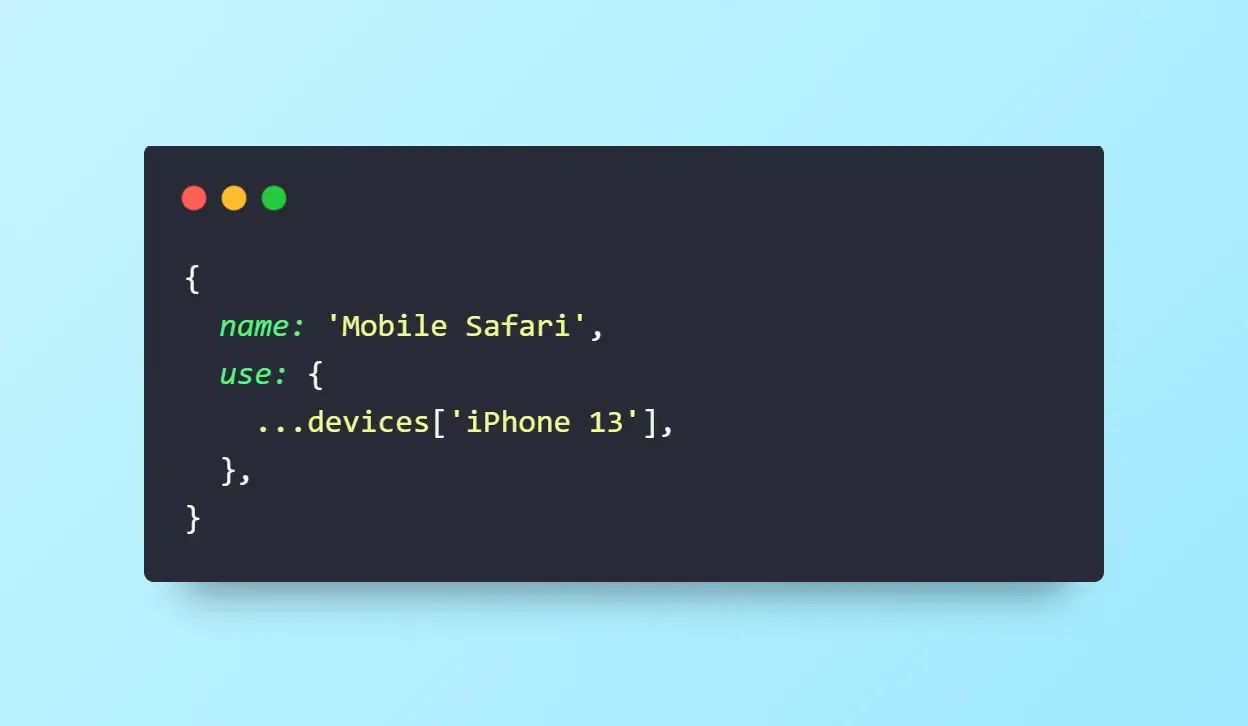
This tells Playwright to:
- Use the screen size of an iPhone 13.
- Simulate mobile Safari (WebKit engine).
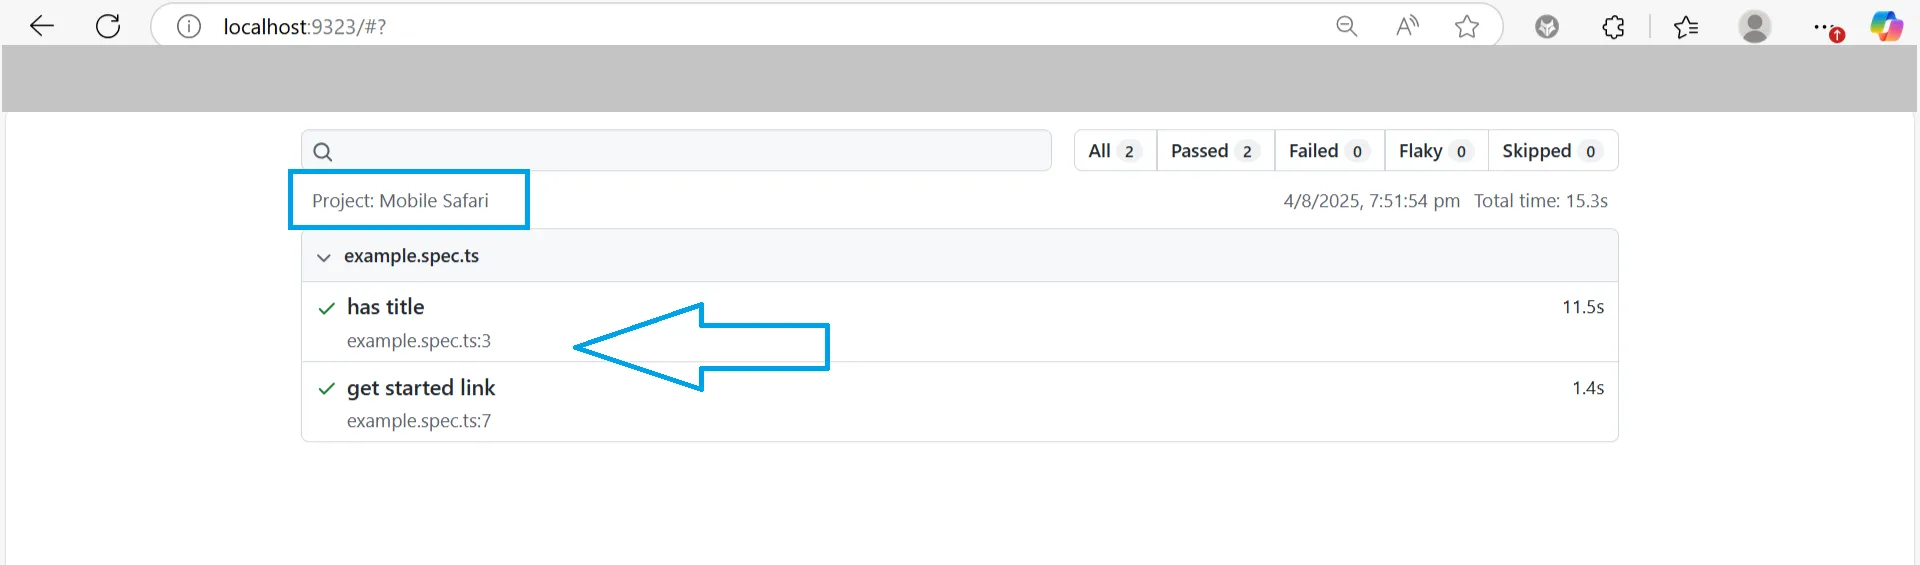
How to run it:
npx playwright test --project="Mobile Safari"
You’ll now see your tests run as if on an iPhone, using Safari’s rendering engine.

6. Running Tests
Once you’ve written your Playwright tests and configured your browsers, the next step is to run them smartly. This needs to be a smart process because, you can’t just run a test and hope for the best. You must understand the feedback you can use quickly, clearly, and with control.
In this section, we’ll walk through how to run your tests across browsers, isolate test cases, control parallelism, and generate helpful reports.
By default, Playwright makes smart decisions about how to run your tests. But once you’re working with a larger suite, debugging flaky tests, or integrating into CI, you need more control. This is where CLI options, test isolation, and reports become essential.
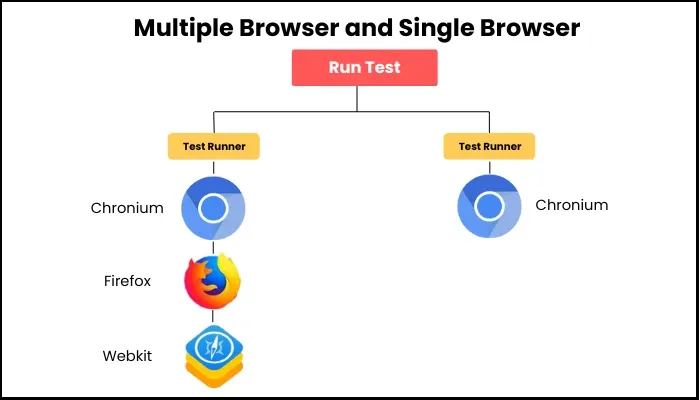
1. Run All Tests in All Browsers (Default Behavior)
If you’ve set up your playwright.config.ts to define multiple browser projects (e.g., Chromium, Firefox, WebKit), Playwright will run all tests in all of them by default. We explained this previous section.
Behind the scenes, Playwright:
- Finds all your test files.
- Runs each test once per browser project.
- Outputs the results in a readable terminal format.
And even if you don’t want to want to test all browsers, you can run it in a specific browser or do a mobile emulation for a specific device.
This isolation gives you faster feedback and avoids unnecessary parallel runs during debugging. Similarly, there are multiple ways to isolate your test.
1. Run a Specific Test File
If you only want to run one test file, for example, when working on a feature:
npx playwright test tests/example.spec.ts
This is helpful when you want to:
- Focus on one area.
- Avoid waiting for unrelated tests to finish.
- Speed up test development.
2. Run a Specific Test by Name
You can filter tests by name using -g (short for grep):
npx playwright test -g "get started link"
Playwright will only run tests that match the string you provide. This is useful when isolating one failing test or running a small group of related ones.
For a complete list of test runner flags and configuration options, check the official Playwright docs
3. Control Test Parallelism
Playwright runs tests in parallel using multiple workers, each test runs in its own browser instance and its own thread.
You can control how many workers are used:
npx playwright test --workers=1
When would you do this?
- If tests are failing randomly (a sign of flaky parallel behavior).
- If your machine is low on resources.
- If your backend or database doesn’t handle multiple sessions well.
4. How Playwright Isolates Tests (Clean Contexts)
Every Playwright test runs in its own browser context. Think of this like a private, fresh incognito tab. That means:
- No cookies, local storage, or session data is carried over.
- Tests don’t interfere with each other, even in parallel.
- You don’t need to manually reset the environment between tests.
This test isolation is one reason Playwright tests are more stable by default.
5. View Detailed Results with HTML Reports
Text logs are helpful but they’re not the best way to understand why a test failed. Playwright provides a built-in HTML report that gives you a visual summary of your test run.
Step 1: Enable the HTML Reporter
Open your playwright.config.ts and add (or confirm) the reporter section:
reporter: [['html', { outputFolder: 'playwright-report' }]],
This tells Playwright to create a playwright-report/ folder after every test run.
Step 2: Run Tests
npx playwright test
All tests will run, and the report will be generated at the end.
Step 3: Open the Report
Use this command:
npx playwright show-report
It will open your default browser and show a visual summary of the results.
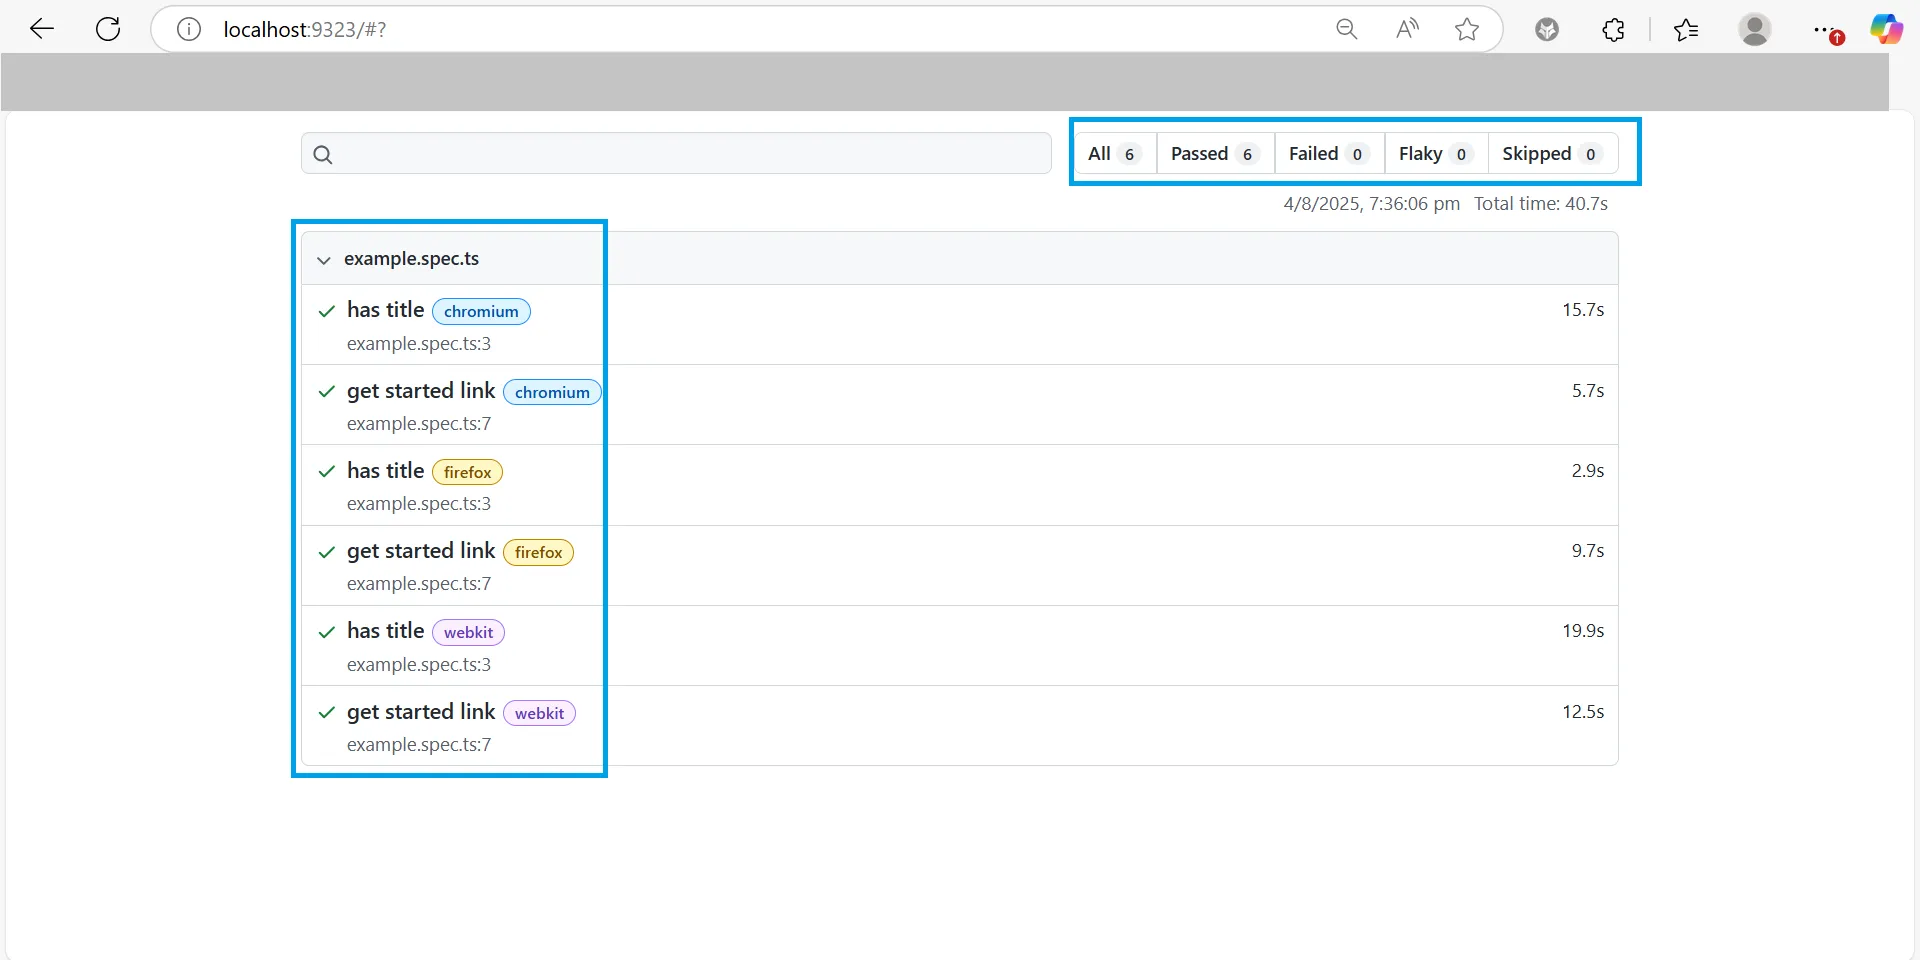
What You’ll See in the Report
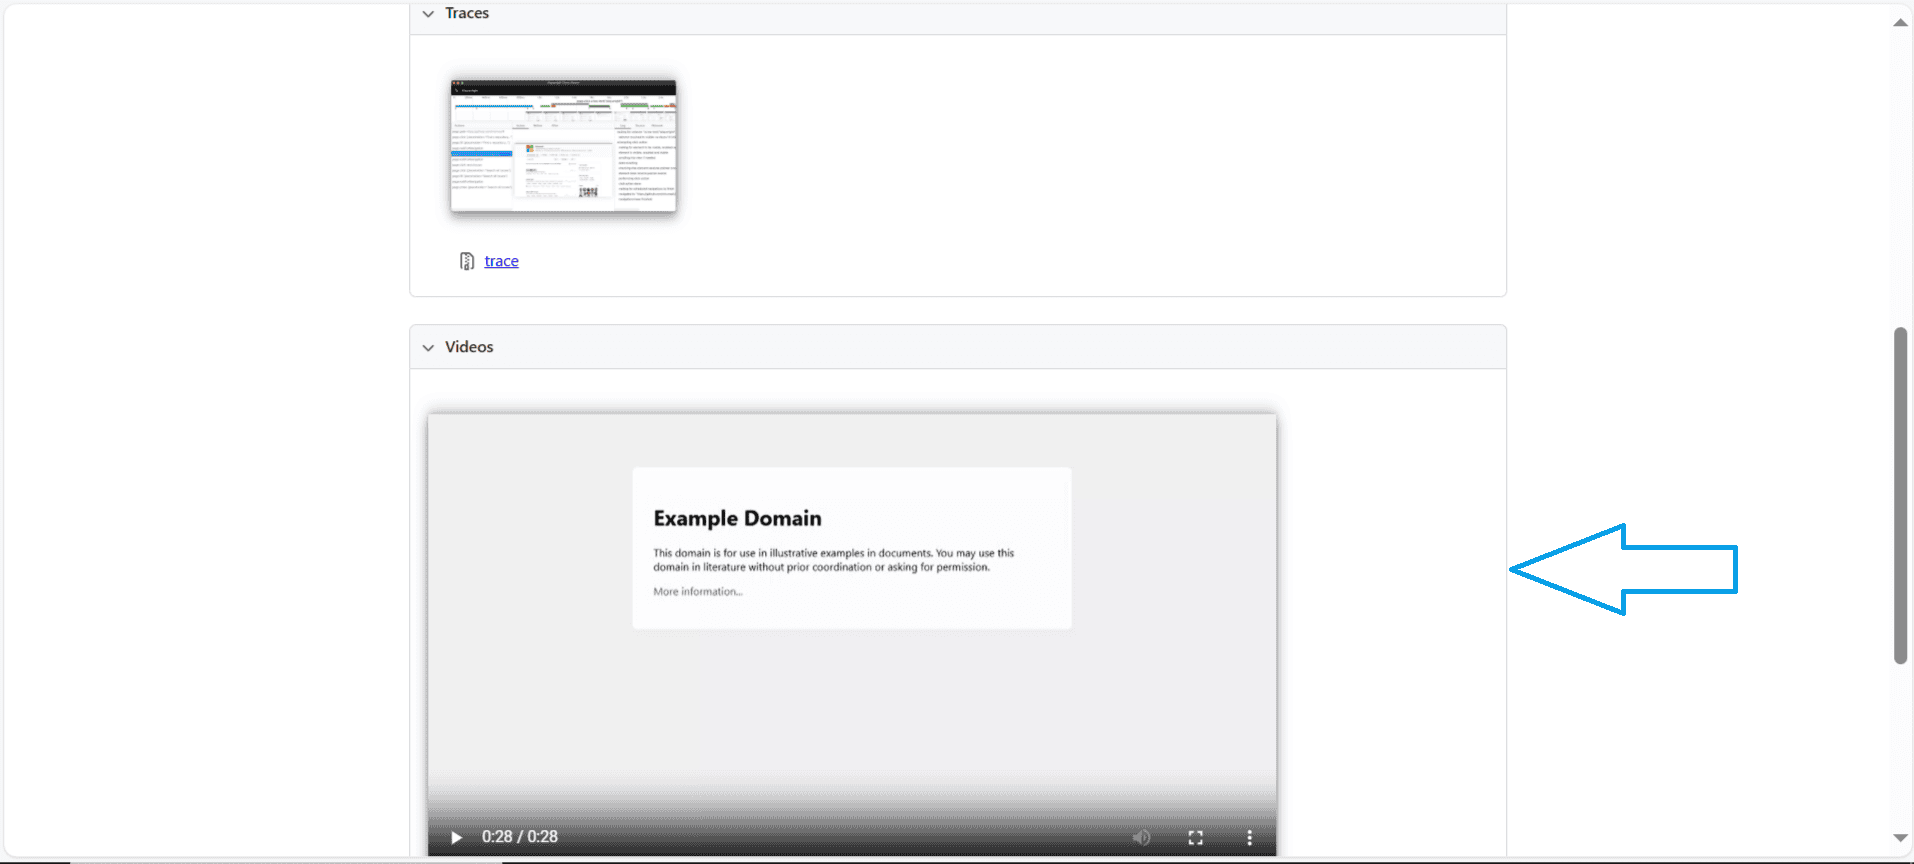
- Pass/fail status for every test.
- Execution time for each test.
- Screenshots and videos on failures.
- Trace files you can open to debug failures step-by-step.
Let’s say a test passed on retry. The HTML report will:
- Show a retry badge.
- Mark it as flaky (good for follow-up).
- Let you compare the failed and successful attempts.
Or maybe a test takes 4x longer than others. The report will:
- Show a long bar on that test’s timeline.
- Let you open a trace to see where time was spent.
These kinds of insights help you identify tests that need work.
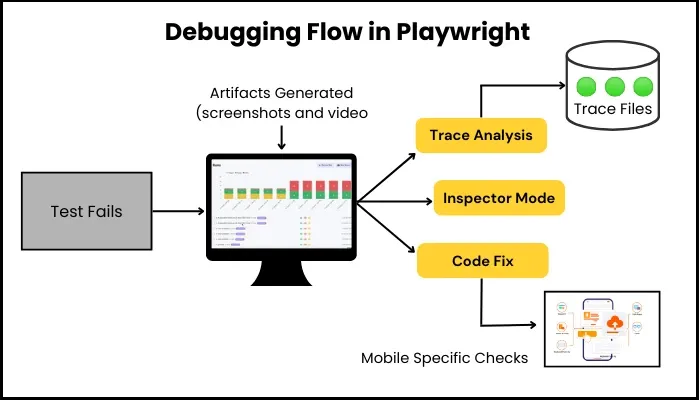
7. Debugging: Traces, Screenshots, Inspector
Now, we’ll cover how to debug failed tests with the help of Playwright’s useful features. Playwright includes several built-in tools to help you debug tests with ease:
- Trace Viewer: Shows you everything that happened during a test.
- Screenshots & Video Recording: Capture visual context on failure.
- Inspector Mode: Lets you step through your test code live.
- Codegen: Writes code for you as you interact with the page.
- Network Mocking: Lets you simulate server responses, errors, or offline conditions.
Let’s go through each of these tools step by step.
Step 1: Enable Debugging Tools in Your Config
To use these tools, update your playwright.config.ts file with the following:
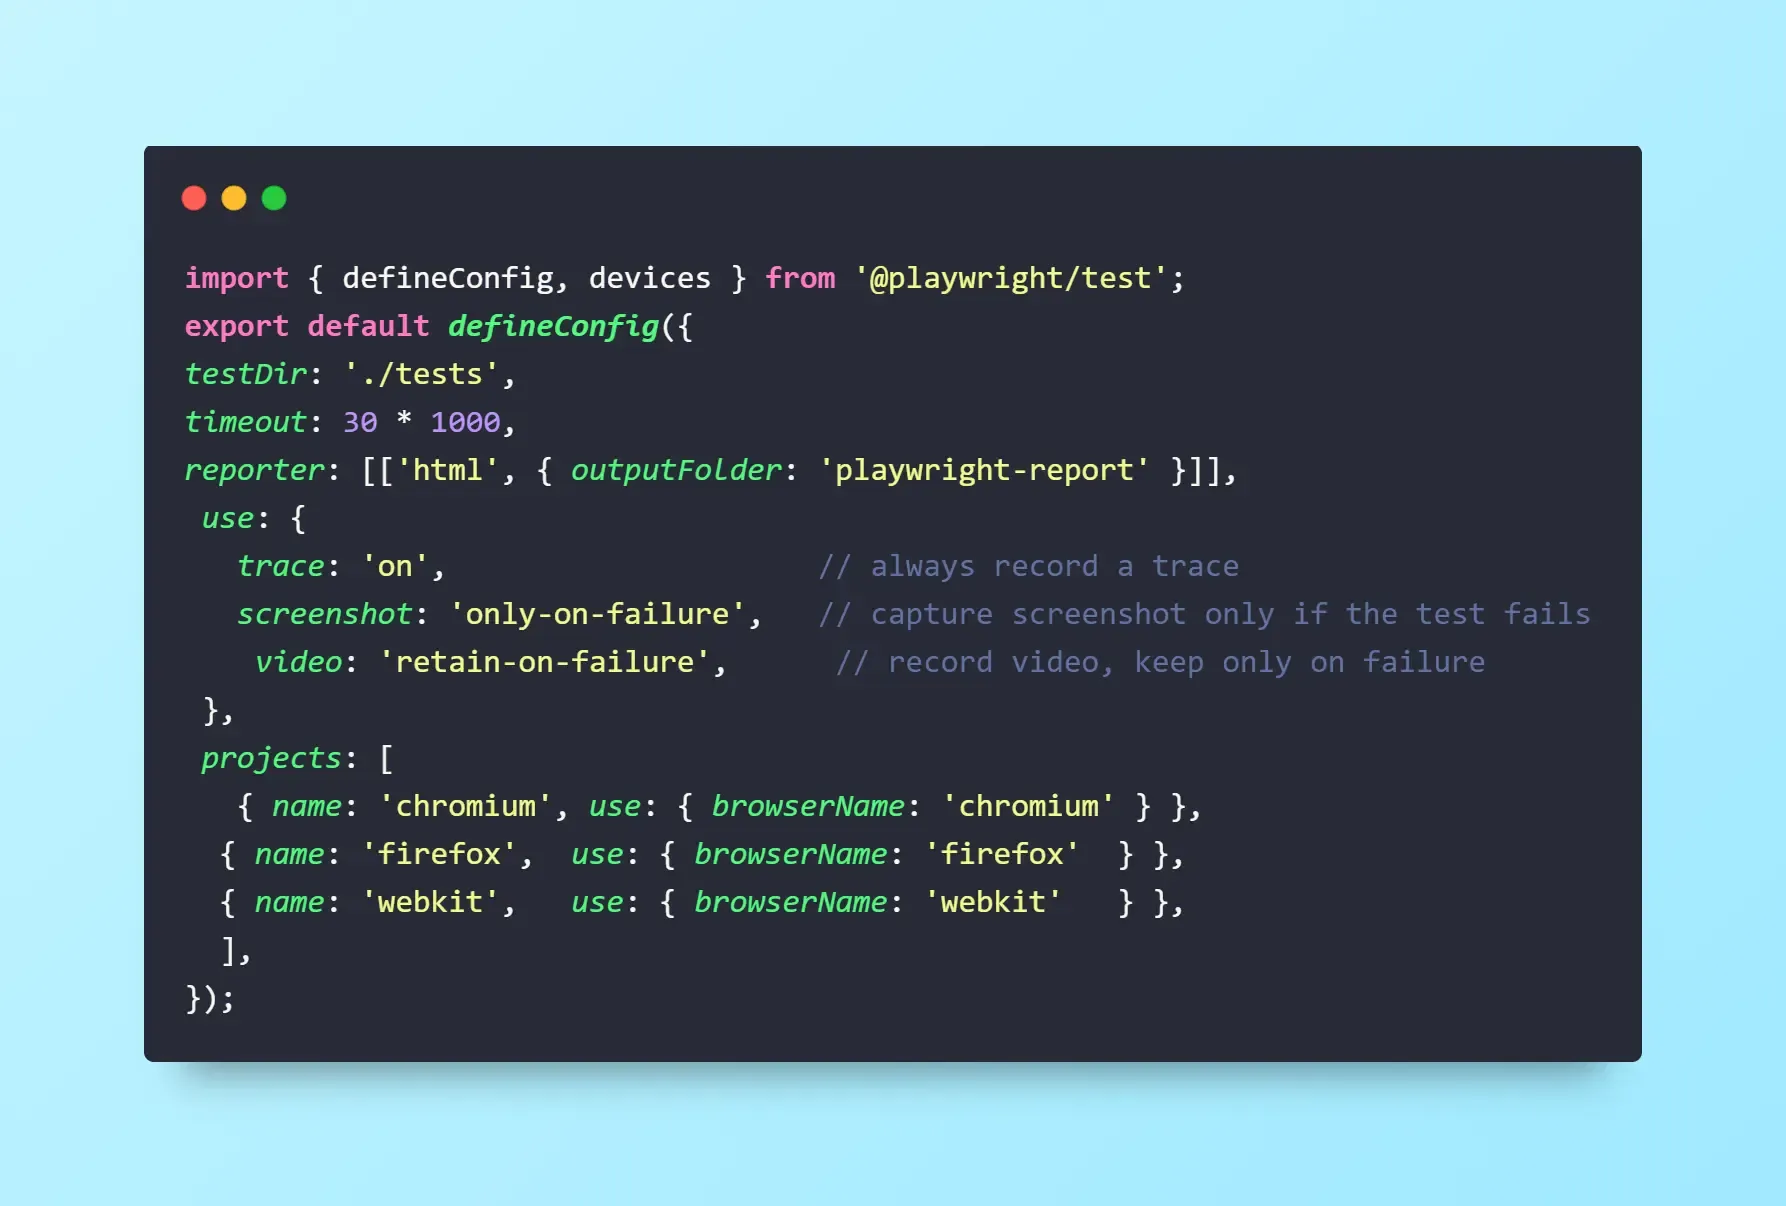
What these settings do:
- trace: 'on' captures a detailed log of everything the test did (like a video + event timeline)
- screenshot: 'only-on-failure' takes a screenshot only when a test fails
- video: 'retain-on-failure' saves a short video of the test if it fails
Playwright will automatically create a test-results/ folder to store these files.

Step 2: Run Your Tests
Open your terminal and run:
npx playwright test
Your tests will run like before but now, if anything goes wrong, you'll get rich artifacts: traces, screenshots, and videos.
Even when tests pass, traces are still captured (since we set trace: 'on'), which is helpful for debugging behavior that "almost" fails.
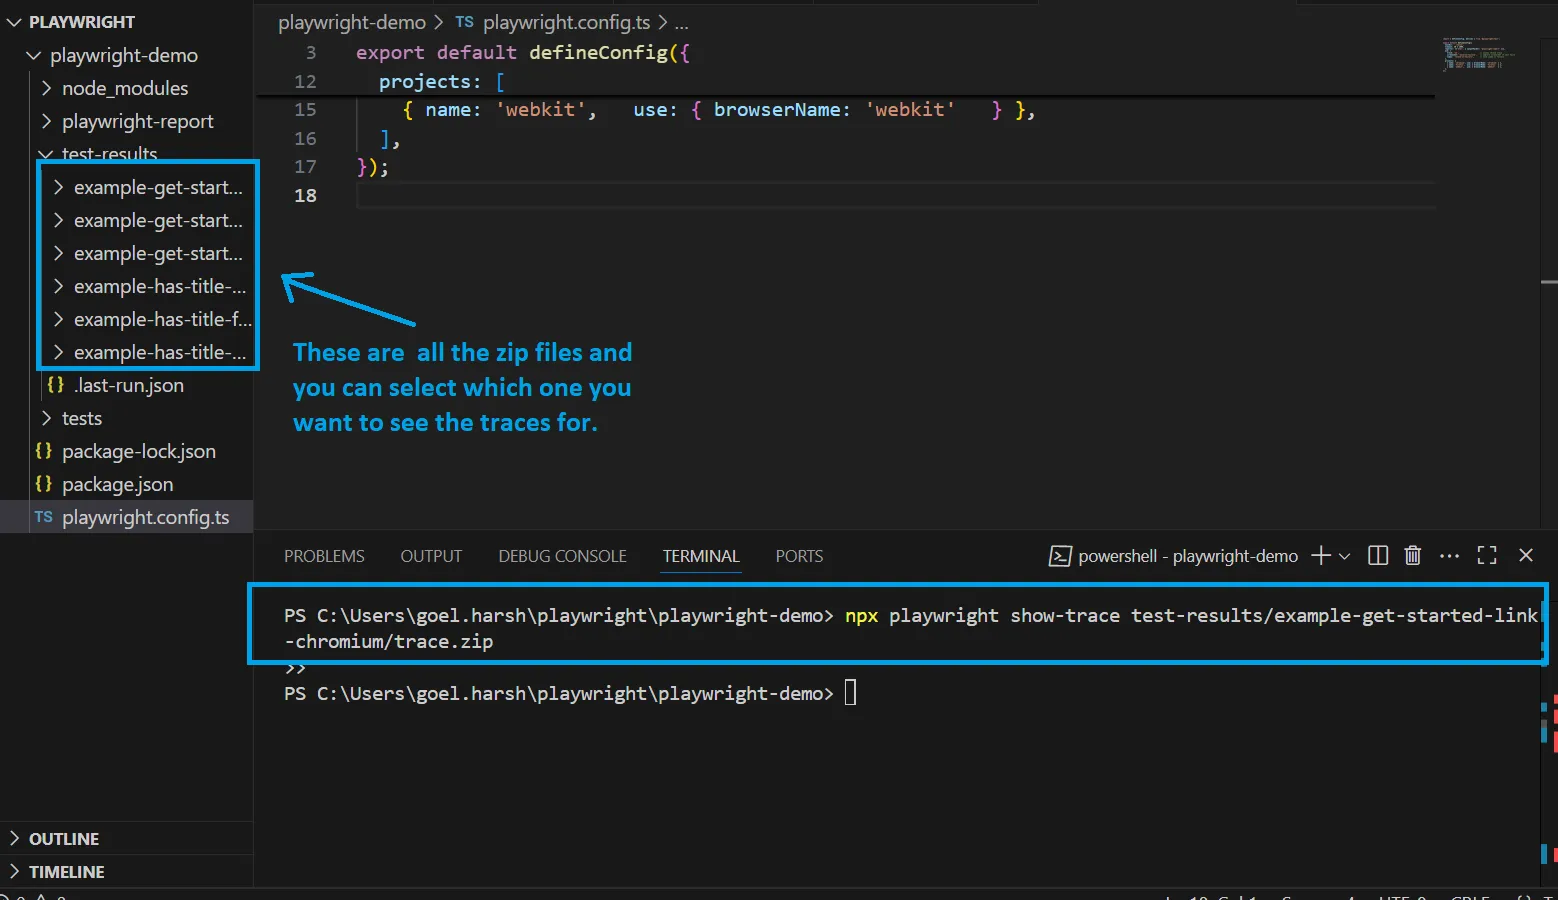
Step 3: Open the Trace Viewer
Traces are stored as .zip files inside the test-results/ folder. You can open them with:
npx playwright show-trace test-results/<your-folder-name>/trace.zip
Once opened, the Trace Viewer will show a timeline with:
- Each step the test took (click, fill, navigate).
- DOM snapshots before and after each action.
- Console logs.
- Network requests (with status and response times).
This is extremely useful when a test fails, and you're not sure why.
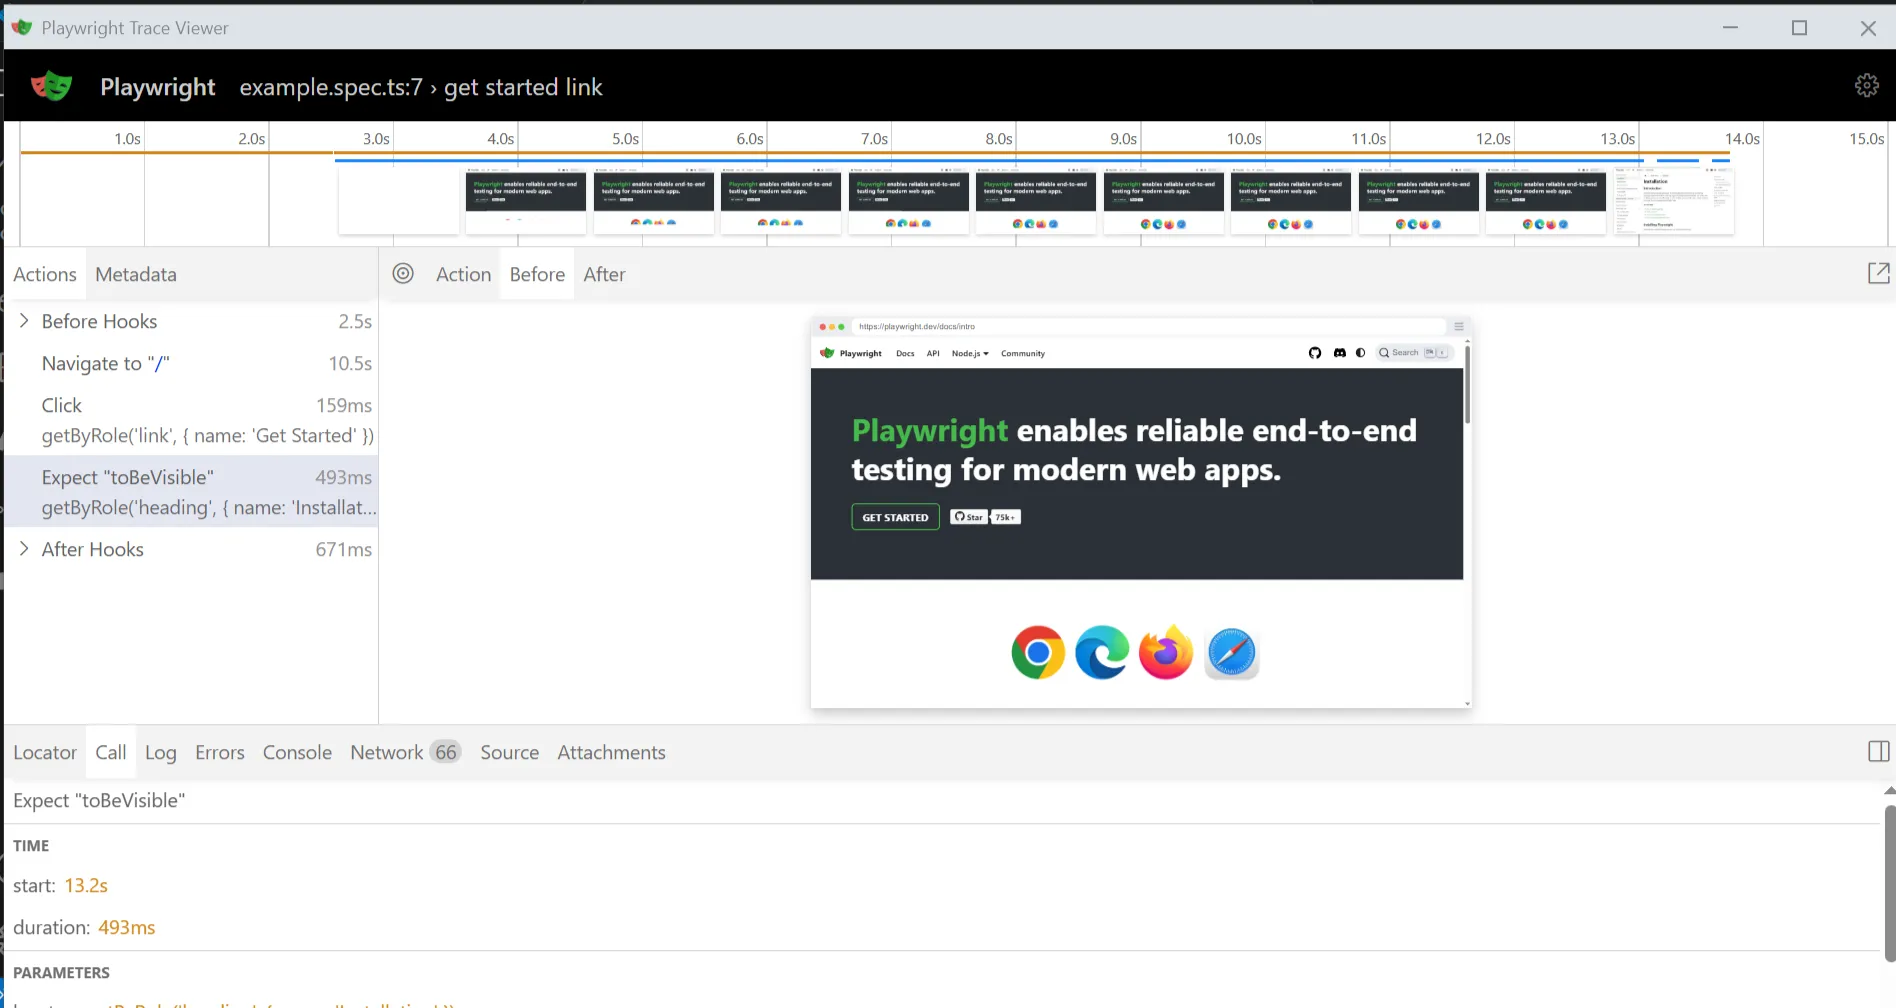
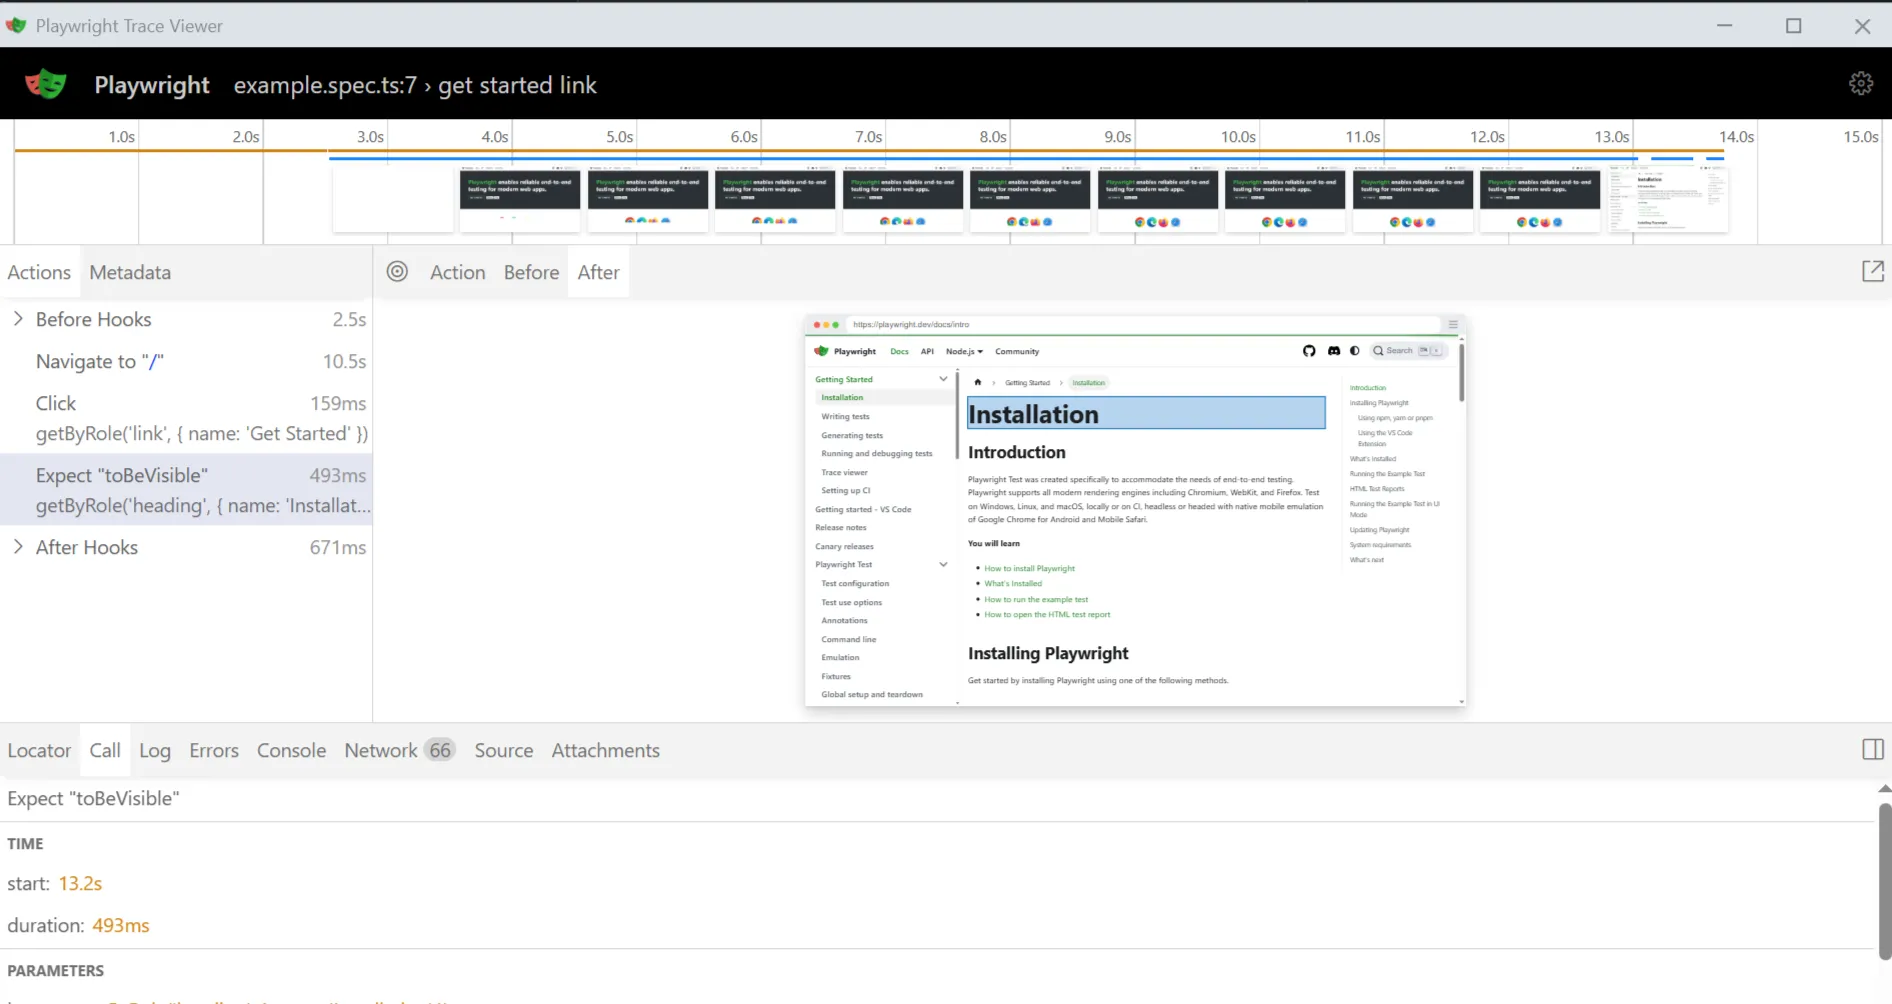
The Trace Viewer shows each step your test took, including clicks, input, network calls, and more.
Step 4: Generate Test Code with Codegen
Sometimes you just want to quickly prototype a test. Instead of writing everything from scratch, you can use Playwright’s code generator.
Run this command:
npx playwright codegen https://playwright.dev
This will:
- Launch a browser window
- Let you click, type, and interact with the page
- Generate the Playwright code for every action you take
The output will look like this:
await page.goto('https://playwright.dev');
await page.getByRole('link', { name: 'Get Started' }).click();
You can copy and paste this into your own test files as a starting point.
As you interact with the browser, Playwright generates test code in real time.
Step 5: Step Through Tests with Inspector Mode
Sometimes, you want to watch it run and pause at each step.
Use Inspector Mode to do just that:
npx playwright test --debug
This opens two windows:
- A Playwright Inspector panel.
- A browser where your test runs.
The test pauses before each action. In the Inspector, you can:
- Click "Step" to go one action at a time.
- Click "Resume" to let it continue.
- Highlight the target element.
- Explore the page live, including using browser dev tools.
It’s like setting breakpoints for your tests.
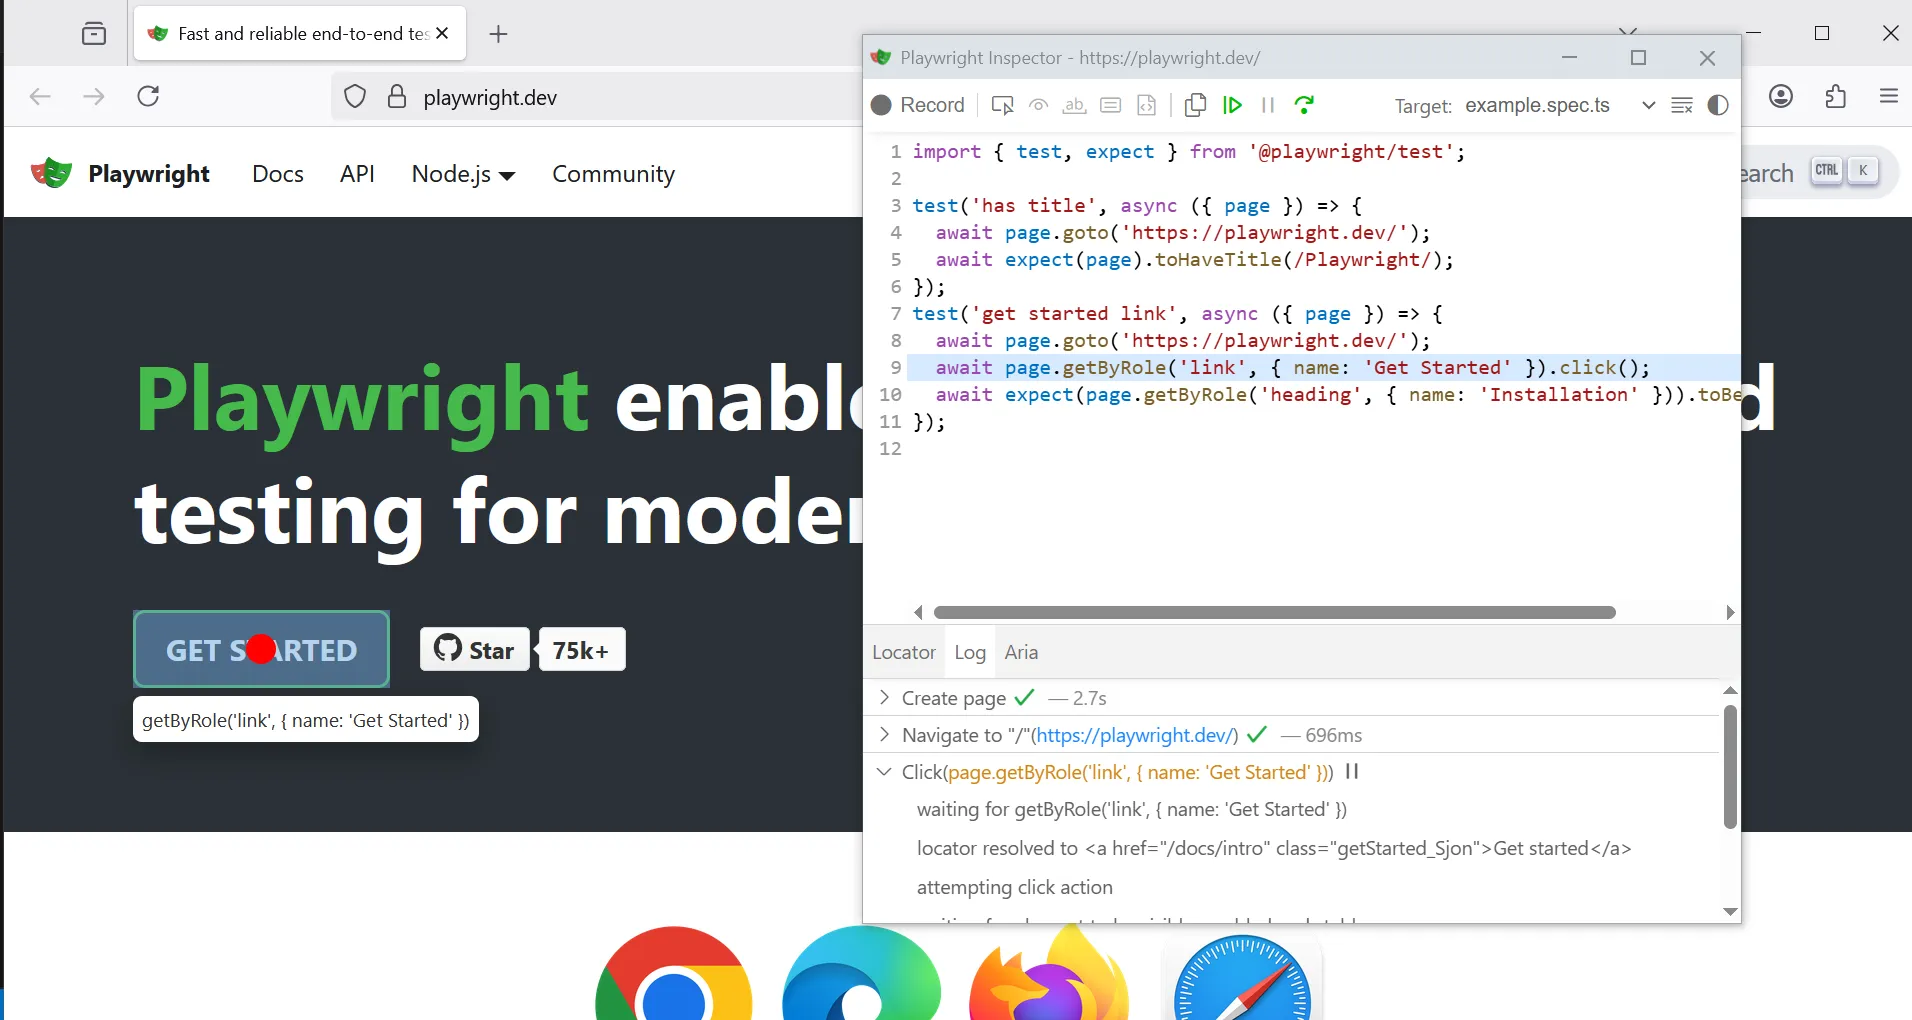
Inspector Mode pauses the test at each action so you can step through and explore the page.
Step 6: Mock a Failing Network Request
Sometimes your API isn’t ready yet. Or maybe you want to test what happens when it fails (like a server error). With Playwright, you can mock any network request.
Here’s how to simulate a 500 Internal Server Error:
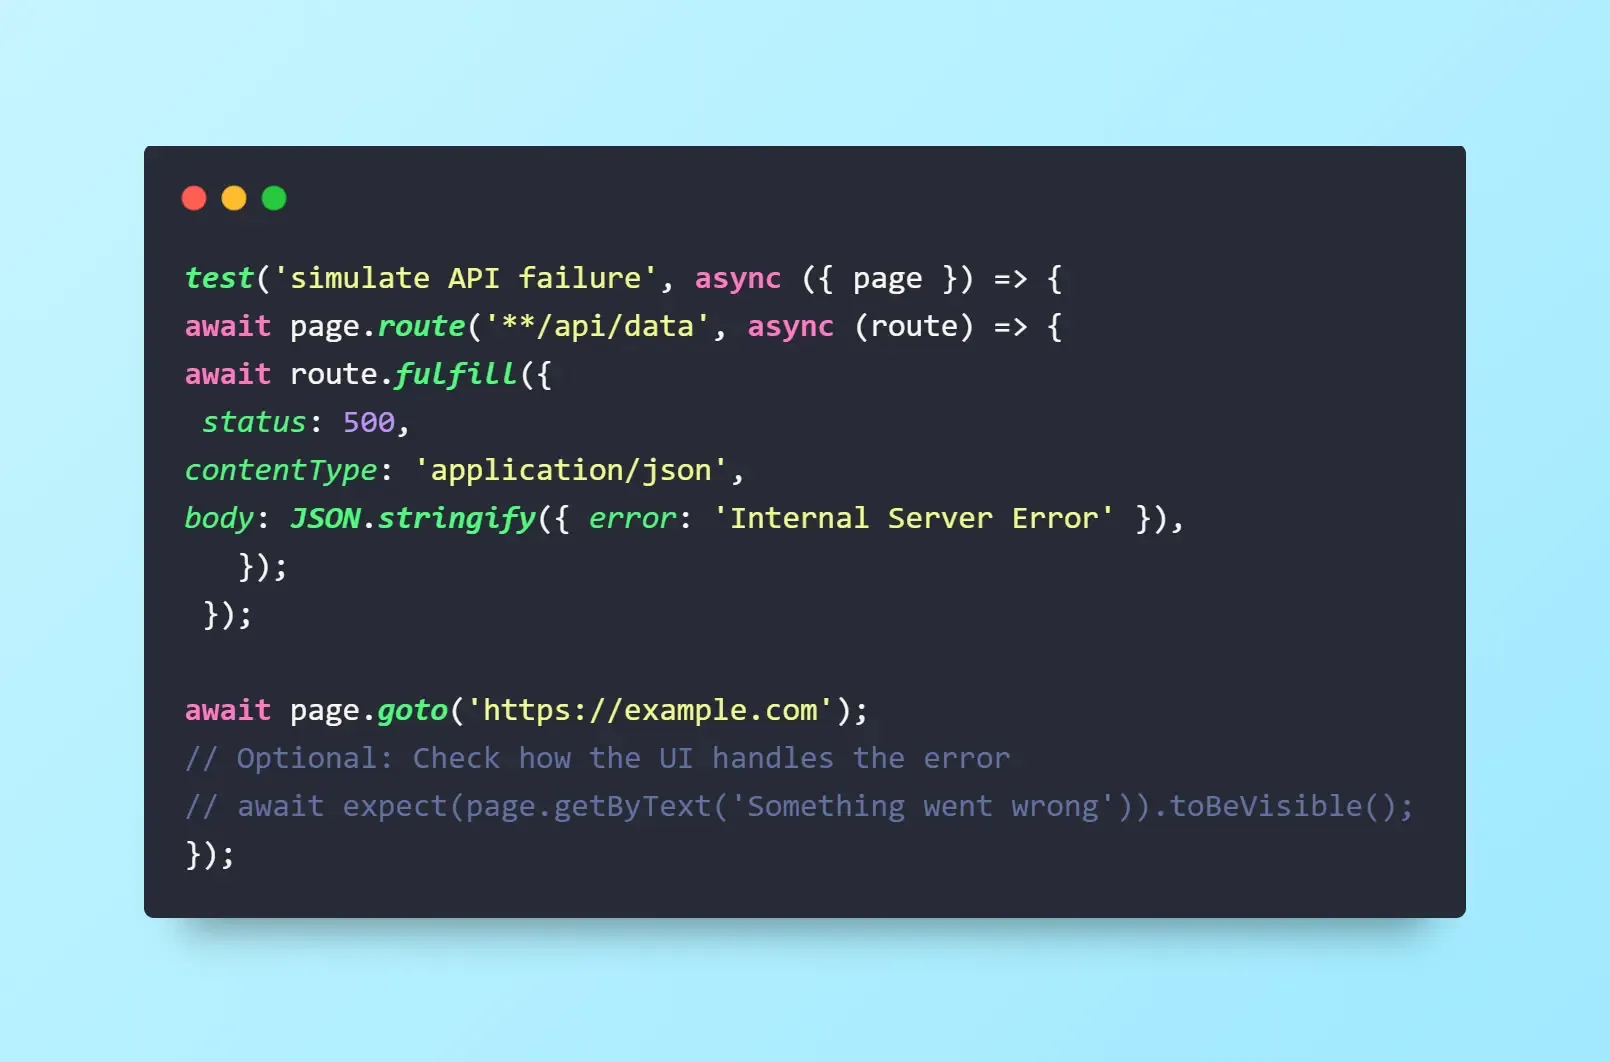
What this does:
- Intercepts any request to /api/data.
- Responds with a fake 500 error.
- Lets you test how your app reacts (e.g., shows an error message).
You don’t need a real backend to test failure cases. This is especially useful for edge case testing, mobile fallbacks, and error handling.
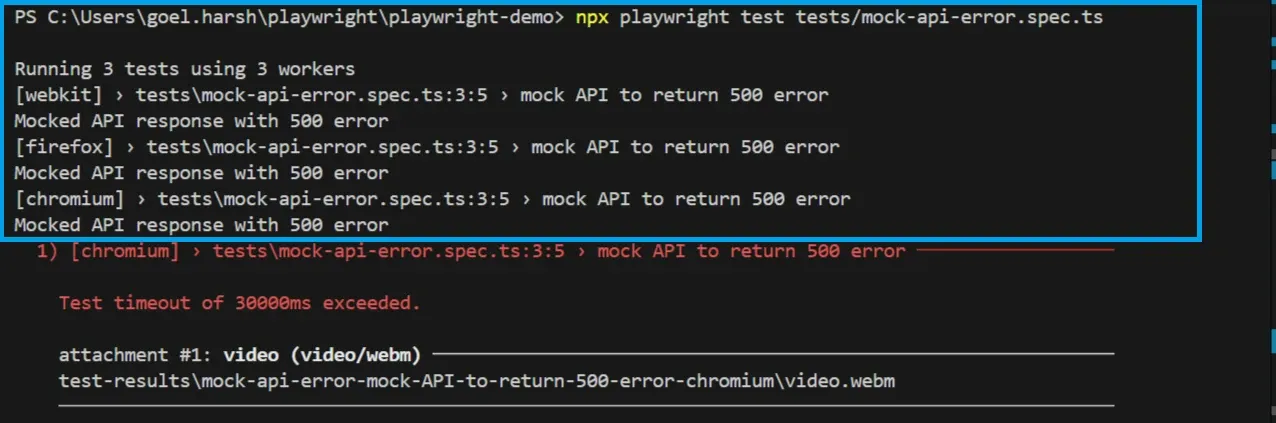
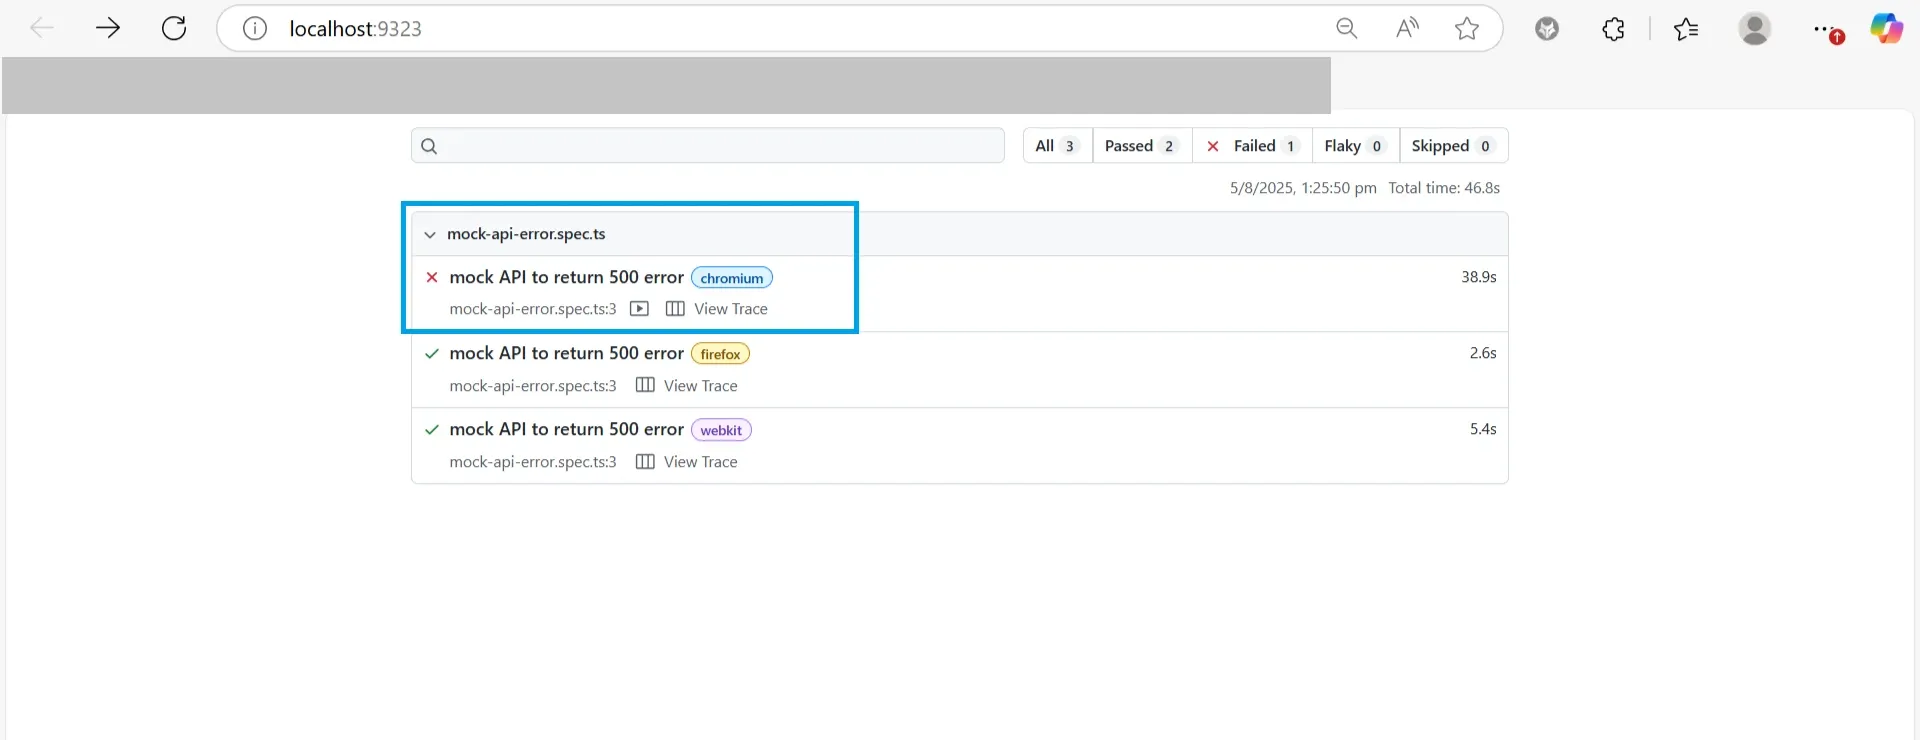
In the image, you can see there’s an option to see the video of the failed test. After clicking the video icon, the screen looks like this.
8. Visual & Responsive Testing
Functional tests alone won’t catch visual regressions. Playwright supports snapshot testing, where you capture a screenshot of an element or page and compare it against a stored baseline. If the pixel‑diff exceeds a threshold, the test fails.
You can integrate Playwright with visual testing tools like Percy or Chromatic to generate visual diffs across browsers and screen sizes. For example, after each test, capture a screenshot:
![]()
This is particularly important because browsers handle layout and rendering differently. Safari’s flexbox sizing quirks, for instance, can cause subtle UI shifts that only a visual comparison will reveal.
9. Cloud & Real Device Testing
Running tests locally covers only a subset of browsers and devices. To ensure coverage across older browser versions and real devices, integrate Playwright with cloud‑based services like BrowserStack or Sauce Labs. These platforms let you run the same Playwright test suite against a wide matrix of browsers and operating systems.
Example: Set environment variables for BrowserStack credentials and modify playwright.config.ts to use their capabilities. Then run your tests on real iOS or Android devices without owning the hardware.
This approach complements Playwright’s built‑in emulation and ensures your UI works on real devices with actual rendering engines and touch interactions.
10. Best Practices for Reliable Cross-Browser Tests
Not everyone tests the same way. A solo developer might be focused on quick feedback. A QA engineer might care about detailed structure and coverage. A product team might need stability across environments and browsers.
Playwright supports all of them, but how you use it depends on who you are and what your priorities are. Here’s how to adapt your testing practices based on your role.
A. For the Solo Developer:
If you’re building and testing in the same project, your goal is usually fast feedback and low maintenance. You want your tests to run quickly and reliably without making your codebase harder to manage.
- Keep tests close to your components or features
Instead of dumping all tests into one big folder like tests/, you can place them next to the files they’re testing.
It keeps things organized, makes refactoring easier, and helps you catch problems sooner. Example folder structure:
components/
Button/
Button.tsx
Button.spec.ts
With this setup, if you change Button.tsx, your test is right there for a quick update. Use test IDs or accessible roles
A common mistake is relying on fragile selectors like class names or DOM order. These break easily when your UI changes.
Instead, use semantic locators
Good example using roles:page.getByRole('button', { name: 'Submit' });
Bad example using fragile CSS selectors:
page.locator('.btn-primary:nth-child(2)');
If your elements don’t have clear roles or names, add a data-testid:
In your HTML:
<button data-testid="submit-button">Submit</button>
In your test:
page.getByTestId('submit-button');
Using roles and test IDs makes your tests stable and aligned with accessibility standards.
B. For Teams
When more than one person works on the project, testing needs to be repeatable, fast, and integrated with your tools. You’ll want good setup practices, CI/CD integration, and helpful failure feedback.
Use fixtures for shared setup: Fixtures let you define common environments or setups, like logging in a user or connecting to a clean database.
Without fixtures, you’d repeat the same setup in every test. That leads to duplication and inconsistent state. Basic fixture example: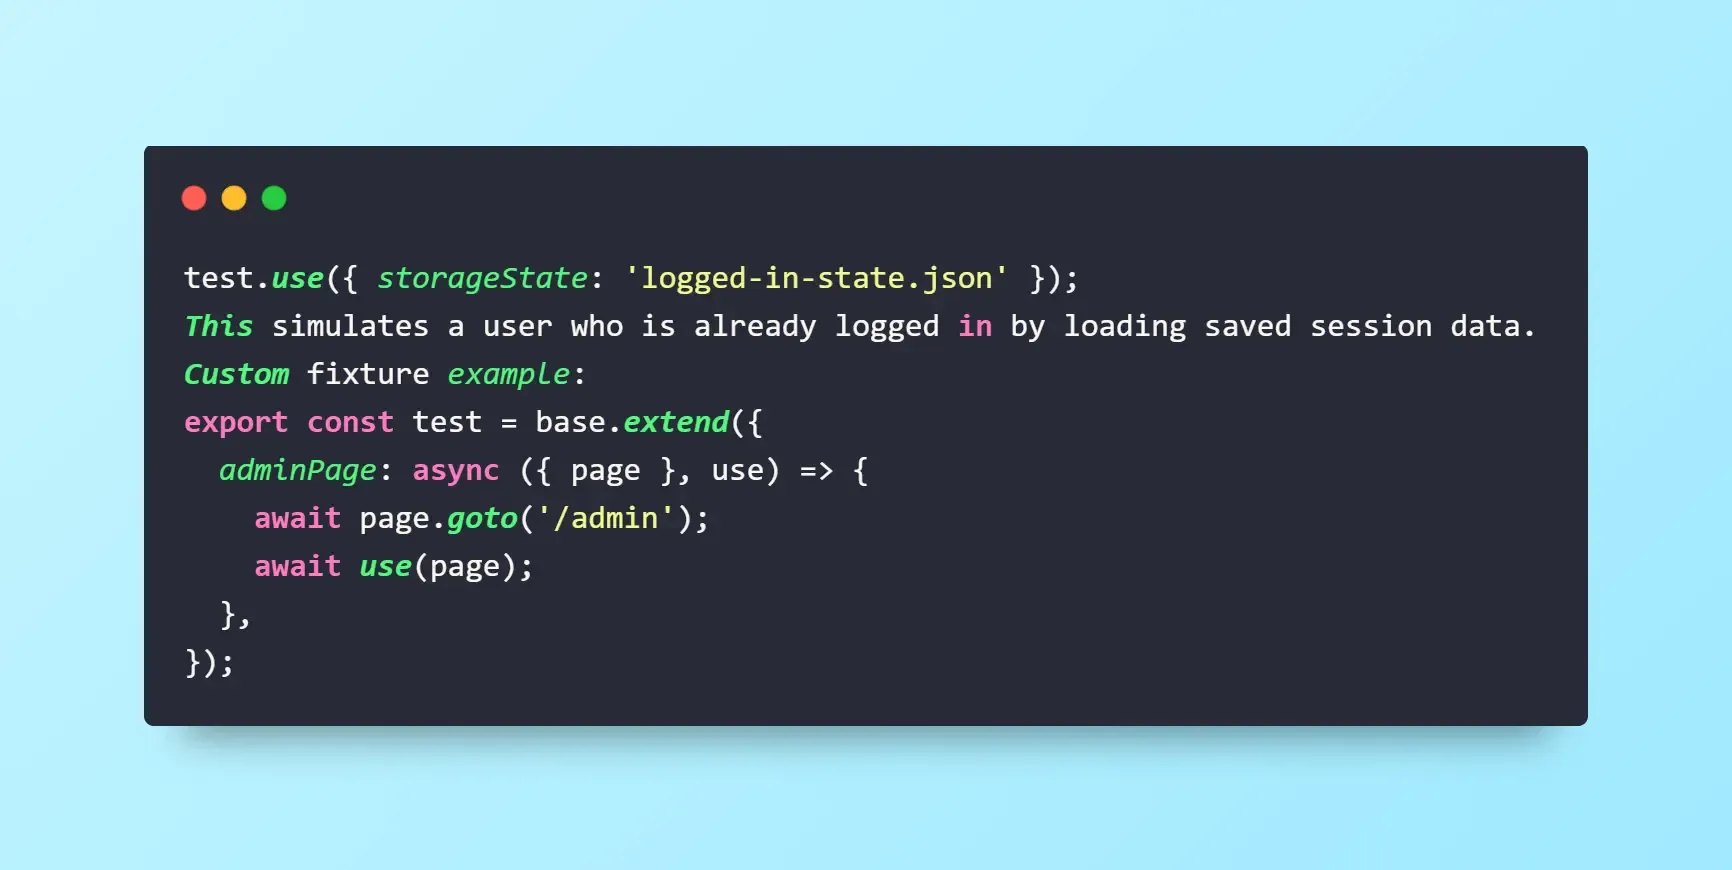
You usually place these in a fixtures.ts file and import them in your tests.
- Scaling Tests in CI/CD: Playwright works seamlessly with Continuous Integration (CI) tools like GitHub Actions.
This means every time someone pushes code, your test suite runs automatically.
Here’s a sample ci.yml config file for GitHub Actions: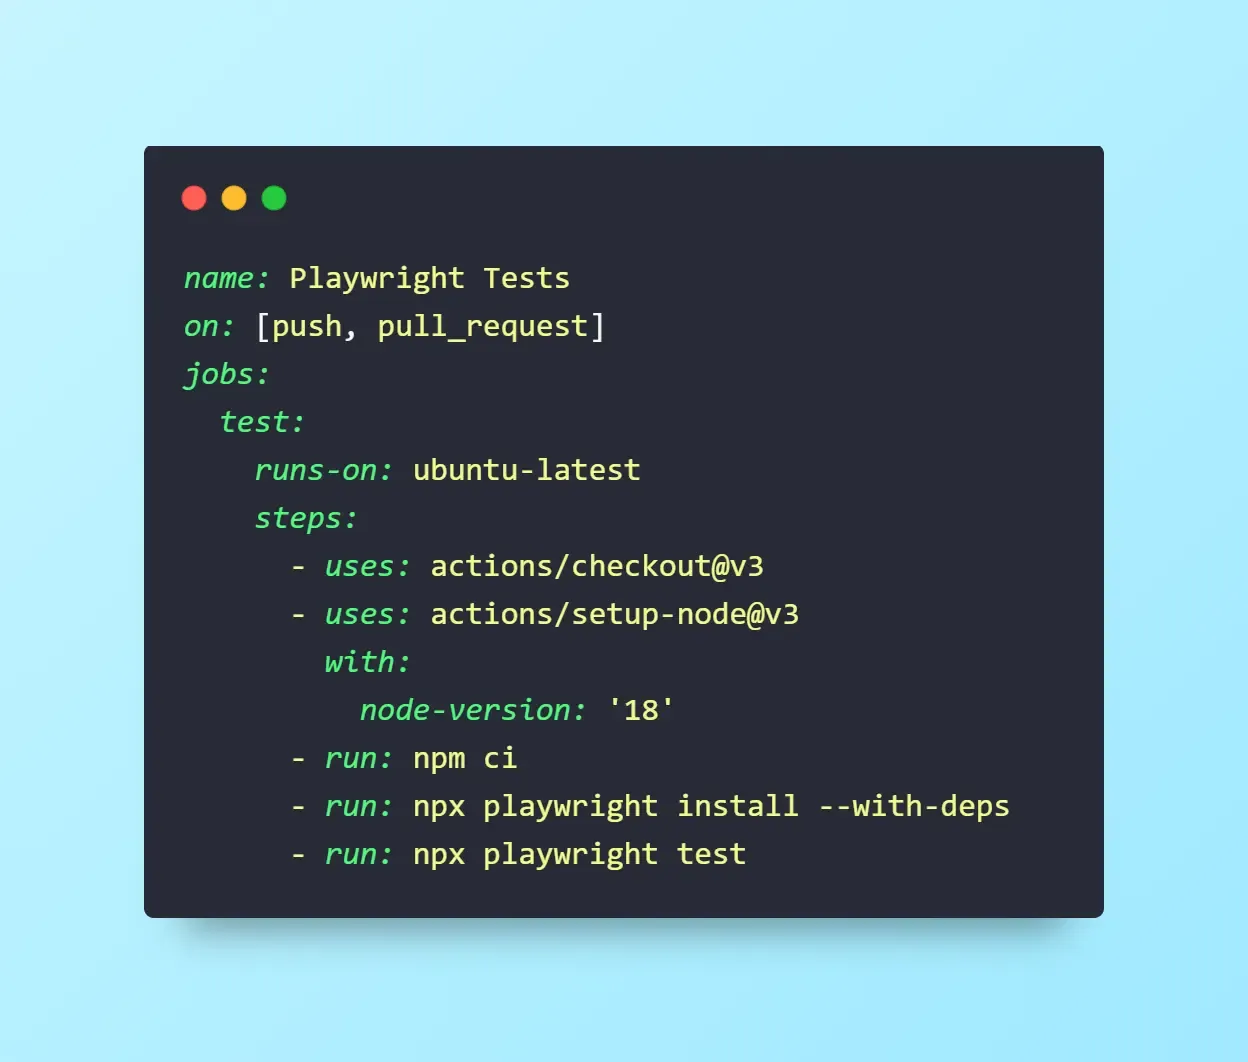
- Share traces and reports in PRs
Playwright generates rich debug info when tests fail:- Screenshots of the failed state.
- Traces you can open with: npx playwright show-trace trace.zip
- HTML reports you can share or view in CI.
This helps your teammates understand failures without rerunning anything locally.
C. For QA / Test Engineers
Your focus might be on coverage, clarity, and ensuring test suites scale as the app grows. Structure, grouping, and decision-making around mocks vs real data matter here.
- Structure tests around features, not files
Instead of grouping tests by technical layer, group them by user-facing features.
Example:
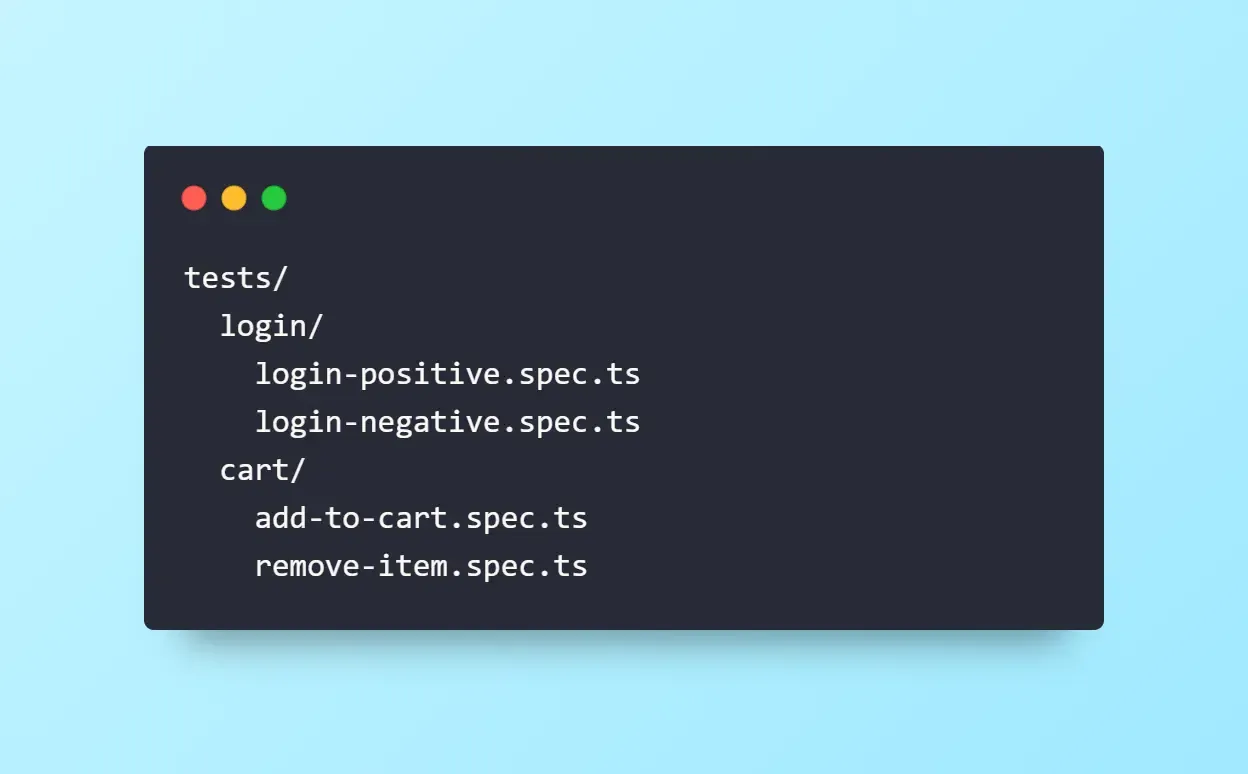
This mirrors how real users use your app, and makes it easier to track what’s tested (and what’s not).
- Use tags or metadata to group tests: You can group related tests using test.describe() or add custom tags to filter test runs.
Example using describe:
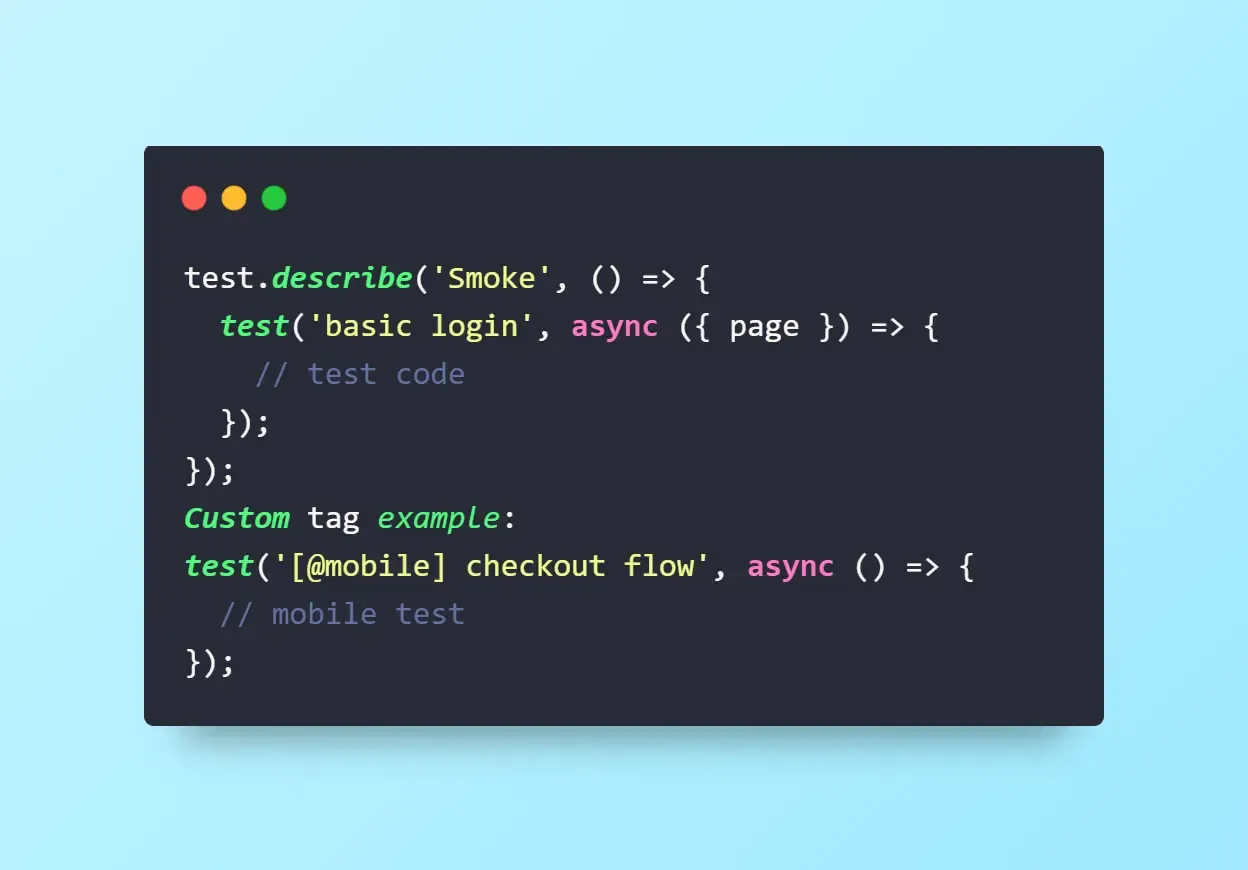
Then you can run just those tests:
npx playwright test -g @mobile
This is useful for Smoke tests, Regression suites, Mobile-only flows.
- When to mock APIs vs use real backend: Mocking and staging both have their place. Here’s how to choose:
Scenario | Use Mocking | Use Staging API |
|---|---|---|
API not built yet | ✅ | ❌ |
Test needs fast, predictable result | ✅ | ❌ |
Testing full user flow | ❌ | ✅ |
Pre-release validation | ❌ | ✅ |
Use mocking when speed and control matter. Use staging when you need realism.
Beyond the role‑based advice already in this guide, consider these:
- Adopt a Page Object Model (POM) to encapsulate locators and interactions for each page. This keeps tests readable and maintainable.
- Manage test data using fixtures or factory functions, ensuring tests run independently and are deterministic.
- Tag critical paths (e.g., smoke tests) and run them on every pull request. Use descriptive names and metadata (@mobile, @regression) for filtering.
- Monitor performance by capturing page load times and network metrics. Slow tests may indicate performance regressions.
11. What’s New in Playwright (2025): Key Features
- Component testing: Playwright can mount and test individual UI components in frameworks like React or Vue.
- UI Mode improvements (v2): Enhanced time‑travel debugging and test exploration tools.
- Network replay: Record network traffic into a HAR file and replay it to test offline or error scenarios.
- Web First Assertions.
- Latest browser engine support.
- User‑data directory reuse: A new --user-data-dir option allows you to reuse browsing state between sessions.
- Partitioned cookie support: You can now save and restore partitioned cookies using the partition_key property when retrieving or adding cookies.
Explore complete list of all latest playwright features here.
Conclusion
Cross-browser testing is no longer optional. With Playwright, you now have:
- Unified testing across Chromium, Firefox, WebKit.
- Full support for mobile emulation, visual testing, and CI/CD and integration with cloud testing services.
- Power tools like Trace Viewer, Inspector Mode, Codegen and snapshot testing.
At ThinkSys, we specialize in delivering enterprise-grade Playwright automation solutions. Whether you’re starting from scratch or migrating from Selenium, our engineers design scalable, maintainable frameworks that integrate seamlessly into your workflows. From cross-browser coverage to performance and accessibility checks — we help you go beyond “it works” to “it works everywhere, every time.
We invite you to explore the official release notes and our own case studies to see how Playwright’s latest features can supercharge your test strategy.
Frequently Asked Questions
- Chromium (Google Chrome, Microsoft Edge)
- Firefox (Gecko engine)
- WebKit (Safari on macOS and iOS)
- Uses native browser protocols → faster execution
- Handles auto-waiting and async events automatically
- Provides advanced debugging (Trace Viewer, Inspector)
- Legacy/older browser support (including Internet Explorer)
- Larger ecosystem and integrations
- Viewport emulation
- Touch events
- Device descriptors (e.g., iPhone 13, Pixel 5)
Share This Article:


