How to Conduct Usability Testing
Imagine opening an app or website and immediately feeling lost. You can’t find what you’re looking for, buttons don’t seem to work the way you expect, and you’re left frustrated. Chances are, you wouldn’t stay long or be eager to return.
This is exactly the experience usability testing aims to prevent. By putting your product in the hands of real users, usability testing helps you see firsthand where things might be falling short or could be improved to keep users engaged and satisfied. This article will guide you on usability testing, when, and how to perform it.
Usability Testing VS Other QA Testing
While traditional QA testing focuses on functionality and technical accuracy, usability testing is all about understanding the user experience. Here’s how usability testing differs and why it adds unique value to your product:
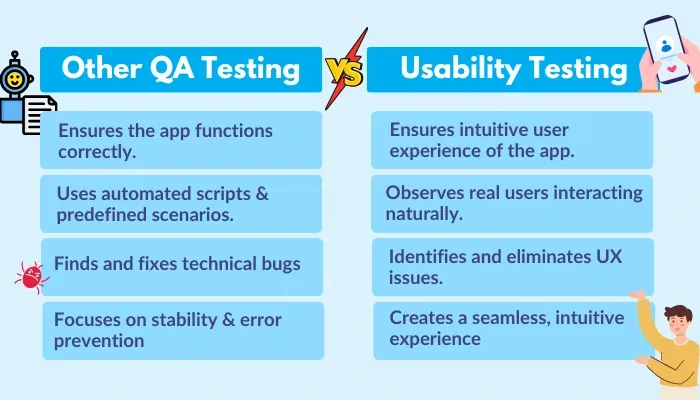
- Focus on User Experience, Not Just Functionality: Traditional QA testing ensures that your app works correctly. However, usability testing takes it one step further to see if users find your product intuitive and easy to navigate.
- Testing with Real Users Instead of Automated Scripts: Most QA testing uses automated scripts to simulate different scenarios quickly. In usability testing, you watch people’s actual reactions, revealing where they might hesitate or get confused and provide insights.
- Emphasis on User-Centered Design Rather than Just Bug Fixing: While QA testing looks for technical bugs, usability testing focuses on experience issues such as confusing layouts or complex setups. It’s less about fixing code errors and more about ensuring a smooth, frustration-free journey for your users.
- Prioritizing Optimization: Other QA testing types take a preventive approach where the goal is to avoid errors, crashes, or breaches. Usability testing is about optimization. It doesn’t just ensure the product works but ensures the product works better for your users.
Different Types of Usability Testing
Depending on the goals and the stage of your product’s development, different usability testing types can provide the insights you need. The top types are explained below so you can choose the right one to make your product user-friendly.
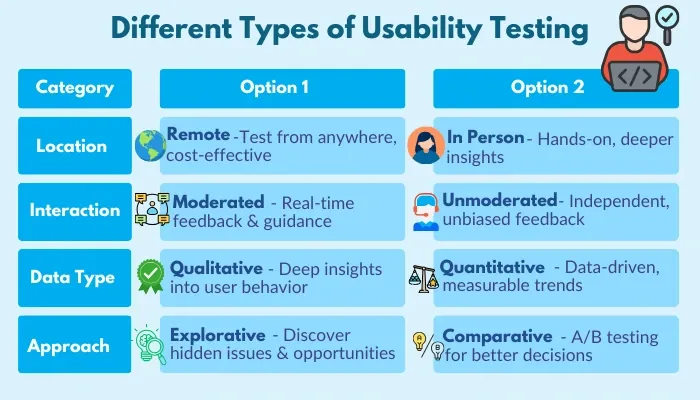
1. Remote VS In-Person
Remote testing allows participants to test your product from anywhere. It’s efficient, budget-friendly, and opens the door to a diverse range of users. On the flip side, there’s nothing quite like the personal connection in in-person testing.
When you need flexibility and broader access, you can go with remote testing. For a more hands-on, detailed understanding of user behavior, in-person testing is the way to go.
2. Moderated VS Unmoderated
As moderated testing is an interactive process, it gives you the chance to ask questions, clarify doubts, and steer conversations toward valuable insights. However, unmoderated testing lets users interact with your product independently, often resulting in raw and unbiased feedback without the ability to intervene in real time.
Go for moderated when deeper interactions are needed. Unmoderated is best when time and budget are limited, and you want users to navigate naturally.
3. Qualitative VS Quantitative
Qualitative testing is about understanding user feelings, struggles, and motivation in detail whereas quantitative testing gives you the numbers and metrics including task success rates or completion times that help identify patterns and trends.
Qualitative is your go-to when the right insights matter while quantitative is ideal for tracking measurable progress and performance.
4. Explorative VS Comparative
When you’re unsure where to begin, explorative testing is your best friend. It helps uncover hidden issues and fresh opportunities by giving users the freedom to explore. In contrast, comparative testing is all about putting two designs or features side by side to determine which resonates more with your audience.
Go for explorative testing when you need problem discovery. However, if you’re down to the final options and need a clear winner, comparative testing is the way to go.
When to Perform Usability Testing?
Knowing the right time to conduct usability testing can make all the difference in delivering a user-friendly app. Here are some common scenarios where usability testing becomes essential.
- Before Launching Your App
Pre-launch usability testing helps you catch issues early, ensuring a smooth user experience from day one. This is your chance to identify and fix problems before they affect your application’s reputation. - After a Major Update or Redesign
Whether you’re rolling out a new feature or giving your app a fresh look, usability testing ensures these changes improve the UX. - When Users Struggle or Leave Negative Feedback
If users complain about navigation difficulties, confusing workflows, or other challenges, usability testing can pinpoint the root of these problems. It provides actionable insights that guide improvements to make your app more user-friendly. - To Evaluate Competitor-Inspired Features
When adopting features inspired by competitors, usability testing ensures these additions integrate seamlessly into your app. It helps you determine whether these features address user needs or complicate the experience. - When Expanding Your User Base
If you’re targeting a new demographic, usability testing ensures your app accommodates different expectations, cultural nuances, and usage patterns, ensuring inclusivity and accessibility.
How to Perform Usability Testing?
Performing usability testing is all about stepping into your users’ shoes and ensuring your app delivers the smooth, and intuitive experience they expect. Here is the step-by-step guide to help you understand the process effectively.
Step 1: Define Your Goals and Target Audience
The first step in performing usability testing is to ask yourself: ‘What do I want to achieve?’. Solid usability testing begins with a purpose, whether it’s enhancing navigation, validating new features, or uncovering hidden frustrations.
Once your goals are set, focus on your audience. Your app’s users are the key to unlocking relevant insights. Consider:
- What are they? Define their demographics, behaviors, and preferences.
- What are their needs? Map out their goals when using your app.
- What challenges do they face? Anticipate where they might encounter friction.
For instance, while testing a fitness app, you need to recruit active individuals who rely on such tools for tracking their workouts. Platforms like UserTesting or RecruitLoop can help you find participants matching your user persona.
Step 2: Choose the Right Testing Method
The method you select shapes how your test is conducted and the insights you’ll gain. Since you’ve already explored the different usability testing types, here’s how you can tailor your approach:
- Budget Considerations: If resources are tight, remote testing can be a cost-effective option. Maze and Hotjar are the top platforms that can help you reach users globally. Larger budgets can go for in-person testing to get more detailed feedback.
- Timeline: Short on time? Opt for unmoderated tests that can run asynchronously. Moderated sessions, while more insightful, often require more scheduling and preparation.
- App’s Complexity: For simple apps, unmoderated tests may suffice. However, if you’re testing a multi-layered system like an enterprise dashboard, a moderated approach ensures testers can clarify any doubts in real time.
- Testing Frequency: Will this be a one-time test or part of an iterative process? Regular usability testing pairs well with agile development cycles, where you can test updates or new features as they roll out.
Additionally, you can combine different methods as required. For instance, start with moderated sessions to uncover in-depth insights, then scale with unmoderated testing for broader feedback.
Step 3: Establish Evaluation Criteria
When you define clear evaluation criteria, you allow yourself to measure the effectiveness of your usability testing and identification of actionable improvements. And, here’s how you can do it:
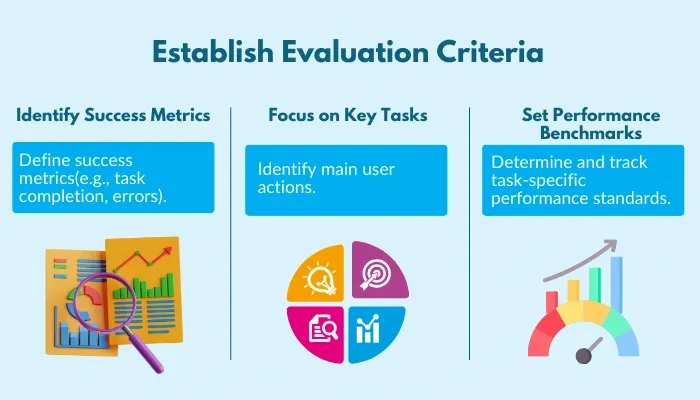
- Identify Success Metrics: Determine what success means for your application. Is it ‘high task completion rate?’ ‘minimal errors?’ ‘faster task times?’ or something else? Align these metrics with your usability goals for better evaluation.
- Focus on Key Tasks: Identify the specific tasks your users are most likely to perform, such as signing up for an account, navigating to key features, or completing a checkout. Break these tasks into measurable steps to ensure nothing is overlooked.
- Set Performance Benchmarks: Define acceptable ranges for each task. For example, if completing a form takes more than two minutes or three clicks, it may indicate a usability issue. Optimal Workshop or Lookback are the top tools to help you track your performance benchmarks.
Step 4: Set Up Your Testing Environment
Creating a reliable testing environment helps ensure that your participants interact with your app in a way that mirrors real-world conditions while eradicating unnecessary distractions.
You need to consider:
- Consistency: Standardize aspects such as login credentials, network speed, and app versions to ensure every participant experiences the same environment.
- Distraction-Free Setup: Avoid interruptions by testing in a quiet space. Encourage participants to turn off notifications or other background apps during the session.
- Accessibility: Test setups should account for users with varying needs. For example, you can include screen reading tools such as NVDA, JAWS, or VoiceOver, and Dragon NaturallySpeaking voice navigation tools for accessibility testing.
Step 5: Start with a Pilot Test
Running a pilot test is a necessary step to refine your usability testing process before moving to the main test. By performing a pilot test, you can identify gaps or issues in your setup and ensure everything functions as anticipated. Follow these steps to conduct an effective pilot test:
- Begin by selecting one or two individuals from your organization who closely match your target audience. These participants should represent the characteristics of your end users but may not necessarily be part of your final usability testing group.
- Demonstrate participants through the tasks and scenarios you’ve designed for testing. Moreover, pay attention to whether they understand the instructions, complete the tasks logically, and interact with the product as expected.
- Make sure that the tools you use in testing work seamlessly. Moreover, for in-person tests, confirm that the physical setup such as AV devices is ready to capture data.
- Use the feedback from this trial run to adjust unclear instructions, resolve technical issues, or modify test scenarios.
Step 6: Shortlist Participants for Testing
Recruiting participants who align with your target audience is one of the most critical parts of usability testing. These individuals will provide the insights you need to enhance UX.
- Start by identifying the characteristics your participants should have such as age, profession, technical expertise, or specific habits. For instance, if you’re testing a fitness app, you may look for individuals who regularly track their workouts.
- Recruitment platforms like UserTesting, Respondent.io, and UserInterviews are excellent to help you connect with participants who match your criteria.
- Create a brief questionnaire to filter participants and ensure they meet your criteria. You can include questions related to their familiarity with similar products or their ability to perform tasks relevant to your app.
Step 7: Conduct the Test
Now that you’ve gathered all the required resources and participants, the time has come to perform the test. Welcome your participants with a friendly introduction, explaining the purpose of the test.
Let them know the app is being evaluated, not their skills, helping them ease nervousness.
As they need to complete several tasks such as navigating a specific menu or performing a dedicated action, it is best that you give them clear instructions beforehand. While they work through the tasks, stay in observation mode and encourage them to think aloud.
Step 8: Collect and Evaluate the Feedback
Once your usability tests are complete, it’s time to dive into the data and extract meaningful insights.
- Organize Your Data: Compile all your observations, notes, and recordings in one place with tools like Dovetail or Trello.
- Identify Trends and Patterns: Review the feedback closely to spot recurring issues. mFor instance:
- Did multiple users struggle with the same feature?
- Were there specific tasks that consistently caused confusion?
Group these patterns by frequency and severity as issues affecting a majority of users or preventing task completion should be priorities for further action.
- Map Feedback to Your Goals: Revisit the objectives you defined at the beginning of the process. For instance, if your goal was to evaluate the app’s ease of navigation, focus on feedback that directly relates to this. Doing so ensures that your analysis stays aligned with your priorities.
- Focus on Qualitative Insights: You need to pay close attention to what participants said and did during the test:
- What were their verbalized frustrations or moments of hesitation?
- Did they make unexpected choices while completing?
Use these qualitative insights to understand user intent and uncover pain points that quantitative metrics might not fully explain.
- Categorize Issues by Impact: Break down problems into levels of urgency:
- Critical Issues: Problems that block essential functionality such as users failing to complete core tasks.
- Moderate Issues: Frustrations that don’t stop users but negatively impact their experience.
- Low-Priority Issues: Minor inconveniences such as inconsistencies that don’t hinder usability.
- Formulate Actionable Recommendations: Use your findings to provide actionable suggestions for improvement of your app. For instance:
- If users struggle to locate a button, recommend repositioning or redesigning it.
- If navigation feels clunky, suggest streamlining the menu structure.
- Create a Report: Summarize your findings in a concise report for your team. Include:
- Key insight from the test.
- Visual data like graphs, heatmaps, or screenshots highlighting issues.
- A prioritized list of recommendations.
Step 9: Implement Changes and Retest
With all the feedback in hand, it’s time to turn insights into action. You need to address the most critical issues first.
Once the changes are made, give them a test run internally so that you can catch any unexpected glitches or oversights. Then, take it back to your users. Retest the update app, focusing on the areas you’ve improved.
Finally, compare the new results to your original findings. Have the updates made a real difference? This step is all about ensuring your hard work translates into a truly user-friendly app.
The Future of Usability Testing
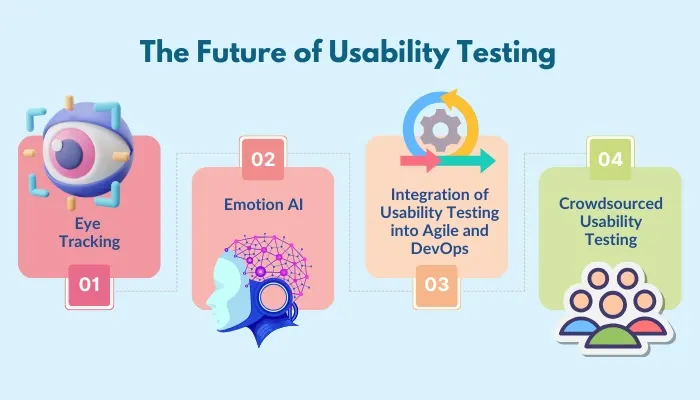
Usability testing is stepping into the future with groundbreaking trends that are reshaping how businesses connect with users. This section will guide you on what’s new in usability testing, why these shifts are happening, and how they can benefit your usability testing efforts.
1. Eye Tracking
Eye tracking involves monitoring where users look while interacting with your application using specialized tools such as Tobii Pro or iMotions. It captures data on visual attention, showing which parts of your interface draw focus and which are ignored.
Whether users are struggling to find an important button or completely missing a key feature, this technology highlights critical blind spots. With these insights, you can confidently optimize your app’s design.
For instance, you’ll know where to place your CTAs or how to arrange your layout for maximum clarity. The outcome will be a user-friendly experience that reduces friction, boosts engagement, and makes navigating your app feel intuitive.
2. Emotion AI
Emotion AI, also known as affective computing, analyzes facial expressions, voice tones, and physiological signals to determine users’ emotions while interacting with your app. With competition soaring, understanding not just what users do but how they feel is a game-changer.
This technology allows you to identify moments of frustration, delight, or confusion. By addressing these emotional cues, you can create an app experience that resonates on a personal level, fostering loyalty and improving satisfaction.
3. Integration of Usability Testing into Agile and DevOps
Rather than treating usability as a separate or final step, teams have started to integrate it into their continuous development and deployment cycles. By incorporating usability checks early and consistently, teams can catch and address user experience issues as they arise. Furthermore, organizations have witnessed a reduction in costly redesigns and enhancement in collaboration among teams.
4. Crowdsourced Usability Testing
As the need for diverse feedback increases, crowdsourcing has become a go-to method for usability testing. It’s more cost-effective and faster than traditional testing, plus it provides insights from actual users rather than relying on in-house testers. This broadens the scope of testing and makes it possible to identify issues you might have missed with a smaller, less varied test group. Crowdsourcing lets you quickly gather insights from a wide range of real users, ensuring your product is optimized for everyone.
Conclusion
Whether you’re refining existing features or preparing for a groundbreaking launch, leveraging usability testing empowers you to create experiences your users will love. All you have to do is follow the process and make necessary alterations as per your application for the best outcome. However, if you’re stuck anywhere, feel free to connect with a professional usability testing company to guide you in the right direction.

How do I know if my app needs usability testing?
- High bounce rates
- User complaints
- Difficulty navigating your app
Share This Article:


