Andorid App Testing Checklist 2026
With over 70% market share in smartphones, you’re most likely to meet a person using an Android smartphone. The primary reason for this vast market share is its open-source nature. However, this same perk increases the complexity during testing when compared with iOS. Combine that with device fragmentation, and testing becomes incredibly tedious—making a well-structured Android testing checklist essential for ensuring app quality across devices and OS versions.
Why Is Android App Testing More Complex?
- Open-source flexibility = fragmentation: Unlike iOS, Android’s open nature means device manufacturers customize the OS and UI, leading to inconsistencies.
- Thousands of devices in market: From budget phones to foldables, testing must ensure stability across screen sizes, chipsets, and custom skins.
- Frequent OS updates: Apps must remain compatible with newer Android APIs without breaking on older versions still in use.
Must Read: Essential iOS testing checklist 2026
1. Setting Up Your Android App Testing Environment
Modern testing is all about minimizing time consumption and maximizing efficiency. With that in mind, testing is not left for the later stages, but is considered during the development phase. By understanding the development environment requirements for Android app testing, you ensure that the environment is configured correctly, helping you catch bugs early, improve app quality, and streamline your release process.
- Android Studio Testing Tools: What’s Included?
Android Studio is the official integrated development environment (IDE) for Android applications. Without a doubt, it is effective and comes with tons of features. Additionally, it comes with several built-in tools that help you prepare and perform testing for a stable app across all Android devices.- JUnit: When it comes to a testing framework for Java, JUnit is the one you can rely on. Though it’s a general-purpose testing framework, Android Studio configures it to run unit tests within your project’s local Java Virtual Machine (JVM). Due to this, testing becomes faster, allowing for quick feedback during development.
- Espresso: The user interface plays a crucial role in the success of any mobile app. With Espresso, Google’s official UI testing framework for Android, you can build, run, and debug tests directly within Android Studio. Moreover, this framework can sync test actions with the UI thread of the app under test automatically, minimizing the common problem of test flakiness in UI testing.
- Logcat: Logging helps you keep track of changes and diagnose issues, allowing testers to identify problems efficiently. For that, you have Logcat, the primary real-time logging and debugging console for Android development. With this tool, you can understand the runtime behavior of your app, diagnose errors, track the execution flow, and identify the cause of crashes.
- Performance Profilers: To run effectively and efficiently, apps utilize the desired resources. With Android Profiler tools, you can get real-time data and insights into your app’s resource consumption while it’s running on an emulator or a connected device. These tools include a CPU profiler, memory profiler, network profiler, and energy profiler, which provide information on your app’s CPU usage, memory allocation, network activity, and energy consumption, respectively. Using this information, you can identify performance bottlenecks, optimize resource usage, and ensure a smooth and efficient user experience.
- Emulator Configuration: Best Practices
Android has thousands of device variants from different brands. And these brands not only release a single device each year, but a series of devices, which may number up to fifty releases in a single year. This vast array of devices makes it impossible for the tester to test on every real device. That is why emulation is the preferred approach. Due to the diversity of devices, it is best to follow the industry-wide practices for quicker and accurate testing.- Cover a Broad Range of Android Virtual Devices (AVDs): The first step in emulating your Android app is to create an AVD, which involves setting specific hardware and software configurations. One of the best things you can do here is to develop and maintain a variety of AVDs that reflect your target audience. To cover a range of target groups, you need to emulate different Android API levels, screen sizes, different RAM sizes, and high-end and low-end devices. By doing so, you’re covering the majority of device types, ensuring consistent performance across the Android ecosystem.
- Leverage AVD Snapshot: Every time you open an AVD, it restarts the OS and app on the virtual device. Rather than following this process, the emulator allows you to skip this step and open the app directly. For that, you need to create a snapshot of the app, which retains the application’s state at which the snapshot is saved. Launching an emulator from a snapshot takes seconds, drastically reducing the startup time compared to a full cold boot.
- Use Hardware Acceleration: Emulators run on computers, and they are more powerful than smartphones. With that in mind, it is natural that they offer better testing performance. Wrong. Even though they are powerful, their ‘high-performance’ mode isn’t activated by default. To achieve high performance, you need to install and enable HAXM for Intel processors and KVM for AMD processors running on Linux. These hypervisors enable the emulator to utilize the host CPU's virtualization extensions directly, resulting in significantly improved emulator execution speed and graphics rendering.
- Physical Device Lab Setup
Every expert tester recommends testing applications on both emulators and physical devices. When compared to emulation, testing on physical devices is considered tedious and resource-intensive, as you need a variety of devices. However, the outcome of these efforts is the identification of bugs that are prone to being missed by emulators.
To truly cover the broad range of users, understanding how to test across Android device versions is paramount, as having only one or two devices may not be sufficient to get the job done. You need various devices for appropriate test coverage. A physical device lab is a testing facility equipped with the necessary infrastructure for thorough testing. However, you need to put in the right efforts to identify and eradicate bugs. The following are the top recommendations for achieving the highest effectiveness from physical device lab testing.- Device Management and Automation: Managing the devices efficiently is just as crucial as acquiring them. Installing builds, rebooting devices, clearing app data, or capturing logs are repetitive tasks that can be automated using Android Debug Bridge (ADB) scripting. Additionally, you can utilize open-source test lab management tools, such as Smartphone Test Farm, for multi-user control, or opt for enterprise-level platforms like Kobiton, HeadSpin, or others if scalability and advanced telemetry are required.
- Maintain Test Hygiene: Test device maintenance is an essential aspect, ensuring a reliable test outcome. Maintaining these devices involves clearing the cache, rebooting, updating, and ensuring sufficient disk space is available. When performed weekly, these tasks will keep the test devices up and running with optimum performance. Furthermore, it’s recommended that you perform battery health checks, run diagnostics, and reset devices to factory settings monthly to eradicate test residue.
- Supplementing with Cloud Device Labs: Although a physical lab offers excellent control and realism, it should be complemented with cloud-based testing services such as Firebase Test Lab, AWS Device Farm, or BrowserStack App Live. These platforms allow you to test on region-specific devices, simulate varied network conditions, and validate compatibility with uncommon OS versions without the need to purchase or maintain the hardware.
- Beta Testing on Google Play
- How to Launch a Closed or Public Beta?
When you believe that your app is relatively stable and free from issues that may hinder its core functionality, you can proceed to beta testing. Google allows you to release your app for private or public users. Closed beta or private testing involves pre-release versions with a wider, controlled group of trusted users, often representative of your target audience. In contrast, a public beta involves running a test with a potentially large group of real users, making your app's beta version discoverable on Google Play.
However, users can only join the closed beta by receiving an invitation from the developer via email or a URL. On the other hand, apps for public beta are released directly on the Google Play Store. But that’s not all.
- Beta Testing Requirements:
You need to know the following requirements for successful beta testing of your Android app.- Google Play Developer Account: Every app released for private or public testing using Google Play needs to have an active Google Play Developer account. If your account is created after November 13, 2023, you must have at least 20 testers who must remain active on the app for 14 consecutive days or more.
- App Preparation: Your app should be ready or, at the very least, offer core functionality without critical bugs that prevent basic usage. Also, you will need a signed Android App Bundle or an APK (if your app already exists), along with a detailed privacy policy if your app requires access to user data.
- Google Play Console Setup: Google Play Console is the place where you can access your app’s information or add a new app. For beta testing, you need to set up this console, where you will add the app name, description (both short and full), icon, feature graphic, screenshots, and a video (optional). You can also set pricing for your app, but keep in mind that it will remain free for everyone downloading this app for beta testing.
- Determine Closed or Public Beta: As mentioned above, Google allows developers to release a closed or public beta of their app. If you’ve opted for a closed beta, you need to send invites to users using their email addresses or by sharing the URL. However, if it’s public or beta, users can download the app directly from the Play Store. Every beta testing app will have a notice stating that this is a pre-release version of the app.
- How to Launch a Closed or Public Beta?
2. Android Platform Validation
As Android is highly fragmented, with thousands of unique device configurations and multiple OS versions actively in use, Google aims to establish a standardized design language, thereby ensuring a better customer experience. Android Platform Validation aims to achieve this, where developers should ensure that their app aligns with the technical, behavioral, and UX standards defined by the Android ecosystem. In addition, it provides compatibility and stability while also ensuring that your app adheres to Android’s evolving best practices, Google Play policies, and system-level constraints.
- Material Design Compliance Checklist
Users want a predictable design across applications, enabling them to navigate the UI with ease. By keeping that factor in mind, Google has introduced Material Design, a set of guidelines that developers can follow to create a consistent design for their applications. Even though these guidelines are not mandatory, it is recommended to follow them for intuitive visual design and UI elements.
The following are the key elements of Material Design compliance:- Typography: Material Design defines a comprehensive type scale that includes various font sizes and styles designed for different purposes within an app's UI. Google's default typeface for Material Design is Roboto (for Android and the web), or Google Sans for select branding purposes, ensuring readability and a clear visual hierarchy. Materials Design offers presets for font weights, line height, letter spacing, and character count per line to enhance readability and visual balance across various screen sizes.
- Color Palettes: Your application should have a dedicated color theme and palette that supports your brand. Google provides tools like the Material Theme Builder to help create accessible and harmonious color palettes based on brand colors, ensuring sufficient contrast for readability, especially for text and icons. Keep in mind that you need to select a primary color, a secondary color, and corresponding darker and lighter variations of each.
- Motion and Animation: Material Design emphasizes meaningful motion that guides the user's attention and provides intuitive feedback, making interactions feel natural and responsive. The added motion should have a motive behind it, rather than being unnecessary and distracting. Furthermore, it should follow a hierarchical approach, where the motion originates from the input.
- Iconography: The icons are divided into three categories: product icons, system icons, and animated icons. Google offers a comprehensive library of Material Icons that adhere to Material Design guidelines. The specifications cover icon size (commonly 24dp for interactive elements), stroke weight, consistent visual style, pixel grid alignment, and negative space to ensure clarity and legibility across various resolutions and contexts.
- Android Version Compatibility
Android is the most widely used mobile operating system worldwide. Being an open-source OS, several original equipment manufacturers (OEMs) utilize Android for their products, increasing the device variations. Furthermore, OS upgrades rely on manufacturers, leading to delays or no updates for existing devices. All these factors contribute to the extended fragmentation of Android devices, enhancing complexities in compatibility testing.
To ensure the utmost device coverage of your app, you need to know about the following regarding Android fragmentation testing:- OS Version Compatibility: Android 16 is the latest Android version, having been released in June 2025 for Google Pixel 6 and newer devices. While Android 15 was the preceding version, many devices have not yet been updated to it due to manufacturer limitations or the end of support for these devices. Not just that, but several devices are running older OS versions that can be traced to Android 7.
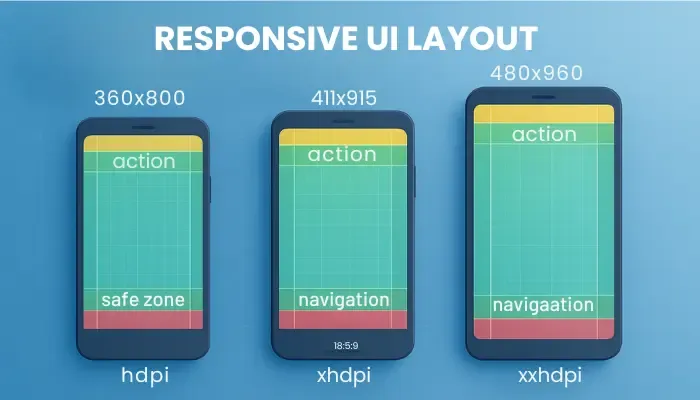
With over 8 OS versions, the compatibility of an app with every version becomes tedious. Google has the Google Platform APIs for developing Android apps. To ensure compatibility with your app, you ensure that the app behaves consistently across all targeted Android API levels, ideally from API 24 (Android 7.0) to API 34 (Android 14). You must validate Runtime permission behavior (API 23+), Doze and App Standby (API 23+), Scoped Storage (API 29+), Foreground Service Requirements (API 31+), Notification Permission (API 33+), and Predictive Back Gesture (API 34+) for enhanced compatibility with all leading devices. - Screen Sizes and Form Factors: Android devices come in various screen sizes to cater to the diverse needs of different users. When it comes to testing the compatibility with these devices, you need to validate responsive UI layouts on small phones, large phones, foldable phones, and flip phones. Using Android Studio Layout Validation, you can test your app on various view orientations, including portrait and landscape views, split-screen modes, and resizable modes.
- OS Version Compatibility: Android 16 is the latest Android version, having been released in June 2025 for Google Pixel 6 and newer devices. While Android 15 was the preceding version, many devices have not yet been updated to it due to manufacturer limitations or the end of support for these devices. Not just that, but several devices are running older OS versions that can be traced to Android 7.
- Permission Testing Strategy
From necessary permissions to optional permissions, Android apps require user consent to access specific data. Some permissions may be automatically granted during installation (install-time permissions), whereas others may require confirmation from the user (runtime permissions and special permissions). Install-time permissions can only be those that grant limited access to the app without affecting other installed apps or the system.
On the other hand, runtime permissions or dangerous permissions include storage, microphone, camera, or any other permission that affects the functioning of other installed apps or the system as a whole. The platform and the OEM define special permissions, and they may affect the system's functioning.- Permission Declaration: It’s fundamental to understand that every permission your app needs must be declared in its AndroidManifest.xml file, the OS’s initial reference point of your app’s capabilities. However, over-permissioning can raise security concerns and may lead to rejection from the Google Play Store. Also, Android has constantly upgraded the permission mechanism with each OS release. You need to test version-specific permissions (READ_MEDIA_IMAGES for Android 13+ vs. READ_EXTERNAL_STORAGE for older versions) to ensure that your app follows the right permission model for each Android version.
- Runtime Permission Requests: Google introduced Runtime Permissions (aka dangerous permissions) with Android 6.0 Marshmallow. These permissions are granted at runtime, rather than during installation, transforming permission handling into a critical user journey. The user can accept or deny the permissions. In some apps, users have the option to grant limited access or request permission each time a session is started. You need to verify the app’s behavior at every step: when the system permission dialog first appears, how the app reacts if the user grants permission, and how it handles denial. In case of denial, the app should explain why the permission is needed. If the user denies it, the app must not keep prompting directly, but guide the user to allow permissions through Settings. In addition, make sure to validate that the app gracefully adapts if a user revokes a permission directly from system settings, ensuring no crashes.
- Special Permission Requests: Unlike Runtime permissions, these cannot be requested through a popup or dialog. Rather, they require users to manually provide permission through Settings. Here, your app should redirect the user to a specific screen within the system settings for manual approval. Test the entire flow, confirming the app successfully redirects the user, accurately detects whether the permission was granted or denied after the user returns, and ensures the associated app functionality performs correctly based on the user’s choice.
- Background Processing Testing
Android has tightened restrictions on background processing to conserve battery life and system resources with newer releases. Apps need to integrate dedicated APIs to ensure issues such as missed notifications, data inconsistencies, and other silent features are avoided.- Android's Background Execution Limits: Doze mode (Android 6.0) and App Standby Buckets (Android 9+) are Android’s power management features that restrict what apps can do in the background. The former defers CPU and network activity when a device is unused for a long period, bundling background tasks into maintenance windows. On the other hand, the latter categorizes apps based on usage frequency, with stricter limits on less-used apps. Testing should involve understanding these system-level behaviors as they directly influence when and how background tasks execute.
- Testing with JobScheduler and WorkManager: Android’s recommended APIs for deferrable background work are JobScheduler and WorkManager. Using these APIs, apps can schedule tasks based on network availability, charging status, device idleness, and other system conditions. It’s crucial to test that tasks scheduled via WorkManager or JobScheduler actually execute when their defined constraints are met, even if the app isn’t actively running. In addition, verify that the tasks do not run when their constraints are not met. One of the most important checks to ensure that your app is approved for the Google Play Store is to test that background work can be cancelled correctly by the app when no longer needed.
- Foreground Services: When your app needs to perform a task that is noticeable to the user and must continue uninterrupted even if the app goes to the background, it should use the Foreground service. Every app that uses foreground services must display a persistent notification to the user, showcasing that the app is performing active background tasks. Your testing should ensure that the notification appears correctly, users can interact with the notification, and the notification goes away when the app is closed. Newer Android versions require declaring the foregroundServiceType in the manifest. Make sure that the declared types match the service’s actual functionality.
- Google Play Store Readiness Checklist
Before an app can be published on the Google Play Store, it undergoes stringent checks that involve a combination of automated checks and human reviews. The motive is to ensure that the app is secure, provides the claimed functionality, and meets the quality standards of Android. Comprehensive mobile app store submission testing is crucial to ensure that it meets the Google Play Store criteria successfully. To submit an app for review, you first need a Google Play Console Account, which comes with a one-time registration fee of $25. In addition, you need to follow the following submission requirements to list your app on the Google Play Store.- User Data & Privacy Policy Verification: Google Play focuses strongly on user privacy and data transparency. Regardless of whether the app accesses sensitive user data or not, it must have a clear and comprehensive privacy policy. However, apps that do access such data need to ensure that an active privacy policy URL is provided in the Play Console and within the app and disclose what user data is collected, how it’s used, and with whom it’s shared. Also, the Data Safety section in Play Console is filled out accurately and completely, matching the app’s data collection and sharing practices.
- Core App Quality: Google Play expects a baseline level of quality for all submitted applications. What you need to know here is that Google monitors Android Vitals metrics that impact user experience and app discoverability.
- Minimum Functionality: Rather than submitting a half-baked app, your app should be finished and provide a clear and engaging user experience.
- Application Not Responding (ANR): The ANR rate is the percentage of daily active users who experience a crash while using the app, whereas user-perceived ANR occurs when the app freezes or crashes after the user has input. As per Google, the user-perceived ANR rate should be less than 0.47% across devices and 8% per phone model.
- Battery Usage: Any app that drains too much battery will never be the user's preference. Google understands this and assigns low rankings to any app that consumes excessive battery.
- Target API Level: With every Android update, a new API is introduced for the corresponding Android version. Google periodically requires apps to target a recent Android API level to ensure they leverage the latest privacy, security, and performance optimizations. With that in mind, your app should meet the correct API level requirement for the specific Android version. Make sure that the app’s targetSdkVersion in the build.gradle file meets or exceeds Google's latest mandate.
- Store Listing and Promotional Assets: The app's presence on the Google Play Store is crucial for discoverability and user acquisition. It's essential to verify that all store listing assets comply with guidelines and accurately represent the app.
- The app name (max. 30 characters), short description (max. 80 characters), and full description (max. 4000 characters) should be accurate, relevant, and free from misleading keywords, adhering to the character limits.
- As misleading or low-quality visuals can lead to rejection, you need to add the app icon (512x512 px, PNG, max 1MB), a minimum of 2 screenshots, a feature graphic (1024x500 px), and a promotional video.
- Confirm that the app has an appropriate content rating, determined by completing a questionnaire in Play Console.
- The developer contact information should be provided in the Play Console so that users can reach out to you if they need support.
- Advertisements and Monetization: When it comes to monetizing your app, you can take several routes. You can offer a paid app, subscriptions, in-app purchases, run advertisements, or combinations of different methods. When submitting the app, you must define whether your app will be free or a paid app. Keep in mind that you cannot change the pricing once you decide to offer your app for free on the Play Store.
For in-app purchases, you need to verify that all digital goods and services are processed through Google Play's billing system. Furthermore, thoroughly test the purchase flow, subscription renewals, and cancellation processes to ensure a smooth checkout experience.
If you’re running ads, they shouldn't interfere with the app's functionality, be appropriate for the app’s content rating, and shouldn’t lead to deceptive practices.
3. Android Device-Specific Testing
Even with robust platform validation, an Android app’s true quality is often revealed by testing on various devices. As stated above, Android has thousands of different devices with unique hardware. But that’s not all. Unlike Apple, there are many manufacturers of Android devices, and many of them add their custom touch on top of the base Android OS.
- Manufacturer Customization
Almost every major Android device manufacturer has a custom skin on top of Android. The top custom UI skins include One UI by Samsung, OxygenOS by OnePlus, MIUI by Xiaomi, ColorOS by Oppo, Xperia UI by Sony, and Nothing OS by Nothing. Some companies add minimal customization, such as Xperia UI, whereas others prefer to add numerous personal touches. Your testing approach should include various devices from all manufacturers, ensuring that manufacturer-specific customizations don’t affect the functionality of your app.
Make sure to pay attention to the following:- UI/UX: OEMs invest heavily in creating a distinct look and feel for their devices, which includes custom launchers, notification panels, navigation gestures, fonts, and quick settings menu. Though designed to adhere to Material Design guidelines, your app’s UI elements might encounter visual glitches on these UIs. Your testing should also focus on UI consistency, layout integrity, and interaction responsiveness of a diverse set of OEM devices. Verifying button placement, text truncation, font rendering, and image scaling are essential tests to perform on your app.
- Background Process Management: Adding a custom skin requires resources, which ultimately consumes more memory and battery. To tackle this, these UIs have background process management systems, a more aggressive version of Android’s Doze mode, and App Standby. These preserve battery life by killing or restricting apps running in the background. To ensure that your app is unaffected by this, you need to simulate scenarios where the app is moved to the background for extended periods, the device is idle, and battery saver is activated. Your app should remain open and functional in the background after each test.
- Custom API Extensions: Manufacturers don’t just add visual elements. Many have unique functionalities that involve their proprietary APIs. While these can be beneficial for developers targeting specific OEM devices, they can also introduce complexity for general app compatibility. The app must be tested to ensure it coexists harmoniously with OEM-specific features without causing conflict, crashes, or functional impairment. Features such as split-screen, small windows, alternative app stores, specific gestures, or any other OEM-specific feature should be tested for enhanced stability on devices running custom UIs.
- Screen Size and Density Variability
Android caters to a wide range of screen sizes and resolutions, which increases testing complexity. From a small 4-inch display to a large 15-inch tablet, your app should perform the same, if not better, on all the screen sizes. Understanding these variations is paramount to ensuring a consistent, aesthetically pleasing, and usable app experience for all users.Visual Elements: Your UI is the first thing that will make or break the connection between the user and your app. With that in mind, ensure that all UI elements function as anticipated. Using Jetpack Compose, Espresso, or any other UI testing tool, you can test your app and analyze how the UI elements are displayed on different screen sizes. Android has the following size classes to test the adaptive layout of the app.
Size Class Breakpoints Compact Width Width <600dp Medium Width 600dp ≤ width < 840dp Expanded Width width ≥ 840dp Compact Height height < 480dp Medium Height 480dp ≤ height < 900dp Expanded Width height ≥ 900dp - State Restoration: Users frequently rotate their devices and use multi-window mode. These actions trigger configuration changes where the Android system may destroy and recreate the app’s Activity. State restoration refers to the process of preserving and restoring the user's UI state and any transient data when an Activity is recreated due to a configuration change. A stable app should restore state whenever a change is made. Moreover, you use StateRestorationTester in Jetpack Compose to perform a configuration change. You have to ensure that your app does not crash when changing configuration, including rotation and resizing.
- Hardware Feature Availability
Android is not just a versatile but a competitive market where companies are in a rivalry to maintain uniqueness while giving users the features they want. Manufacturers often release their products with specific hardware or accessories. For instance, ASUS ROG, a gaming smartphone series, comes with triggers. Testing your app for such features is crucial to ensure that your app does not crash when any of these hardware components are used.- Alert Slider: Some devices, primarily OnePlus devices, feature a physical three-position slider that allows users to switch between ring, vibrate, and silent modes without unlocking the device. As it bypasses software controls, any app that provides sound or vibration feedback must react correctly to these system-level changes. You need to test that the app’s audio input and vibration feedback correctly adapt or silence the moment the slider position is changed. Also, ensure that your app’s notifications respect the selected alert mode.
- Shoulder Triggers: Gaming phones often come with ultrasonic or pressure-sensitive buttons placed on top or side edges of the smartphone, mimicking controller shoulder buttons. Though designed for gaming, they can be mapped for other functions. For gaming apps, verify that the in-game actions correctly map to the physical triggers and respond reliably to single presses, holds, and rapid presses. On the other hand, accidental presses of these triggers on non-gaming phones should not trigger unintended actions or interfere with standard touch input.
- Dedicated Camera Buttons: The Sony Xperia series is known for being camera-centric, and several Xperia phones feature a physical camera button on the side. By default, this button opens the camera and captures the image. If your app includes an internal camera feature, test whether the physical button correctly triggers focus and photo/video capture within your app's interface.
- Foldable Displays: Probably the most advanced hardware functionality in all smartphones, the foldable displays are not just eye-catching but allow the screen to fold or unfold, dynamically changing its size and form factor. The physical folding and unfolding actions trigger significant configuration changes that the app must immediately and seamlessly adapt to. To ensure seamless transition from small to big screen, you need to test the app’s behavior during the act of folding and unfolding the device, launch the app on each display, and try a partial fold.
- Memory and Performance Constraints on Lower-End Devices
Not every processor is high-performing in Android devices. To cater to the requirements and budget of every user, manufacturers provide phones with less RAM, slower processors, limited storage, and smaller sensor cameras. These specifications make such devices prone to sluggishness, crashes, and poor battery life, especially when the app is not optimized. With the proper testing, you can identify bottlenecks, prevent failures, and deliver an acceptable user experience.- Resource Usage Monitoring: Given their limited resources, apps running on low-end devices should prioritize minimizing resource consumption for core functionalities. For that, you need to analyze the app’s memory footprint, both during idle states and under heavy load, to identify excessive RAM usage, memory leaks, or patterns that might lead to Out-Of-Memory (OOM) errors.
Alongside memory, CPU utilization must be tracked to detect inefficient processing, prolonged high CPU spikes, or unnecessary background activity. Higher CPU usage will not only make the app slow but also consume more battery. The Android Studio Profiler can help you measure and evaluate all these metrics, allowing you to optimize your app for better performance. - Performance Metrics Evaluation: Beyond raw resource numbers, the actual user-perceived performance must be rigorously validated through specific metrics. The first step is to measure the cold, warm, and hot start app launch times, allowing you to understand the waiting time your users face.
UI becoming choppy is one of the most significant issues in low-end devices. You should look for any visual stuttering, skipped frames, and delays in reactions to user input during navigation. Using profile GPU rendering and showing refresh rate in Developer Options can provide visual cues for stuttering. - Stability Under Load: Low-end devices are particularly vulnerable to instability when resources are strained. So, comprehensive stability testing under load should be performed to ensure that even low-end devices can handle your app seamlessly. Here, you need to simulate real-world scenarios, such as launching multiple other resource-intensive apps in the background and then switching back to your app, verifying its correct relaunch and state retention without crashes or 'Application Not Responding' errors.
Additionally, you need to perform stress testing, where your app undergoes prolonged, repetitive, and resource-intensive actions to identify stability issues that occur under extreme pressure.
- Resource Usage Monitoring: Given their limited resources, apps running on low-end devices should prioritize minimizing resource consumption for core functionalities. For that, you need to analyze the app’s memory footprint, both during idle states and under heavy load, to identify excessive RAM usage, memory leaks, or patterns that might lead to Out-Of-Memory (OOM) errors.
4. Tablet Optimization Testing
Tablets offer a perfect blend of laptops and smartphones with larger screen real estate and a big battery. However, this unusual screen size demands dedicated optimization and testing to ensure your app leverages these advantages rather than simply stretching the phone’s interface. The goal is to provide a truly superior and intuitive user experience on larger screens. Also, your testing should include varying screen sizes from 8” to 14” tablets. 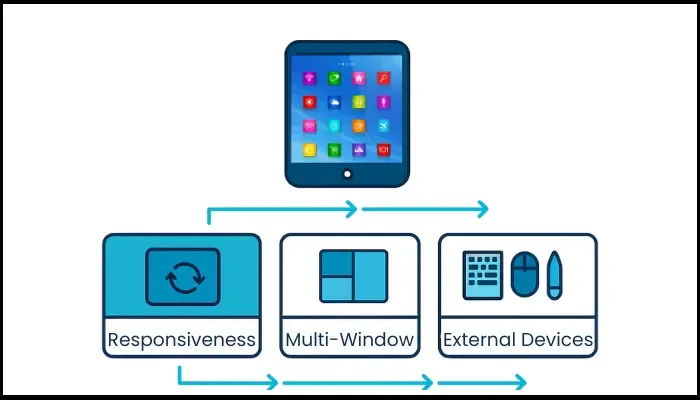
- Responsiveness Testing: Your application should adapt to the screen size, aspect ratio, and orientation, utilizing the screen space effectively without visual defects. The first thing you need to do is rotate the tablet between portrait and landscape modes on every screen to test orientation handling, ensuring that it adjusts accurately without any cut-off elements or excessive empty space. In addition, ensure that text, images, and components scale proportionately.
- Multi-Window Testing: The best way to enhance productivity and utilize the larger screen size is through multi-window. However, your app should behave reliably and efficiently when sharing screen space with other applications for this to work perfectly. To test this, launch your app in split-screen mode and drag the divider to the maximum and minimum sizes. Here, your app’s UI should adapt correctly at all sizes, content should not be truncated, and all interactive elements should remain accessible and functional.
- External Device Support: To enhance efficiency, many users add external devices such as a mouse, keyboard, and stylus to the tablet. Your app should support these commonly used devices for a better user experience and increased productivity. For a physical keyboard, test all text input fields for accurate typing and character input, as well as commonly used shortcuts. When a mouse is connected, the clicking should be precise, scrolling should be accurate, and all the clicks should function flawlessly. Also, try using a mouse with more than three buttons (such as a gaming mouse) and ensure that the additional buttons function as intended. In the case of a stylus, it should register every touch interaction and pressure sensitivity, especially while drawing.
Conclusion
Testing Android apps isn’t only about catching bugs. That’s part of it, sure—but really, it’s about making sure the app feels right across a messy range of devices, Android versions, and how people actually use their phones. Things get weird out there. A checklist won’t fix everything, but it keeps you sane. And it helps you catch the stuff that would’ve slipped through the cracks otherwise.
At ThinkSys, we help global brands test their Android apps using both real devices and cloud labs—so when launch day comes, they’re confident their app is ready, and it stays strong long after.
Frequently Asked Questions
- Android Studio
- Espresso
- JUnit
- Logcat
- WorkManager
- Firebase Test Lab and BrowserStack cover everything from unit tests to UI and cloud-based testing.
Share This Article:


