SaaS Quality Assurance: Testing Strategies for Cloud-Based Applications
Unlike traditional on-premise software with slow, predictable release cycles, SaaS platforms ship updates fast, sometimes several times a day. That speed introduces new testing challenges. One bug doesn’t just affect a single customer anymore. It can impact thousands of users, causing outages, lost revenue, and reputational damage. And even a single glitch can push users away.
That’s why SaaS quality assurance testing is mission-critical. QA teams ensure performance, scalability, security, and user trust in a platform that’s constantly evolving. They stop bugs before they surface, and if something does slip through, it’s fixed in hours, not months.
But here’s an important thing: there's never just one bug. SaaS teams juggle among performance, security, compatibility, and usability issues, all at once. That’s why you need a comprehensive approach to SaaS quality assurance.
This guide breaks down the major principles of SaaS testing so you can ship fast, fix faster, and scale with confidence. Whether you're scaling a startup or hardening an enterprise platform, mastering SaaS QA will be so much easier for you from today.
Multi-Tenancy Testing
Multi-tenancy powers nearly every major SaaS platform from Salesforce to Slack, letting one codebase serve millions of users, each in their own private space. It’s what lets one single app serve many customers, all at the same time. But this setup can also lead to some of the biggest problems. Because even though customers share the same system, each one expects complete privacy, full security, and custom options just for them.
It usually starts with something small like a missed edge case, a forgotten test. But those small gaps widen fast. If your testing misses even a tiny problem like one customer seeing another’s data, you could end up with a serious breach, legal issues, and customers walking away.
Think of multi-tenancy like a multi-storey building with paper-thin walls. Each resident expects privacy, but one faulty lock or leaky pipe and everyone’s exposed. Multi-tenancy validation is how you make sure one person’s issue doesn’t affect the whole building.
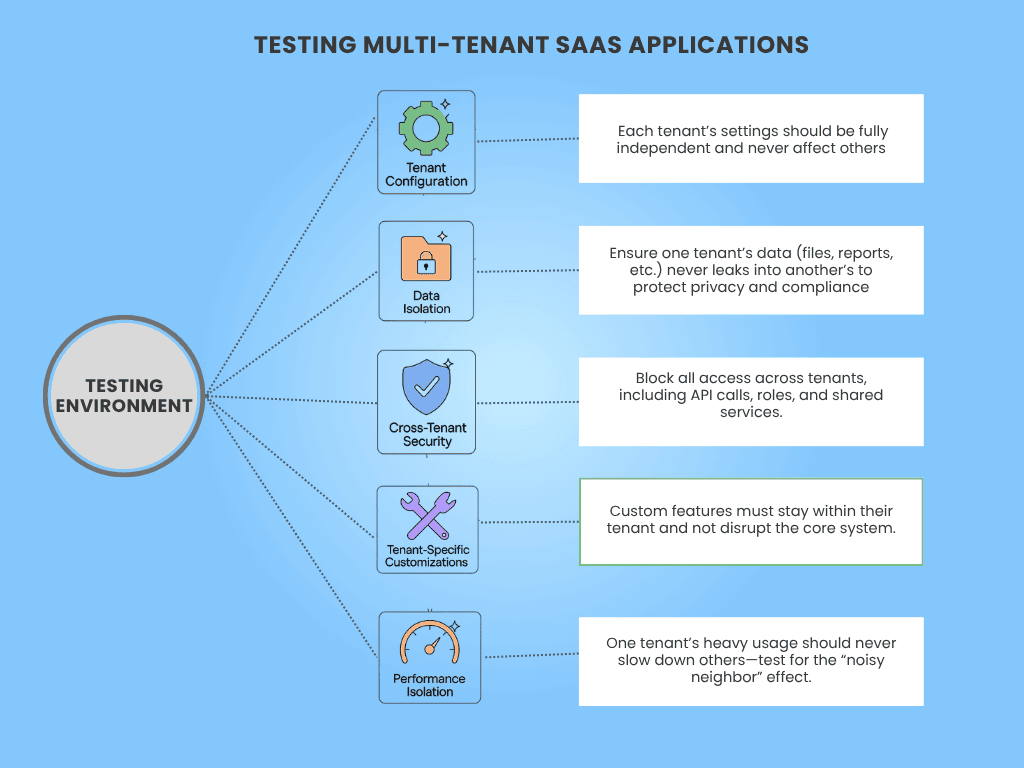
Let’s break down how to test multi-tenant SaaS applications that decide whether your system keeps its promises or falls apart.
Must Read:- Multi-tenant architecture for cloud apps
1. Data Isolation
You need to make sure that each customer’s data, like files, accounts, orders, or messages, is completely private. Nothing from Tenant A should ever show up for Tenant B. Every search, report, and download needs to be seen only by the right tenant.
This is the most important part of the cloud application QA strategy. If even a small piece of data gets sent to the wrong tenant, it could break privacy laws like GDPR or HIPAA. It can also destroy customer trust. We’ve seen real examples where tiny bugs exposed data between customers.
To keep data secure, here’s how to perform SaaS data isolation verification testing to find out leaks and ensure isolation works in real-world scenarios.
- Start by creating test tenants with similar usernames, account IDs, or email addresses. Then try every action you can, such as logging in, viewing profiles, exporting reports, and confirming that no information crosses over.
- Next, log in as Tenant A and try to access Tenant B’s space. Try entering a different tenant’s ID in the URL, calling the API with a fake token, or even writing bad database queries.
- Run “negative tests” too. These tests are designed to fail if something goes wrong. These help you catch bugs that don't show up in normal use.
- Check exports and backups. If you restore data for one tenant, make sure it doesn’t bring over anything from another.
- And most importantly, think like a hacker. If someone really wanted to break in, what would they try? Then test for that.
2. Tenant Configuration
Make sure each customer’s custom settings, like features they’ve turned on, colors and themes, date formats, or permissions, only affect their own account. Changing something for one tenant shouldn’t impact others.
Since SaaS is flexible, this flexibility invites multiple complexities. And complexity multiplies risk. If you change a feature for one tenant and it secretly turns on for others, you’ll confuse people or worse, give someone access to tools they shouldn’t have. That breaks trust and could lead to major support or security problems.
To test whether your app respects those boundaries, walk through it like each customer is living in a different world.
- Start by setting up different tenants with very different configurations. For example, give one single sign-on and the other just a basic login. Turn some features on for one group but off for another.
- Then walk through the app like a user. Run automated tests that cover every major task, like signing in, changing settings, updating info, and using key features.
- Mix and match different settings between tenants to see if any bugs pop up when combinations change.
- Test the user interface and the behind-the-scenes system. Make sure each tenant can change their own setup without anything leaking across accounts.
- Don’t forget edge cases. What happens if a background task depends on a feature that’s turned off? How does the app behave if a new config is halfway saved?
3. Cross-Tenant Security
Make sure no one, whether it’s a user, an API request, or a background job, can cross into another tenant’s space. Even support tools or admin dashboards should stay in their space.
This is where the biggest failures happen. If someone in Tenant A can act like someone in Tenant B, that’s a major security problem. Even by mistake. Your customers expect their space to be completely private and secure. If you mess that up, it’s a dealbreaker.
So, how do you test for tenant trespassing, accidental or intentional? Start here.
- Log in as someone from Tenant A and try to send API requests for Tenant B. These should be blocked completely. Use tools like Postman or curl to simulate elevated API requests and see what slips through.
- Try to raise privileges between tenants, like using a support role from one tenant to manage users in another.
- Look at shared services like caching systems or message queues. If they’re not tenant-aware, they can cause data to mix.
- Review all “global” tools carefully, like admin panels, billing dashboards, or analytics. These tools should still respect tenant boundaries and log everything they do.
- Finally, test like a human. Use real testers or security experts to try and break your isolation rules. This catches things that automation might miss.
4. Tenant-Specific Customizations
Check that any customization, like special fields, custom workflows, branding, or third-party plugins, only works for the tenant that set it up. These extras shouldn’t affect other customers at all.
Many enterprise customers want a tailored setup. That’s part of what makes your product stand out. Customizations help you close big deals, but only if they don’t break the base. A bad plugin or broken color scheme shouldn’t crash your app or make things weird for other tenants.
Here’s how to make sure customizations don’t leak out.
- Set up one tenant with a bunch of custom things, like new fields, large logos, and strange themes. Then check that the other tenants still look and work the same as before.
- Test how the app handles oversized files, complicated workflows, or extreme settings. If tenants are allowed to run their own scripts or logic, put them in a sandbox and make sure nothing they do spills out or crashes the main system.
- Test what happens after upgrades. Does the tenant’s custom setup still work? Or did something silently break?
5. Performance Isolation
Make sure that one tenant’s heavy usage, like running big reports or uploading lots of data, doesn’t slow things down for everyone else.
This is known as the “noisy neighbor” problem. If one customer uses too many resources and others get stuck with slow load times, your system isn’t really isolated. It’s shared. And that creates a bad experience. If customers notice lag, they’ll blame your product, not the noisy neighbor.
Here’s how to make sure your app stands out using SaaS performance testing, even when one tenant puts your app to extreme usage.
- Set up one tenant to do something intense, like uploading a huge file or running a complex search. Then check how fast everything works for another tenant at the same time.
- Use tools to simulate lots of activity from different tenants at once. Watch for signs of slowdown, delays, or errors.
- Make sure you’ve built in limits, like rate caps or timeouts, so one tenant can’t take over everything.
- If your app supports auto-scaling, test that too. Does the system grow to meet demand without crashing other parts?
- Try using tenants with very different data sizes. Does the app still respond quickly when searching or sorting?
Don't miss out: Multi-Tenancy in Kubernetes
SaaS Deployment Pipeline Testing
Your deployment pipeline is a make-or-break system for shipping quality software at scale. It powers every update your users ever see. It decides what gets released, when it goes live, and how safely it happens. Even the tiniest skipped step or misconfigured setting can create massive problems in production.
But here’s the issue: too many teams only test the code itself, not how the code is released.
In fast-moving software teams, where updates go live every day (or even every hour), your pipeline becomes a living part of your product. And it needs the same kind of attention, testing, and care.
Think of your deployment pipeline like an airport runway. It’s how every release takes off. If something goes wrong here—a wrong signal, a loose bolt, a missing safety check—the entire flight is at risk.
So, just like you wouldn’t fly a plane without checking the runway, don’t ship code without testing your pipeline.
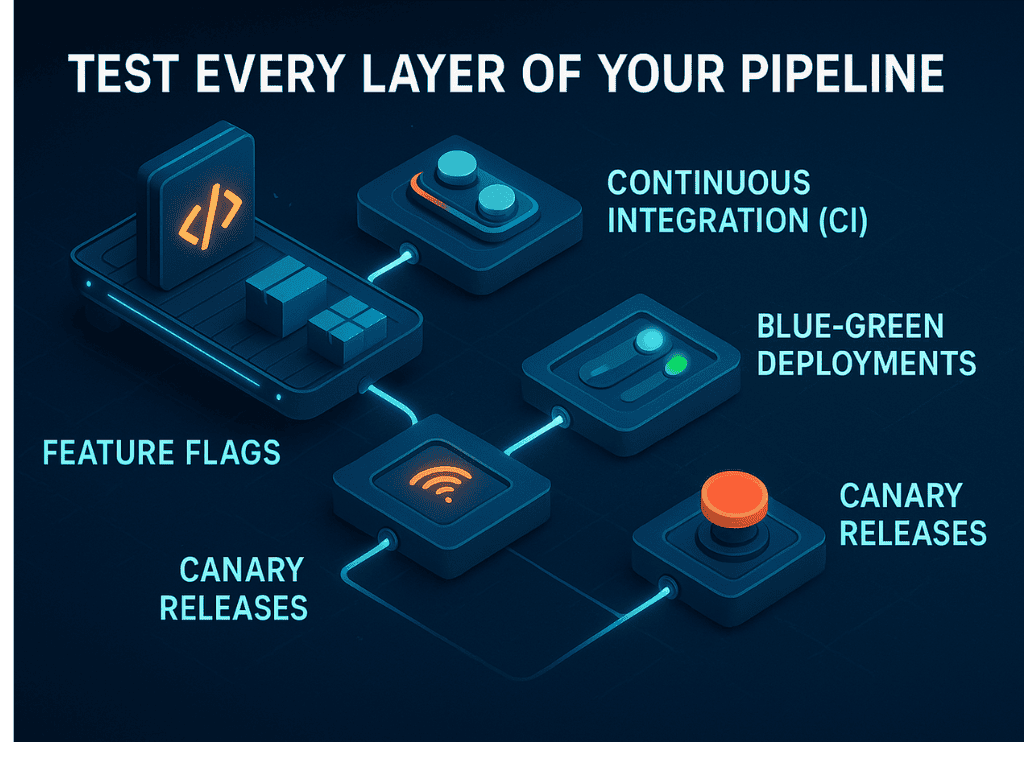
Now that we’ve listed down the risks, here’s how to test each part of your deployment pipeline, starting from the very first commit.
1. Continuous Integration (CI)
Continuous Integration is your first defense. It ensures that every change to your code is automatically tested the moment it’s submitted. That means fast checks like unit tests and slower ones like integration flows or full UI passes. Nothing moves forward unless it passes.
In SaaS, changes happen constantly. New features, bug fixes, and tiny tweaks land every day. Without a strong CI pipeline, bad code slips through, or developers stop trusting the system entirely.
CI also builds momentum. Developers feel confident shipping updates because they know the system will catch issues early. Without that trust, your whole development rhythm slows down. As a result, fewer releases, more stress, and a backlog full of untested code.
Here’s how to make sure your CI process actually works:
- Set up tests that run every time someone submits code—unit tests, service-to-service checks, and full-system tests that mimic real user actions.
- Add checks for bad formatting, missing security rules, or secrets stored in the wrong place.
- Make sure the tests run fast—ideally under 10 minutes.
- Track how long they take. If they slow down, figure out why.
- Block merges if anything fails. Alert the team right away.
- Practice merge conflicts—ensure the system catches stale or out-of-date branches.
- Watch for flaky tests (ones that fail randomly) and fix or remove them fast.
- Make failed builds, skipped steps, and stuck jobs easy to debug and impossible to ignore.
2. Blue-Green Deployments
Blue-green deployments are your escape plan when things go wrong. They let you run two versions of your app—one “live” and one “waiting”—and switch traffic between them instantly. The flip should be invisible to users and easy to reverse.
Also Read:- Deep dive into Blue Green Deployment
Blue-green deployments prevent downtime. But if the environments aren’t identical, or the switch process isn’t tested, you could break production the second you go live.
If you only test this during real releases, you’re gambling. You won’t know if rollback works until it’s too late.
So, simulate the process before users are ever involved:
- Create two test environments that mirror your real setup.
- Practice flipping traffic between them using internal users or staged API requests, especially before big releases.
- Ensure both environments share the same DB rules, background jobs, and config.
- Test what happens to user sessions during a switch. Are they logged out? Do they lose data?
- Check that one-time jobs (like email blasts or cleanup tasks) don’t double-run.
- See how the system responds if the active version is unhealthy.
- Practice flipping back—pretend the new version has a bug and roll back. Time how long it takes.
- Use tools to compare the config, jobs, and settings before you switch.
- Make sure logs, metrics, and alerts work in both versions.
3. Feature Flags
Feature flags are like remote controls for your product, but only if they behave predictably. They let you release features gradually. You can turn something on for 5% of users, or just for your internal team. That’s safer, but only if the flags are solid.
When flags don’t behave? Users see broken UIs, unfinished features, or even silent bugs.
Here’s how to make sure flags don’t create issues:
- Create test accounts with different flag settings, some with the feature on, others off.
- Flip flags mid-session. Does the UI react correctly?
- Make sure old app versions don’t crash when a flag gets turned off.
- Check that flags don’t slow down your app or cause performance issues.
- If flags are user, role, or tenant-specific, test each one individually.
- Practice rolling a flag back—turn it on, catch a bug, and disable it. Time the rollback.
- Track which flags are live, who’s seeing them, and how often they’re triggered.
- Clean up old flags regularly. Old flags clutter your logic, slow down testing, and make debugging harder than it needs to be.
4. Canary Releases
Canary releases are your early warning system. If done right, they give you a test run with real stakes, without the full risk.
They let you ship new versions to a small group of users first. If something breaks, only 5% of people see it, not your whole customer base.
But canaries only work if the process is tested. If rollout logic is broken or metrics don’t fire, you’re at major risk.
To make canaries safe, test the system behind them:
- Ship a new version to a small test group. Compare their experience with everyone else.
- Watch performance metrics like error rates, latency, and crashes.
- Test rollback from the canary group back to the current version.
- Confirm that only the right users see the new version.
- Run tests, automated and manual, during the canary window.
- Measure how fast alerts trigger when something goes wrong.
- Practice scaling the canary up and rolling it back.
5. Rollback Drills
Rollbacks are part of your reliability strategy. Practicing them turns confusion into clarity. Every team releases bad code eventually. But the real problem isn’t the bug. It’s the delay in undoing it.
When you do rollbacks routinely, they happen in minutes, not hours. Customers barely notice. Systems stay clean. And your team handles it with confidence.
To make rollbacks fast, clean, and calm, rehearse them just like real releases:
- Pick a test build and deploy it on purpose. Then roll it back.
- Measure time from detection to rollback completion.
- Test what happens to user sessions—do they stay logged in? Lose data?
- Make sure you can locate the last good build instantly.
- Watch for leftover data or stuck jobs from the bad version.
- Keep rollback logs clear and searchable.
- Run drills often enough that no one panics when it’s real.
SaaS Security Testing
Security is an ongoing responsibility. In SaaS, people can log in from anywhere, through web apps, mobile apps, and APIs. The same things that make SaaS so powerful, fast access, broad reach, and flexibility, also make it a big target. Attackers don’t always need to “break in.” Sometimes, they just look for something you forgot to lock.
And yet, many teams only test security at the surface. A working login page. A form that checks input. That’s not enough. Real security testing means digging deep into identity systems, data protection, APIs, integrations, and everything in between.
If you want to stay safe, start here.
1. Identity and Access Management (IAM)
Test all the systems that decide who can get in, what they can do, and how long they stay logged in. This includes passwords, login screens, roles and permissions, account recovery, session timeouts, and multi-factor authentication.
Most security breaches don’t come from clever hacks. They come from people logging in with stolen passwords or getting access they shouldn’t have. If someone can guess a password, reset an account without permission, or use an old token to act as an admin, the rest of your security won’t matter. Identity is your first and strongest defense.
Once you understand what’s at stake, it’s time to put your IAM to the test. Here’s how to test it.
- Start with logging in. Try weak passwords. Try too many wrong ones in a row. Make sure the system blocks you when it should.
- Set up accounts with different roles, like admin, guest, read-only, and try doing things you shouldn’t. Both in the app and by going around the app with direct links or API calls.
- Log in, then log out. Can you still do anything with the old token? You shouldn’t be able to.
- Try to reset a password. Does the link expire quickly? Can you reuse it? What happens if you change the link?
- Check that session timeouts actually log people out. If someone leaves their account open, it shouldn’t stay that way forever.
- Use multi-factor authentication. See if someone can log in without it, or trick the system with a password alone.
2. Tenant Data Protection
Look at how your app handles customer data. For example, how it’s stored, moved, backed up, and deleted. Focus on encryption (both when data is sitting still and when it’s being sent), as well as tenant isolation in shared environments.
Your app holds customer secrets, credit card info, private documents, health records, business data, etc. If data spills from one customer to another, or if a hacker finds unprotected records, the damage can be massive.
Now, don’t just assume your encryption and boundaries are solid. Run these checks to find the holes.
- Start by making sure every part of your app uses secure connections. Look for any link or page that doesn’t use HTTPS.
- Check your encryption settings. Talk to your infrastructure team and confirm that your disks, databases, and backups are encrypted.
- Test password storage. Are you using strong hashing (like bcrypt)? Are you storing anything in plain text? You shouldn’t be.
- Now look at the tenant boundaries. Add the same usernames or IDs in different tenants and make sure nothing crosses between them.
- Export data for one tenant and make sure it includes only what it should. Try backups and restores, too.
- Delete a user or an account. Can you still find their data? Test this in the database and in your logs. If something’s left over, that’s a risk.
3. API Security
Look closely at your APIs. These are often the main way users and systems connect to your app. Test things like authentication, authorization, data filtering, rate limits, and how your app handles bad or strange inputs.
APIs don’t have buttons or menus. That means attackers can send all kinds of requests directly. If your APIs don’t check identity, enforce roles, or protect against overload, they can expose private data or crash your system. Many of the worst SaaS leaks in recent years came from broken or insecure APIs.
To keep attackers out and users safe, run API reliability testing like a hacker would.
- Try calling an API without logging in. Then try logging in with the wrong role and calling it again. Both should fail.
- Change object IDs in requests to see if you can access data from someone else.
- Send huge, broken, or strange payloads to test how your system handles them. It shouldn’t crash or leak information.
- Try to inject code or scripts into inputs. Your app should clean these out or block them.
- Call the same endpoint again and again, very fast. Make sure your system slows it down or blocks it before it gets overloaded.
- Check what your API returns. Are there extra fields like internal IDs or error messages that give too much information? If so, that’s a risk.
4. SSO and Federated Login
Test how your app works with outside identity providers (like Google or Microsoft). This includes checking login flows, role assignments, token handling, and what happens if something goes wrong with the login system.
For many companies, using their own login systems is non-negotiable. But if your setup is loose or buggy, it could let someone log in as the wrong person, take over an account, or block a whole team from signing in.
These tests reveal if your single sign-on integration and federated login system is secure.
- Set up test users through a third-party login system. Log in, then try changing the login info or reusing old tokens.
- Try editing the login data in the background, like changing the email or role in a login message. If that works, it’s a problem.
- Log in as a brand-new user and see how your app creates their account. Are the right roles applied?
- Remove access from the login system. See if your app reflects the change.
- Break the login system on purpose. What happens when it goes down? Can users still log in another way? Does your app crash or recover?
- Check the token expiration and refresh. Do they rotate properly? Are old tokens invalid?
5. Compliance and Audit Readiness
Look at how your app meets security compliance standards and regulations. This includes logging, session controls, privacy tools (like data deletion and export), and the ability to show evidence when needed.
Big customers want proof. Auditors will ask for logs. Legal teams will ask how you handle data. If you can’t answer clearly, you may lose deals or fail inspections. Your systems have to be secure, and you need to show that with real evidence.
Here’s how to prove your system is safe rules and can work under pressure.
- Try different actions, like logins, role changes, data exports, and make sure they’re all recorded with details like time, IP, and who did them.
- Check if logs can be changed. They shouldn’t be.
- Export all data for a user. Does anything get missed?
- Delete a user or account. Can you still find their info in backups or logs?
- Leave an account idle. Does it auto-log out after some time?
- Try elevating a user’s role. Does it need approval?
- Store credit card info? Make sure it’s masked, encrypted, and limited.
- Keep your test results. Save screenshots and logs. You’ll need them later.
Interesting Read: AI-driven security testing
Reliability and Availability Testing
In SaaS, reliability defines your whole product. If your app is down, no one cares how nice the interface is or how powerful the features are. When people can't log in or complete their work, they lose trust. That trust is hard to earn back. And it doesn’t take much to break that trust. A single bad update. A mistake in your backup settings. A failover system that quietly fails. Or a region you never thought to test.
That’s why testing isn’t optional. The following areas are your must-test zones.
1. Uptime Verification
Even if your system is built for high availability, that’s only half the story. The other half is testing what you built over and over, in real-world ways, until you know it can survive the worst day possible.
To validate uptime, you need to simulate real user activity and watch how the system performs in the wild.
- Start by setting up constant checks that hit your main systems every minute or so, from multiple regions.
- Watch the most important user actions: logging in, using the dashboard, and making API requests.
- Try breaking things on purpose in your test environment, like taking a server offline, removing a domain name, or pausing a service. See what fails.
- Watch how your alert system reacts. Did someone get notified? Did your status page update?
- Try doing updates without downtime. Keep testing live endpoints while rolling out changes.
- Test what happens when something goes wrong. Can the system fall back to a safe state, like read-only mode?
- Finally, check the tools that measure your uptime. Are they accurate? Can they tell you exactly how long things have been broken?
2. Fault Tolerance
This is about making sure your app can survive common problems. Servers can crash. Services can go offline. The goal is to make sure those failures don’t crash the whole app.
No system is perfect forever. Things break. If your system doesn’t handle that well, one small bug can cause a huge outage. But if you test for failure in advance, you’ll know your app can keep going even when pieces fall apart.
Here’s how to simulate failure safely and find out if your system is truly fault-tolerant.
- Take one of your web servers and shut it down. Does traffic go to the others? Do users even notice?
- Turn off your main database and see if the system switches to a backup without losing anything.
- Disconnect your caching system. Does the app get slower, or does it crash entirely?
- Slow down the network between services. Add some delays. Does the app retry, or give up?
- Test how your system recovers. After something fails, does it fix itself automatically?
- Look at session handling. If a user is on a crashed server, do they get logged out, or do they stay connected?
3. SLA Validation
Check if you’re actually meeting the promises you’ve made, like how often your app is up, how fast it responds, or how quickly you handle support requests.
An SLA (Service Level Agreement) is a promise. If you break that promise, it could cost you money, damage your brand, or make customers leave. Testing these promises helps make sure you're doing what you say you will.
To know if you’re living up to your SLAs, you need to put them to the test intentionally and often.
- Review your uptime numbers every month. Are you staying above the goal?
- Pretend the system goes down for five minutes. Would that be enough to break your monthly target?
- Test performance under load. Run your app under load and measure how fast it responds. Are most responses still within the time you promised?
- If you offer support SLAs, try submitting test tickets. Did you respond within the agreed time?
- Check your reporting tools. If you simulate downtime, does the system count it properly?
- Test warning systems. If you’re close to missing an SLA, do your alerts go off?
A reliable SLA strategy means your uptime consistently beats the target. Your app performs under load. Your team catches issues before promises are broken. Reports are accurate, and your customers stay confident.
4. Geographic Redundancy
Testing what happens if an entire region goes down in a scenario of a natural disaster, power failure, or cloud outage. You need to make sure the app can still run in another location without losing anything.
Big failures do happen. If your app is tied to just one region, it’s vulnerable. But if you can move users to another place quickly, they might not even notice. This is key for real business continuity.
To make sure region-level issues don’t break your service, simulate a full failure and see how well your fallback plan works.
- In your test environment, shut down everything in one region. Pretend it’s totally gone.
- Check how fast your system switches over. Can it move users to another location in seconds?
- Look at the data in the new region. Is it up to date? Was anything lost?
- Once the original region comes back, test the process of moving things back or syncing data.
- After the switch, test everything again. Can users still log in, access data, and use every feature?
- Measure how long the whole recovery took, and how much data (if any) was lost.
When geographic redundancy works, users barely notice outages. Your system redirects traffic automatically, keeps data consistent, and restores full service fast, even across regions.
5. Disaster Recovery
This is your plan for the worst case. What if everything is lost? Your servers, your database, your code. Disaster recovery tests your ability to bring the app back from backup and redeploy everything from scratch.
Backups aren’t helpful unless they work when you need them. If you’ve never tried a full recovery, you don’t know if you can do it. And some very large companies have failed at this.
The only way to trust your recovery plan is to try breaking everything and then see if you can put it back together.
- Choose a disaster scenario, like “the production database is gone” or “the entire infrastructure was wiped out.”
- Try restoring your latest backup to a clean system. Check if all the data is there and unbroken.
- Rebuild your servers from code. Reconnect everything. Make sure the app runs again.
- Track how long it takes to get everything working again. Is that time within your goal?
- Try partial restores too, like fixing one broken table, or recovering just a few accounts.
- Act out a ransomware attack. Make sure your backups are stored somewhere separate and safe.
Success in SaaS disaster recovery validation means you can rebuild from scratch, and it works. Your backups are clean, current, and secure. You can recover the full system within the target timelines. And you’ve practiced every step over and over.
Integration Testing for SaaS
Integration testing is how you make sure your product works with everything it connects to. And for SaaS apps, that list is long.
Your product lives in a network of tools: APIs, login systems, webhooks, file imports, calendars, payments, and more. If even one connection breaks, the whole experience breaks.

This is about keeping your product reliable, flexible, and trusted in the real world. Customers expect your app to “just work” with Slack, Stripe, Salesforce, or whatever tool they rely on.
Think of integration testing like making sure every wire in a giant control panel is plugged into the right port—and that nothing sparks when you flip the switch. When it’s done well, the system runs smoothly. When it’s not, things create issues.
So, how do you keep every connection tight, every spark under control? Let’s break it down.
1. Public API Testing
Make sure every part of your public API works exactly as expected. That includes the basics like creating, updating, and deleting data, but also deeper checks like how errors show up, whether older versions still work, and how secure your endpoints are.
Your API is your product for many customers. It’s how they connect their systems to yours. If the API breaks, their whole setup can fail. And they’ll blame you, not their code. One small, undocumented change could cause bugs, broken automation, or even lost money. So you have to get it right.
Here’s how to test your API like it’s the core product.
- Start by writing full test cases for each version of your API, including old and new. Run create, read, update, and delete actions across all the major data types.
- Check that every request and response follows the structure you’ve documented. That includes things like field names, error codes, and formats.
- Now try to break it. Send bad requests, skip tokens, and use wrong IDs. Does the system respond with helpful, secure errors, or does it crash?
- Don’t forget to test features like pagination and sorting. They should behave the same on every endpoint.
- And make sure your limits are working. If someone sends too many requests too fast, do they get blocked with the right message?
- If you’ve marked old fields as “going away soon,” make sure they still work until you fully remove them and that you’re warning users properly.
2. Webhook Reliability
Test that your webhooks trigger for the right events, deliver the correct data, and retry when something goes wrong.
Webhooks are how your app “talks back” to other systems. They trigger automation, alert tools, and update third-party apps. If a webhook fails silently, your customer might not know until it’s too late. These failures often don’t show up in the UI, so the only way to catch them is through testing.
To keep webhooks running smoothly, here’s how to test them with precision.
- Start by creating test webhooks. Hook them up to a dummy endpoint that can catch and inspect each request.
- Trigger events like “user created” or “invoice paid,” and see what the webhook sends. Is the data complete? Is it signed? Does it match your expected structure?
- Now break the receiving endpoint. Make it return errors or take too long to respond. Your app should try again, following whatever retry rules you’ve set.
- Turn the webhook off, then trigger more events. Nothing should be sent now.
- Finally, test how your system reports failures. If something goes wrong, will the user know? Is it logged, shown in a dashboard, or completely silent?
3. Third-Party Integration Testing
Test every place your product connects to another platform. For example, Slack, Google, Stripe, or Salesforce. These integrations usually involve logins, sending or receiving data, or syncing files.
Customers count on these integrations. If one breaks, they notice right away, and they blame you, not the third-party tool. And since you don’t control those external systems, you need to be extra careful. APIs change. Tokens expire. Fields disappear. You can’t stop that, but you can test for it.
Because these tools are outside your control, your tests have to account for everything that could change or fail. Here are some SaaS integration testing methodologies:
- Use test accounts with every system you support. Log in, send data, pull data back, and check that everything works like it should.
- Try breaking the connection. What happens if a token expires? Does your system know how to refresh it? Or does it just fail quietly?
- Send unexpected responses, like weird field names or missing data, and see if your app handles it well or crashes.
- Go through the whole “connect to this tool” process. Make sure permissions are clear and the flow works all the way through.
- And watch for change announcements from third-party services. When they plan to update an API, test your product against that new version early.
4. Import/Export Format Testing
Test the way your app sends and receives files, like CSVs, JSON, XML, or calendar formats. These are the paths for moving data in and out of your product.
Your import/export tools are how customers bring their data into your system or take it with them. If the files are broken, poorly formatted, or hard to use, you’ll frustrate users and break their workflows. A single bad export can ruin a report. A silent import bug can corrupt data forever.
To make sure data always flows in and out cleanly, here’s what to test.
- Start by exporting a full sample data set. Open it in tools like Excel or Google Sheets. Check the encoding, field names, and whether quotes or line breaks are handled properly.
- Now try importing. Use real files, but also edge cases, like files with missing columns, weird characters, or really large sizes.
- See what happens when something fails. Do you get a clear error message? Does the system try to process part of the file? Does it clean up after itself?
- Finally, test that your exports match the schema your APIs expect and that your imports work across common tools, not just your own app.
5. Integration Testing in CI/CD
Make sure integration tests run as part of continuous deployment, not just once in a while. You want to catch problems early, before your users do.
Every time you ship new code, you risk breaking something: an API call, a webhook, a token refresh, a file import. If your integration tests aren’t running automatically, every release is a gamble.
To truly protect your product, you should start testing continuous deployment pipeline earlier instead of being done afterward. Here’s how to do that.
- Set up your testing process to run full checks on your most important integrations, every single time new code is pushed.
- Create a set of sample users or test tenants that don’t affect real data.
- Mock external tools when needed, but also test real integrations regularly, like sending a message to a real Slack test account.
- Make your test results visible. Don’t just pass or fail. They must show what broke and where.
- And set rules: if something critical fails, the release stops. Period.
SaaS User Experience Testing
SaaS products are judged by the entire journey users go through. From signing up to canceling their account. And the parts outside the main app features, the password reset, billing page, and account settings, matter just as much. Maybe more.
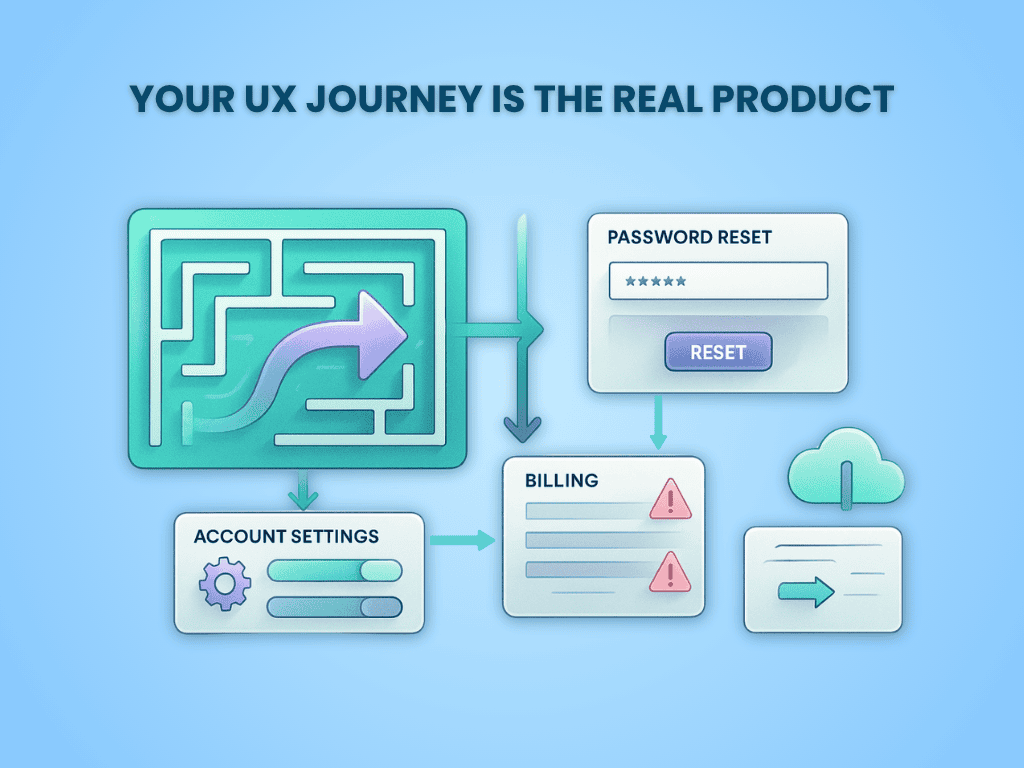 A broken UX at any step-signup to billing- can cost you a user. Test the journey, not just features.
If a user hits a wall while signing up, they might never come back. If their password reset fails, you’ve likely lost them. Your user experience (UX) is your first impression, your sales rep, your customer support, and the key to keeping people around.
Think of UX like a map through your app. If that map is broken, foggy, or confusing, users get lost. And when they get lost, they leave.
So, how do you make sure your UX holds up across the full journey? You test it—deliberately, thoroughly, and across all critical areas.
1. Onboarding Flow
Walk through everything a brand-new user sees: sign-up form, email confirmation, welcome screens, setup checklists, sample content, tooltips, and tutorials. If there’s a wizard, guide, or modal, test it.
If users hit bugs or confusion in the first few minutes, they’ll never reach the part of the app that actually solves their problem. A working onboarding flow has to be fast, clear, and guide users to real value right away.
Here’s how to stress-test your onboarding and make sure it leads users straight to the app.
- Sign up with test credentials. Try common edge cases such as weird characters in names, already-taken emails, or short passwords.
- Check that the welcome email arrives quickly and links work correctly.
- Click through every onboarding prompt: setup steps, walkthroughs, or first-time checklists.
- Interact with any sample data. Do users know what to do next? Does it help or confuse?
- Skip steps if possible. Does the app let you move on without finishing setup?
- Break things on purpose. Enter wrong info or leave forms half-filled. Does the app recover?
- Check any tracking you’ve set up. Are onboarding actions being recorded as expected?
2. Self-Service Features
Try all the basic account management tasks: password reset, email updates, notification settings, MFA, session timeouts, and recovery tools. These are the flows users depend on to help themselves.
If users need help just to reset a password or change an email, you’ve added support costs, and probably lost a few customers. These flows must work perfectly, every time.
To validate your self-service UX, put yourself in a user’s shoes and walk through these critical flows.
- Reset your password with a real email. Check that the reset link shows up, works once, and expires after use.
- Try using a fake email. Make sure the app doesn’t reveal whether the account exists.
- Change account details like email and password from inside the app. Confirm changes stick across sessions.
- Set up multi-factor authentication and log in using the extra step. Try backup codes too.
- Change notification preferences or UI settings. Check if they’re saved and applied.
- Let your session expire. Are you logged out cleanly? Can you still access protected pages without logging in again?
- Use a half-setup account (like one with an unverified email). Does the app gently prompt users to finish setup?
3. Account and Role Management
Walk through how teams are created, users invited, roles assigned, and permissions managed. This is especially important for SaaS products used by companies or groups.
If team setup is confusing or permissions don’t work, the product won’t spread inside organizations. And if permission bugs show up, you’ve got a security issue. Team growth depends on getting this right.
Here’s how to confirm your account and role flows are solid and ready to scale inside teams.
- Invite a user to a workspace. Check that the invite email arrives, works once, and expires correctly.
- Accept the invite and confirm that the assigned role is applied correctly.
- Try changing roles (from viewer to admin or vice versa). Does the user’s access change right away?
- Switch workspaces, if the app allows that. Do data and settings change correctly?
- If the plan includes limits (like 5 users max), test what happens when you try to go over.
- Check permissions carefully:
- Can viewers edit? (They shouldn’t.)
- Can removed users still access anything?
- Are unauthorized actions blocked both in the UI and backend?
- If you have logs, make sure role changes and invites are recorded.
4. Subscription and Billing
Check every billing-related task: starting trials, upgrading plans, updating cards, applying coupons, failed payments, and receiving receipts. Anything involving money needs extra care.
Billing is the trust layer. If users can’t pay smoothly, or worse, get charged incorrectly, they’ll leave frustrated. Billing bugs damage your reputation and cause lost revenue.
To safeguard your billing UX and subscription management, simulate every path a user might take, especially the ones that involve risk.
- In a test environment, walk through each billing path:
- Start with a free trial, then upgrade to paid.
- Downgrade or cancel the plan and confirm when access ends.
- Update card info. Try entering expired or invalid cards.
- Apply coupons or promo codes and check the math.
- Simulate a failed payment. Do retries happen? Are emails sent?
- Check the billing dashboard. Are amounts, taxes, and dates correct?
- Review the emails. Are receipts, renewal notices, and failed-payment alerts sent on time?
- If you have invoices, are they readable and correct?
- Test what happens when users upgrade or downgrade. Do features unlock or disappear right away?
5. Data Export
Try downloading a user’s data, both personal information and workspace content. This is especially important for users switching tools or complying with privacy rules.
People want control over their data. If exports are broken, users feel stuck. That damages trust. If the data is incomplete or unreadable, you’ve failed at transparency.
Here’s how to make sure your data exports give users exactly what they need, clearly, fully, and on demand.
- Fill a test account with all kinds of content: long notes, special characters, images, complex metadata.
- Download the export. Check that:
- All expected items are included
- File formats are correct and readable
- Files open in common apps like Excel or text editors
- Fields are labeled and complete
- For API exports, make sure endpoints return the right files, use correct status codes, and include headers.
- Try exporting as both a regular user and an admin. Are permissions enforced correctly?
- Test large exports. Does the download link work if it’s emailed? Does the file come through in full?
- (Optional but valuable) Try importing the exported data into a test account. Does it make sense?
Upgrade and Maintenance Testing
SaaS moves fast. New features ship every day. Behind the scenes, systems get updated, databases change, and servers get swapped out, all while customers are still using the product. But from their point of view, none of that should matter. They expect everything to work, all the time, no matter what’s happening under the hood.
That’s why upgrade and maintenance testing is just as important as testing any core feature. If something goes wrong during an upgrade, it’s a broken promise.
We’ve seen what happens when companies skip this testing. For example, they accidentally delete customer data with a bad script. Or customers losing transactions mid-upgrade. Sometimes they forget to test how their system handles failovers and leave half their users stuck on old servers for hours.
These are bugs in the release process itself. That’s why every change needs testing, from database upgrades to customer notices.
To avoid those kinds of disasters, your upgrade process needs to be properly tested from end to end.
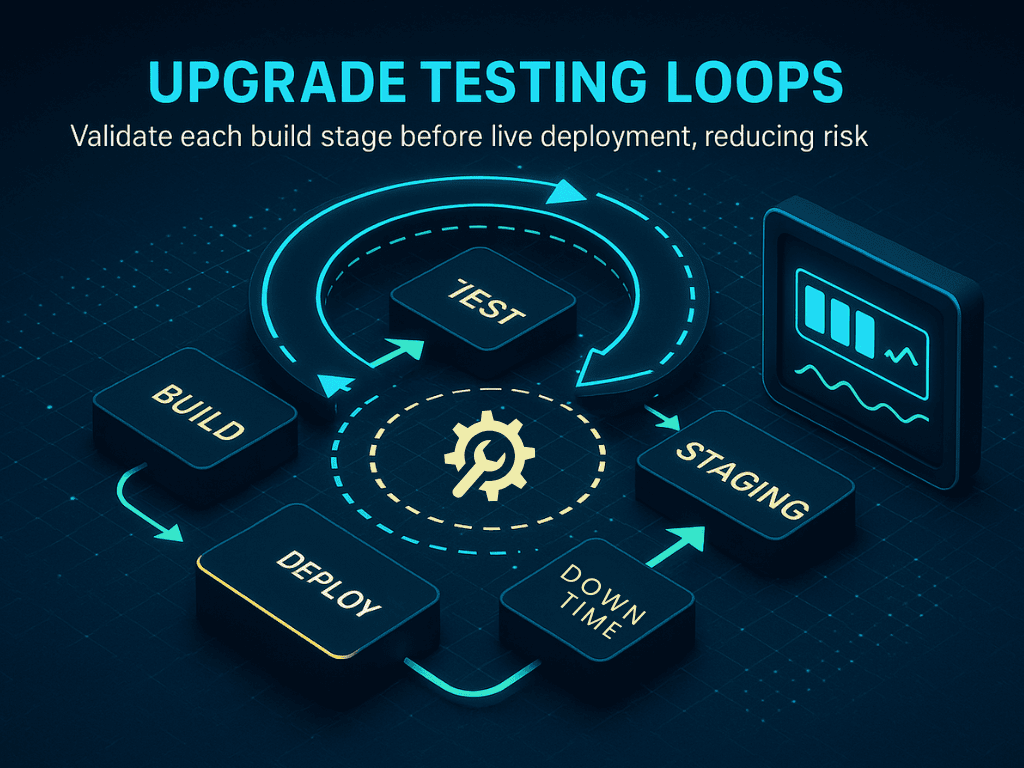
1. Zero-Downtime Upgrades
Make sure you can roll out updates while the system is still live. That means no logouts, no timeouts, and no weird errors during a deployment. Test that sessions keep going, traffic gets routed correctly, and features work across old and new versions.
Even a short outage can break trust or cause missed deadlines for your customers. A five-minute gap in service could violate agreements and cause real business problems. The goal is for customers to never even notice that an upgrade happened.
Here’s how to test whether your system can handle zero-downtime deployments easily.
- Start by simulating live traffic in a test environment. Pretend users are logging in, saving data, and switching tabs. Then trigger a deployment and watch what happens.
- Check that people stay logged in and don’t lose their work.
- Switch traffic from the old version to the new one. Confirm it works even when traffic is high.
- Before switching traffic, test the new version in isolation. Make sure it's ready.
- Test if older parts of the system still work with newer ones. This includes databases, browser assets, and any background jobs.
- If you use systems that detect healthy servers, test how they behave when something goes half-right or half-wrong. Unhealthy versions should never be added to the system.
2. Safe Database Migrations
Test every change you make to your database: new columns, updated tables, or transformed data. Run them on real-like data, with real-like load, and make sure you can undo them if needed.
A bad database change can lock up your system or destroy important data. Even something as simple as removing a column can crash parts of your app. These changes must be tested like they’re explosive.
Here’s how to do data migration testing.
- Clone a real dataset in a safe environment. Then run the migration and measure everything:
- How long does it take?
- Does it block users from doing things?
- Does it slow down your system?
- Once the migration is done, double-check the data. Is everything still there? Did anything get changed by accident?
- Then simulate failure. Interrupt the process. Feed it broken data. Does it clean up after itself? Can you roll it back?
- Try running the new app on the old database and the old app on the new database. This makes sure both sides still work.
- If your database uses copies or read-only versions, test that they don’t fall behind during the update.
- If your change needs follow-up work, like filling in new columns, test that too.
3. Feature Deprecation
Test the whole journey of removing a feature. That includes how users are warned, how data is handled, and how the system behaves once it’s gone.
Removing a feature might seem simple, but if you do it wrong, users get confused, lose work, or feel betrayed. It can also leave broken code behind that causes bugs in the future.
Here’s how to test the removal process so it’s clean, safe, and predictable.
- First, test what users see. Do banners or alerts show up at the right time and place? Are they shown only to the right people?
- Next, test what happens to their data. If it needs to be moved or changed, does that work cleanly? If users need to take action, do they know how?
- Then, test turning off the feature. Does the app still work? Are other parts affected? Do old links or buttons break?
- Check your permissions system. Are the right roles updated to reflect the change?
- Finally, try removing the feature completely. Delete the code and test the entire app again. Make sure there are no errors, missing buttons, or ghost settings.
4. Backward Compatibility
Make sure new versions of your software still support old data, old user settings, and old app connections. Even if your system moves forward, it has to keep working with the past.
Users may have saved settings from years ago. Old apps or tools may still call your APIs. If your system stops supporting them, people will lose features or, worse, get blocked entirely.
Here’s how to confirm your app respects its history and doesn’t break for long-time users.
- Start by creating test accounts with old-style data. These should include saved settings, formats, and feature flags from earlier versions.
- Open old records and make sure they still load properly.
- Check that the system can still understand old configuration options, or at least ignore them without crashing.
- Try connecting old apps or clients to the new system. Do the calls still work? Are the results still correct?
- Finally, test older browsers and devices to see if the interface still behaves the way it should.
5. Rollback and Recovery
Test how well you can undo a bad release. If something goes wrong, how fast can you get things back to normal?
Even the best teams have releases that go sideways. What matters is how quickly and safely you can recover. Your rollback plan is your safety net.
Here’s how to rehearse your escape plan so you can act fast when things go wrong.
- Practice hitting “undo” on a bad release. Can your deployment tools roll back to the last version? Does it clean up anything the new version left behind?
- Take a backup before any big change. Then try restoring it and test if everything comes back correctly.
- Measure how long it takes to recover. Is it five minutes? Fifteen? An hour?
- Test what happens during different types of failure, like halfway through a deployment, after a bad migration, or when a server setting goes wrong.
- Use kill switches or feature flags that let you turn things off quickly. Test that they work instantly and don’t need a new deploy.
- Have a runbook, a clear set of steps to follow when things break. Assign roles and rehearse the process.
6. Customer Communication
Test how and when customers get notified about changes, upgrades, or problems. This includes in-app messages, emails, alerts, and status pages.
When things go wrong, how you talk to your customers matters more than what happened. Clear, fast, honest updates can keep trust intact, even during an issue.
Here’s how to make sure customers stay informed, before, during, and after any change.
- Check banners and pop-ups. Do they appear on the right screens? In the right language? At the right time?
- Simulate real status updates. If there’s a planned upgrade or fake outage, test that updates appear on your public pages and inside the app.
- Send email alerts to test groups. Make sure they don’t go to spam, look good on all devices, and link to the right help pages.
- If you use other tools like Slack alerts or RSS feeds, test those too.
- Different users may need different information. Make sure admins and end users see what they need to know.
- Include post-incident messages in your tests. Can you close the loop with users after the issue is resolved?
Testing for Compliance and Governance
Customers expect full control of their data and a paper trail for everything. If your app can’t prove it follows the rules, trust disappears and fines show up fast.
Think of compliance testing like locking every drawer in an office, logging every time it opens, and knowing exactly what’s inside. If anything’s off, you need to know right away. That’s what this testing is for. It makes sure that your SaaS app follows the law, respects customer preferences, and doesn’t get you into trouble.
Let’s walk through how to test compliance and governance in a SaaS environment.
1. Data Residency Validation
Some regions have strict rules about where data can reside. For example, Europe wants EU citizens' data to stay in the EU. If you’re not careful, one API call or backup could move it somewhere it shouldn’t be.
That’s a problem. If you store or process data in the wrong place, you can break laws like GDPR or India’s data protection bill. That means fines, lawsuits, or even bans.
Here are some ways to ensure you’re compliant with data residency validation rules.
- To test this, set up tenants from different regions. Track where their data is stored, processed, and backed up.
- Create files, users, and records from each tenant and check the storage bucket or database location.
- Run tests during backups and restores. Make sure a Europe-based tenant doesn’t suddenly get restored in the US.
- If you use CDN or caching tools, test if they keep sensitive info inside the right region.
- Think worst case. If a disaster recovery kicks in, will the data still follow the law?
2. Audit Trail Functionality
Your app should be able to answer the question: who did what, when, and how? That’s the audit trail. If something goes wrong, this is the first place everyone looks.
Missing or broken audit logs mean you can’t prove what happened. That makes investigations harder and opens the door to security and compliance problems.
Surely, you don’t want to fail at this. That’s why the following steps will help you.
- Test this by logging in as different users and doing common tasks—changing settings, updating records, logging in, and out.
- Then check your logs. Do they show user ID, timestamp, IP address, and the exact action?
- Try some sensitive actions like exporting data or changing permissions. Are these clearly logged?
- Make sure logs are write-only or tamper-proof. You should not be able to go back and delete or edit them.
- And test that each tenant sees only their own audit trail—never someone else’s.
3. Regulatory Compliance Verification
GDPR, HIPAA, and SOC 2 all come with different rules. But one thing is the same: you need to prove you follow them.
If your app doesn’t meet these standards, you can lose enterprise deals or face legal trouble. And just saying “we’re compliant” isn’t enough. You need to test it.
Follow these steps to find whether you’re complaint:
- Pick the rules that apply to your product. Map them to real features. For example, GDPR’s “right to be forgotten” means you need to test full, permanent data deletion.
- Create dummy tenants in regulated industries. Then walk through scenarios like revoking consent, deleting data, or handling user rights.
- Generate compliance reports, export access logs, and simulate audits.
- Don’t forget third-party tools. If you send data to another app, make sure they follow the same rules.
4. Data Retention Policy Implementation
You can’t keep data forever. Laws and customer agreements often require you to delete it after a set period. But deleting too early is just as bad.
If you don’t follow retention rules, you might violate contracts or data laws. Plus, it’s easy to lose trust if a user finds their data gone too soon.
Here’s how you can test this step by step:
- To test this, assign different retention rules to different data types—messages, files, and logs.
- Create test data with known timestamps. Then, simulate time passing (using date manipulation or test environments).
- Check if the data is deleted when it’s supposed to.
- Test weird edge cases too. What if a user deletes their account, but data needs to be kept for 30 more days?
- Confirm deleted data is really gone, not just hidden in the UI or stored somewhere else.
5. Privacy Control Effectiveness
Your app should give users clear, working ways to control their privacy, like opt-outs, data requests, or visibility settings.
If these don’t work, you risk violating privacy laws or making users feel unsafe. And once trust is gone, it’s hard to earn back.
To ensure privacy control effectiveness, you can start implementing these steps.
- Set up users with full visibility and privacy settings. Then slowly revoke access, one permission at a time.
- Watch what changes in the app. Does the UI reflect it? Does backend access actually stop?
- Test across user types—admin, guest, regular user. Do they see only what they should?
- Try data requests like “download my data” or “delete my account.” They should work fast, securely, and completely.
- And test consent tools like cookie banners, email preferences, etc., to make sure they work across browsers and devices.
Monitoring and Observability Testing
A SaaS system without monitoring is like flying a plane with no dashboard. You have no idea what’s working, what’s about to break, or where users are getting stuck. Observability is what lets you see inside your system.
It’s how you catch issues early, before customers even notice them. Without it, you're blind to problems, and users will be the first to tell you. And sometimes they can be loud about it, which you won’t like
Think of observability as security cameras, alarms, and dashboards for your app. They tell you when something’s off and help you fix it fast. If you're not testing these systems, you might miss the signs until it's too late.
Here’s how to test if your monitoring and alerting setup is doing its job.
1. Logging Functionality Verification
Logs are your black box. If something goes wrong, this is where you go looking for answers. But they’re only useful if they’re working, detailed, and complete.
Bad or missing logs mean you can’t trace issues, prove what happened, or recover fast after a failure. That’s a huge problem during incidents.
Here are some ways to make sure log functionality always works:
- Start by doing a full user session—log in, update settings, make purchases, and trigger errors.
- Then go to your logs. Check if every action is recorded clearly, with timestamps, user IDs, and status codes.
- Trigger known errors and see if logs capture the full stack trace and context.
- Look for gaps. What’s missing? Are some actions or events not showing up at all?
- Test retention, too. Are logs stored long enough for proper analysis? Are they searchable and well-structured?
2. Alert System Validation
Alerts make you aware of any disaster that is coming your way. If they don’t go off at the right time, you could burn your reputation.
Silent failures are the worst kind. You need to know instantly when something breaks or slows down—before users do.
To make sure that your alerting system is working properly, here are some ways:
- Simulate real problems. Shut down a service, increase error rates, or slow down a key API. Watch what happens. Do alerts trigger? How fast?
- Check who gets the alert and how—email, Slack, PagerDuty, etc. Make sure the right team is notified.
- Test severity levels. Minor issues shouldn’t flood the system, but major ones must always get noticed.
- Don’t forget alert fatigue. If alerts fire too often or for low-priority issues, people start ignoring them. So, fix the thresholds.
3. Performance Monitoring Accuracy
If your app slows down, users don’t file tickets - they stop using your app. That’s why performance monitoring is critical. Because unless you monitor performance, you won’t be able to fix it.
But just having charts isn’t enough. You need to test if your system tracks speed accurately and reacts to slowdowns in real time.
Here’s a list of steps that you can follow to maintain accurate performance monitoring:
- Run real workflows—signups, searches, report downloads—then check performance dashboards.
- Compare measured times with your stopwatch. Are they close?
- Simulate heavy load and spikes. Does the monitoring system still track accurately?
- Test sampling rates and data granularity. If it only logs 1 in 1000 requests, are you missing patterns?
- Try regions with higher latency. Is the slowness reflected on your dashboards?
4. User Experience Monitoring
System health isn’t the same as user happiness. Your app might be “up” but still broken for someone. That’s why you need to monitor the actual user journey. If you aren’t measuring actual experience, you’re blind to churn risks and product gaps.
If customers face blank pages, broken buttons, or slow clicks, and you don’t know about it. That’s how churn gets in.
So, how do you actually spot these issues before they cost you users?
- Test key flows like: onboarding, checkout, dashboards, or profile updates. These are your money paths—every friction point is a revenue leak. Then review what your tools captured.
- Simulate poor connections or outdated browsers. Did the UX monitoring tool flag these issues? Because real users aren’t always on fast Wi-Fi and Chrome. You need to meet them where they are.
- Try rage clicks, session drops, or unresponsive elements. Are they logged and visualized? They’re signals of frustration. If you’re not visualizing this, you’re not fixing what matters most.
- Check how much data you’re collecting. If too much, it’s noisy. If too little, you miss insights. Aim for signal over noise. Data must help you take action, not drown in dashboards.
- Replay real sessions. Can you spot pain points that the users never reported? This is where you find the invisible part that degrades conversions.
5. Anomaly Detection Capability
Sometimes problems don’t shout. In fact, they appear harmless intially. Exactly like how fires start from sparks. Anomaly detection is your early warning system only if you build it right. It helps you spot issues before they turn into outages, lost revenue, or churn.
But you have to test it. Otherwise, it’s just false alarms or worse, no alarms at all.
Before you can trust it, you’ve need to put it through some tests.
- To train and validate your anomaly system, start by inserting fake data spikes like, a sudden traffic burst, a drop in conversion rates, or login failures. See if your system flags them.
- Then stress-test its logic: does it adapt to traffic patterns, or is it stuck with static thresholds?
- Push across data types eg. user behavior, system logs, revenue, API errors.
- And finally, test actionability. Do anomalies trigger alerts? Reports? Or just sit in silence, hoping someone notices?
Performance Testing for SaaS
Your SaaS app might have all the right features, but if it’s slow, none of that matters. People won’t wait. They won’t complain either. They’ll just start looking for alternatives.
That’s why performance testing is about more than just uptime. In a multi-tenant SaaS system, one tenant’s heavy use can impact everyone else.
Think of your platform like a highway. Performance testing makes sure there are enough lanes, no bottlenecks, and that a single truck in one lane doesn’t stop traffic for everyone. That truck might be a background job or a bloated export request. Without tests, you don’t know until traffic piles up behind it.
So if you’re not actively testing for performance, you're gambling with churn..
Here are the critical zones where performance falls apart and how to safeguard each one.
1. Scalability Testing Methodologies
Scalability is your app’s ability to grow without breaking. It’s not just about server size. Instead it’s about how your system handles more users, more data, and more activity, all at once.
Without testing this, you’ll never know how much traffic you can handle or when your system will hit a wall.
So how do you actually pressure-test your app’s ability to grow? Let’s break down the steps.
- Start by simulating a slow ramp-up in user traffic. Set up a ramp profile that increases concurrent users by 10% every minute for 30 minutes, then holds. Track how your response times, error rates, and resource use change.
- Use tools like JMeter, Locust, or k6 to simulate real user behavior—login, dashboard use, uploads, searches—at scale.
- Test both vertical (more powerful servers) and horizontal (more servers) scaling.
- Monitor for limits—at what point do things start to fail? Is it CPU? Memory? Network I/O?
- Run tests at different times of day to account for background jobs, backups, or third-party dependencies.
2. Load Balancing Effectiveness Testing
A load balancer is supposed to spread work evenly across servers. But in reality, misconfigurations or sticky sessions can lead to uneven loads. If one node crashes under pressure while others are idle, your app isn’t truly balanced.
Misrouting can also break logins, corrupt sessions, or create data integrity issues in tenant-specific environments. Failing here causes slowdowns, 500 errors, and a terrible user experience—even if the rest of your infrastructure is fine.
Here’s how to test whether your load balancer is doing its job.
- Start by firing large numbers of simultaneous requests. Check your load balancer’s logs or dashboard to see how traffic is distributed.
- Kill a few backend nodes during active load. This form of extreme testing reveals whether your balancer truly self-heals or just pretends to.
- Mix types of requests among static vs dynamic, authenticated vs guest. See how they are balanced.
- Use session replay tools to simulate real behavior, including logins, file uploads, or browsing sessions.
- Try geo-distributed testing. Can your load balancer direct users to the closest or least-loaded server based on region?
- And check your health checks. Are they fast, accurate, and capable of removing a failing node in time?
3. Database Performance Under Multi-Tenant Load
Your app’s database is where the real work happens. And in SaaS, where one database often serves many tenants, performance here makes or breaks the system. A slow query for Tenant A can block others if you’re not careful.
As a result, you might have to experience lag, timeouts, or even outages. And angry customers.
Here’s how to test your database under messy, multi-tenant conditions.
- Create tenants with different data volumes, like some small, some massive. Because if your app slows down when a single large tenant runs reports, you have shared fragility.
- Run typical actions like filters, searches, exports, or report generation.
- Measure query execution time, CPU usage, and locking behavior. Track deadlocks, long-held locks, and transaction wait times with tools.
- Mix read-heavy and write-heavy operations at the same time. Watch for slowdowns or deadlocks.
- Use connection pooling and caching, but test how well they isolate or prioritize by tenant.
- Check your indexing strategy. Are there tenant-specific indexes? Or do global ones create bottlenecks as data grows?
- Test backup and restore processes under loa,d too.
4. Resource Utilization Monitoring
You have to track how efficiently your app uses its resources. Inefficiency drains your cloud budget and ruins the user experience invisibly.
And if you’re not watching disk usage, logs, queues, or background jobs, you might be running out of fuel without realizing it.
So, how do you get visibility into what your app is actually burning through? Start here.
- Set up a dashboard that tracks key resources for each part of your system: app servers, DBs, caches, APIs, and queues.
- Run complex user flows. Upload files. Generate reports. Open dashboards. Measure how resource use changes with each action.
- Stress test different layers. What happens if the queue gets backed up? Or does the file system fill up?
- Add alerts for CPU spikes, memory leaks, or abnormal disk activity. Then simulate those scenarios.
- Track per-tenant resource consumption. Think of it as tenant profiling for infrastructure health. Some tenants may consume 10x more resources than others. Your system should catch that before it affects everyone else.
5. Performance Degradation Detection
Most performance issues don’t happen all at once. They creep in as slow page loads here, slightly longer queries there. Performance drift is gradual. You don’t notice it until your whole foundation feels rotten.
And if you don’t have tests in place to catch these slowdowns, they stack up until your app feels broken.
This is where many teams fail. They measure uptime, but not how things feel over time.
You need to spot the slow slide before users do. Here’s how to track that degradation.
- Set up synthetic tests that run the same actions every 5–10 minutes: logging in, viewing dashboards, uploading content, etc.
- Track how the average response time changes across hours, days, or weeks.
- Introduce small code changes or version upgrades, and compare before-and-after latency.
- Run tests during high load, low load, and deploy windows. Check for patterns—are things always slower right after release?
- Replay user sessions from previous weeks. Are the same actions now slower?
- Create a visual baseline. Make it easy to see when performance is drifting, even slightly, before users notice.
- Set alerts for deviations from your baseline like 5%, 10%, 20%, before users feel a thing.
Conclusion
We just walked through a comprehensive approach to SaaS quality assurance testing. There are numerous QA steps to complete before you release your product to customers. One bad update or a missed bug can destroy trust you’ve spent years building. And if you’re just getting started, recovery might be out of reach.
So, what’s the only safe move? Test thoroughly before launch.
You now have the complete steps: what to test and how to test it, at your fingertips. Follow the steps to test your cloud application and launch with confidence.
If you still have questions, reach out to our QA experts. They have helped SaaS businesses across industries ship with certainty and leave a lasting impression.
Share This Article:


